Real Time Connection
The kitchen board, the POS kitchen tabs and the customer screen all read from one live channel. Until that channel is configured, tickets are not delivered and every screen stays empty. This is the first thing to set up after activation.
Go to Restaurant POS → Settings → Kitchen & Customer Screen.
Choosing a channel
Scroll to the Other Setting block and set Select App Access Type.
| Option | What it uses | Choose it when |
|---|---|---|
| Firebase (default) | A Firebase Realtime Database in a Google project you create | Your hosting cannot run Node.js, or you want several kitchen screens for the same outlet |
| Socket | The Node server that ships with WooCommerce Point of Sale, running on your own server | Your server can run Node.js, you do not want a Google account involved, and one kitchen screen per outlet is enough |
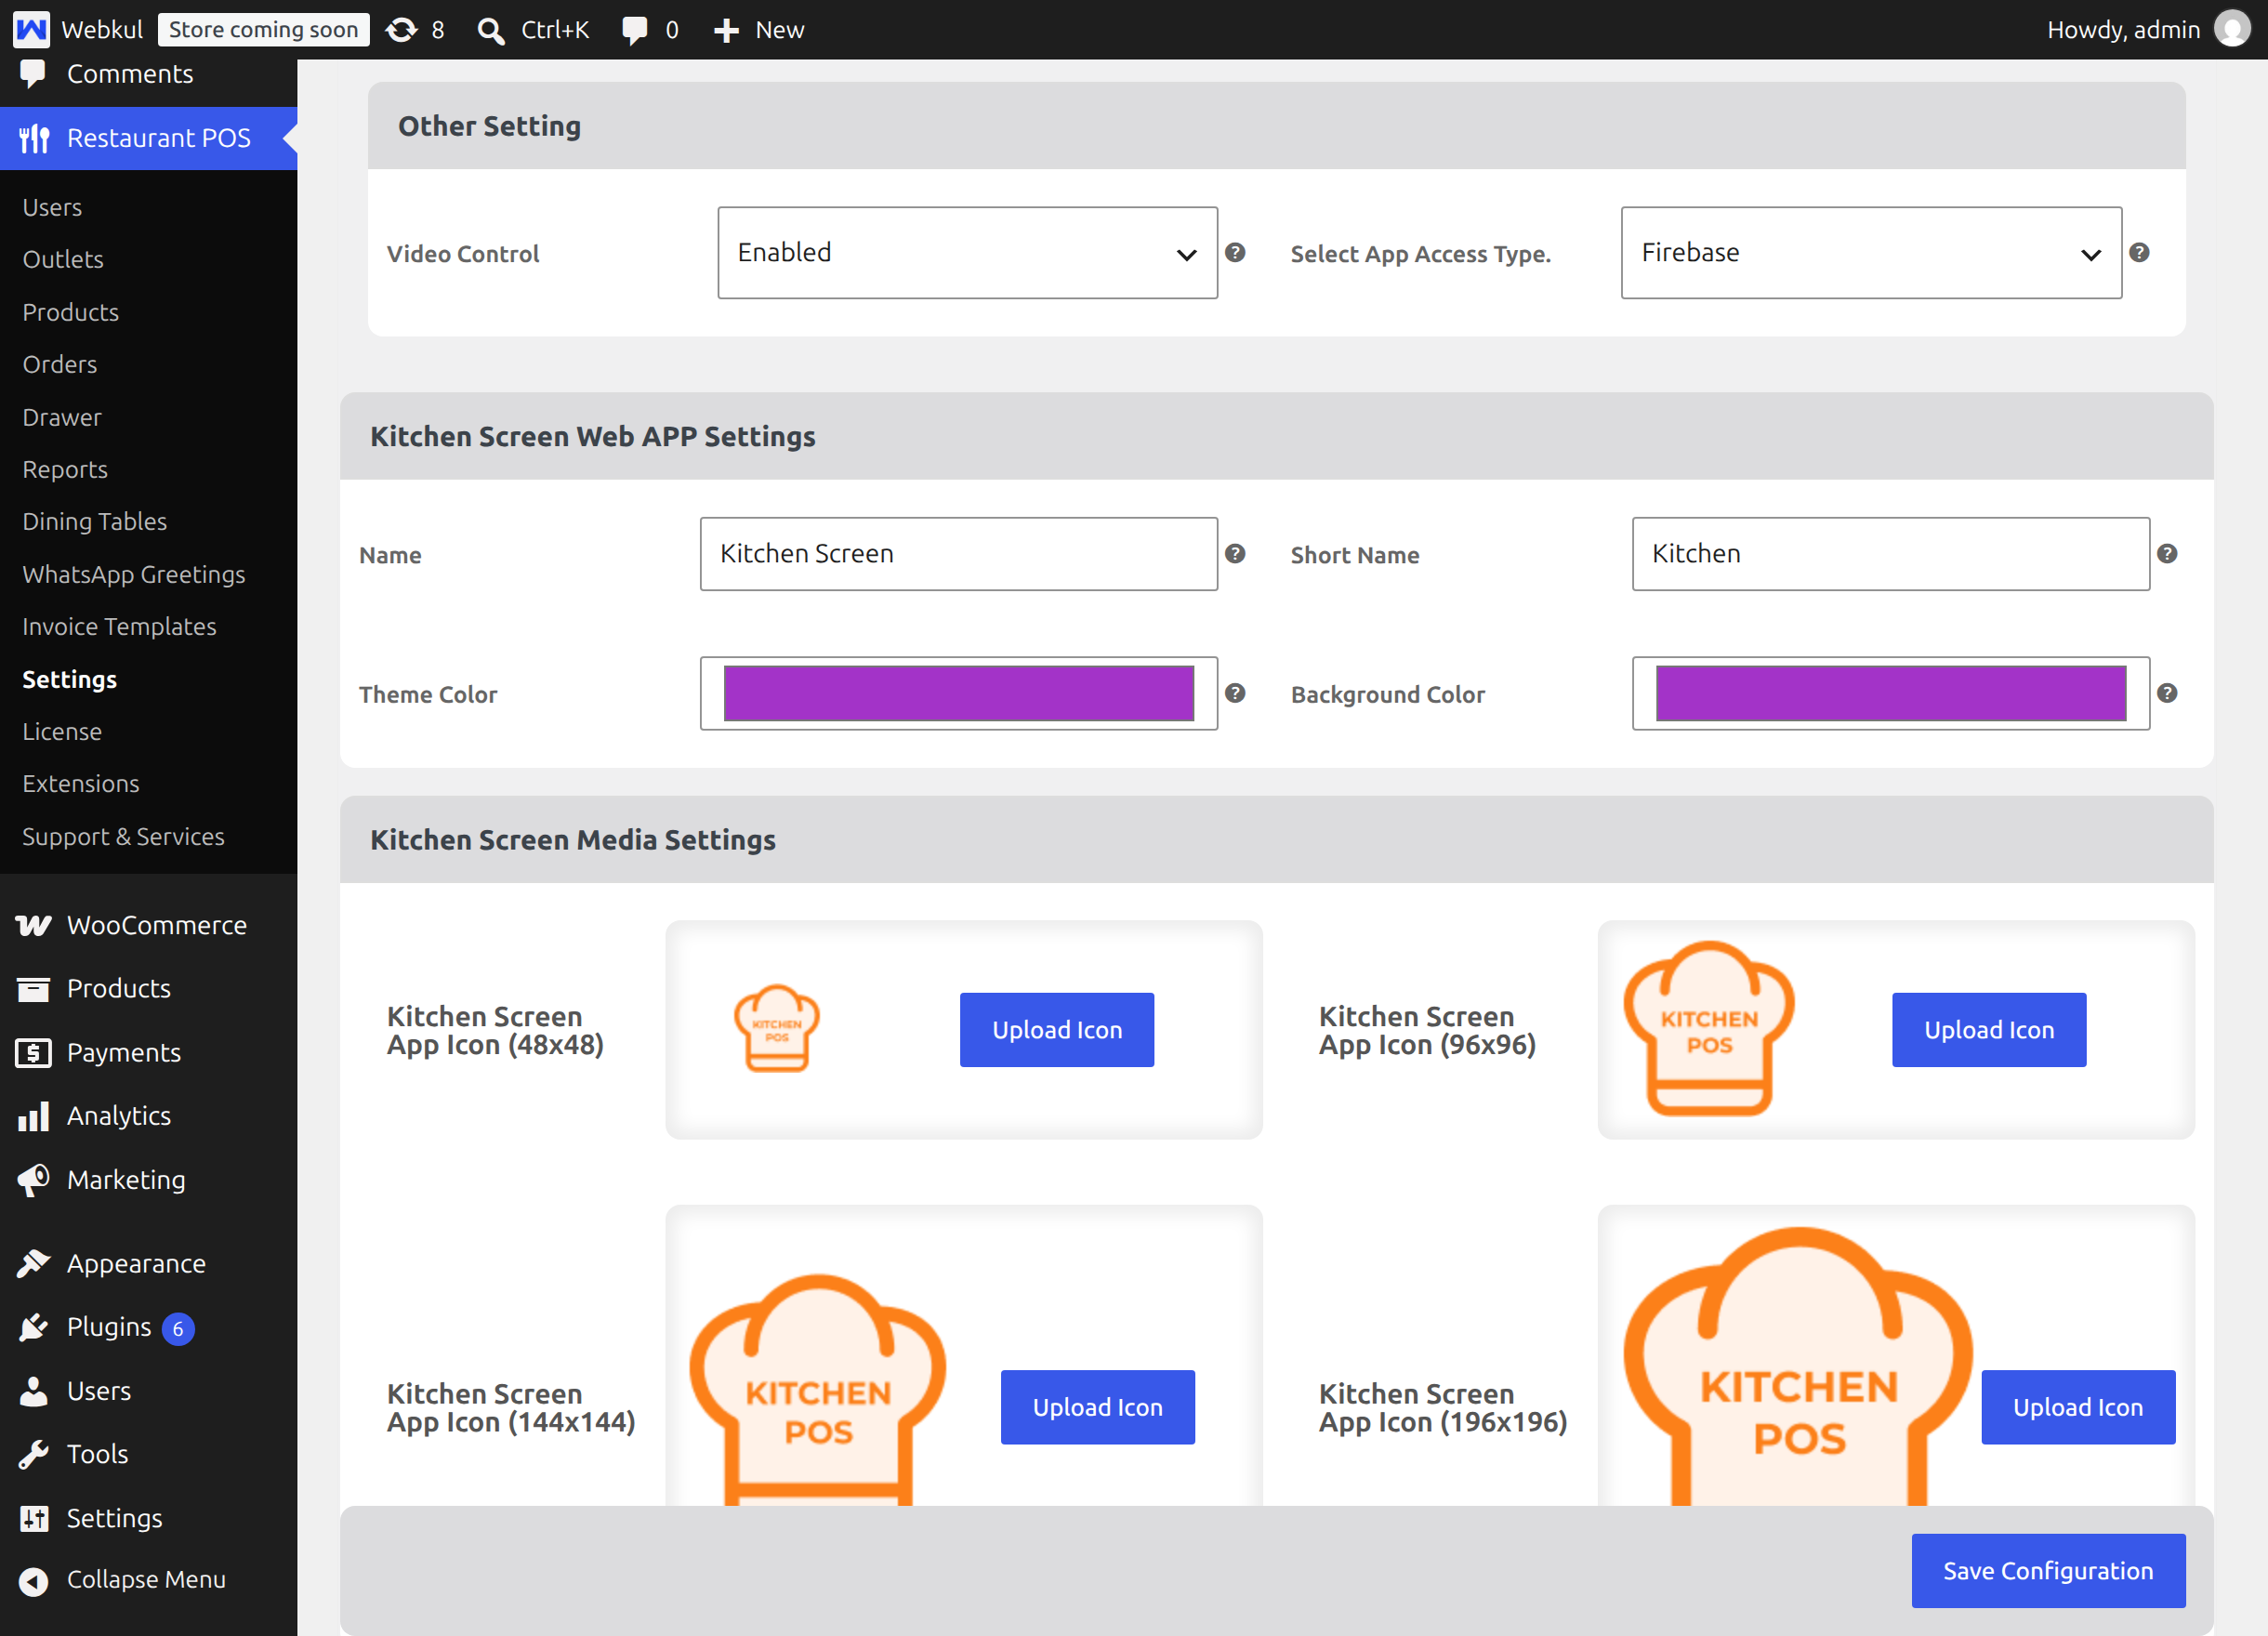
Firebase is only the default — you do not have to use it. The kitchen screen, the customer screen, the POS kitchen tabs, the statuses and the browser alerts all work on either channel.
How the two differ
| Firebase | Socket | |
|---|---|---|
| What you need | A free Google Firebase project and its eight keys | Node.js 14 or newer on the web server, with PHP shell_exec or exec enabled |
| Where tickets are stored | Your Firebase Realtime Database | Your WordPress database |
| Yesterday's tickets | Cleared automatically on the first connection of a new day | Kept until they are sent or deleted |
| Ticket numbers | Restart every day | One running number that keeps counting up |
| Kitchen screens per outlet | As many as you like | One at a time |
| POS screens per outlet receiving live kitchen updates | As many as you like | One at a time |
| Customer screens per outlet | As many as you like | As many as you like |
| Usage limits | Firebase plan limits on connections and data | Only your own server |
One kitchen screen per outlet on Socket. The Node server keeps a single kitchen connection and a single POS connection for each outlet. Opening a second kitchen screen signed in to the same outlet disconnects the first one, which then stops updating; reloading it takes the connection back from the other screen. Customer screens are counted per device, so any number of them can run. If one outlet needs two kitchen screens — a grill station and a cold station, say — use Firebase.
Ticket numbering and clearing are explained on Order Lifecycle.
Switch between the channels at any time; tickets already on the board are not carried across, so change it outside service hours.
Firebase
Firebase is a Google service. You create a free project of your own, and the module talks to it from the kitchen, customer and POS screens. The whole set up takes a few minutes and is done once.
1. Create a Firebase project
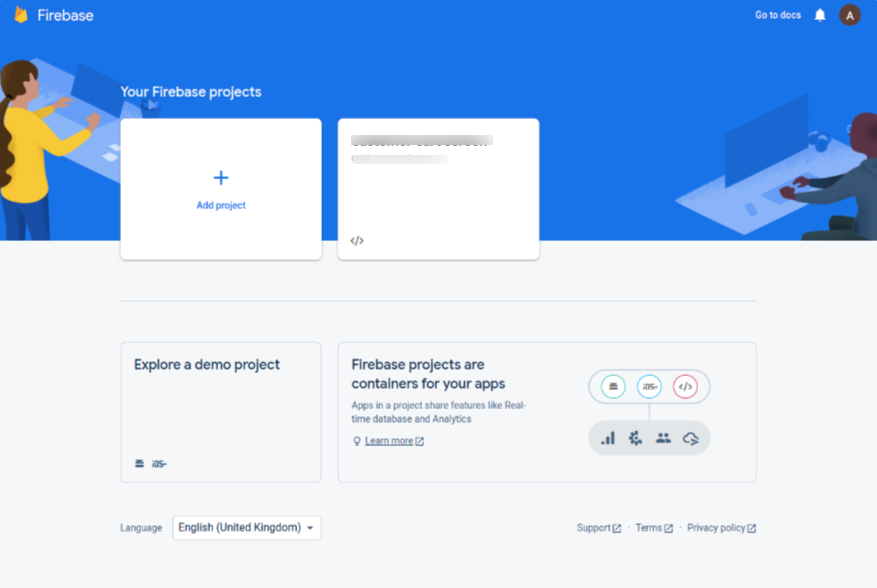
Sign in to the Firebase console with a Google account. The console lists any projects you already have; select Add project.
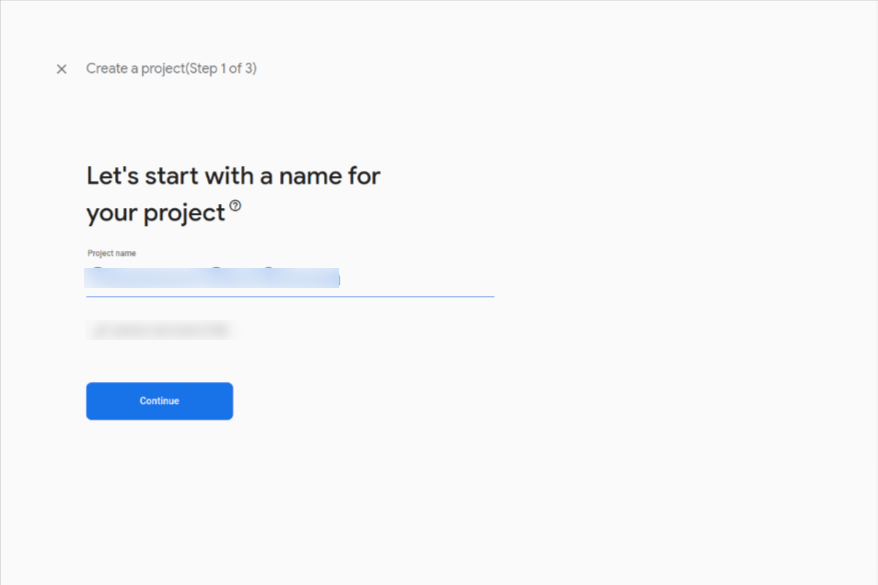
Give the project a name — something like Restaurant Kitchen Screen — and select Continue. Firebase suggests a project id underneath the field; you can accept it.
Firebase then offers Google Analytics. Either choice works for this module: switch it off to finish faster, or leave it on and pick or create an analytics account. Select Create project.
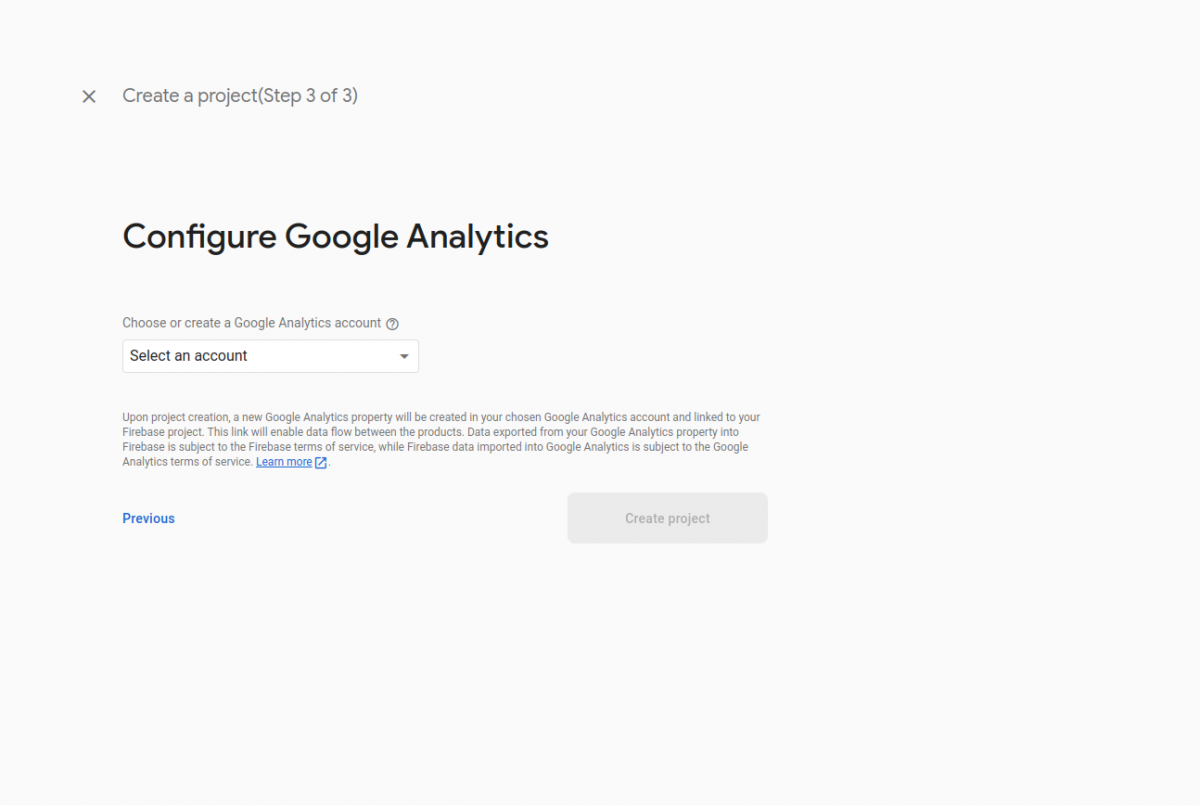
Firebase builds the project and reports Your new project is ready. Select Continue.
2. Create the Realtime Database
This step is what produces the Database Url the module needs, so do not skip it.
In the left menu open Build → Realtime Database and select Create Database. Choose a location, pick a starting security rule set, and finish. The database URL is shown at the top of the database screen and looks like https://your-project-default-rtdb.firebaseio.com.
3. Register a web app
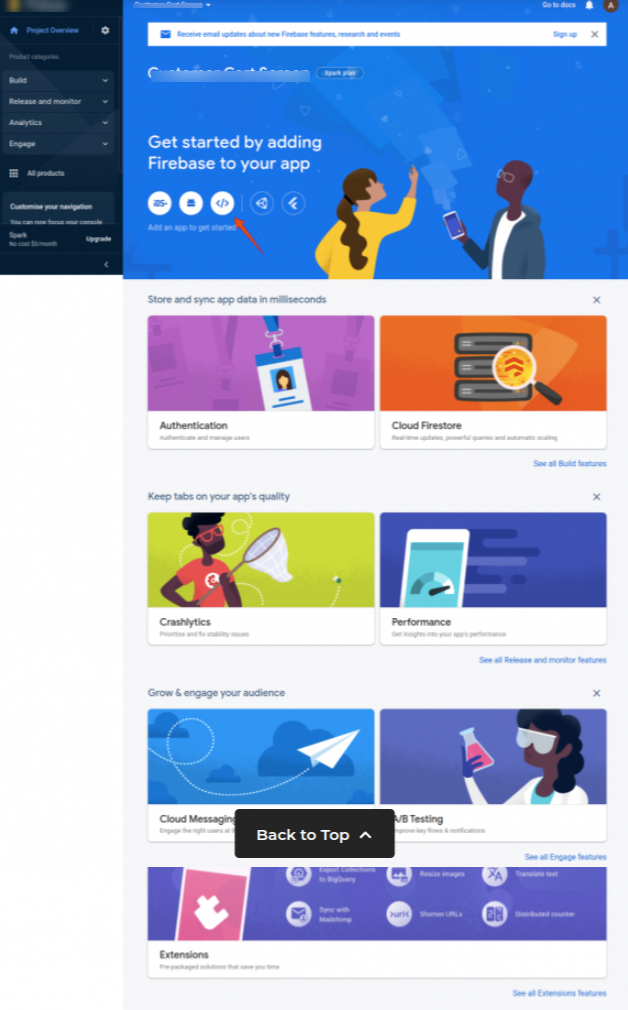
On the project overview, select the web icon — the one marked </> — under Get started by adding Firebase to your app.
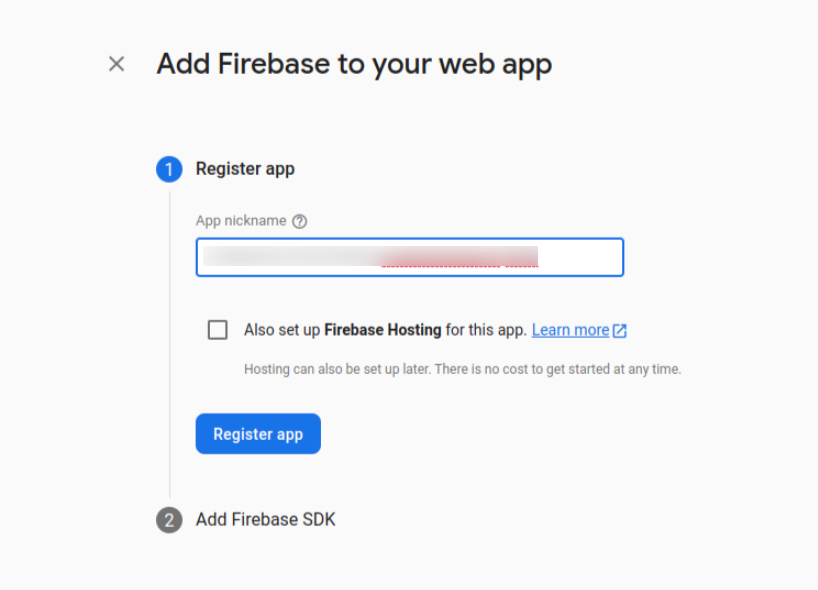
Give the app a nickname and select Register app. Firebase Hosting is not needed, so leave that box unticked.
4. Copy the eight values
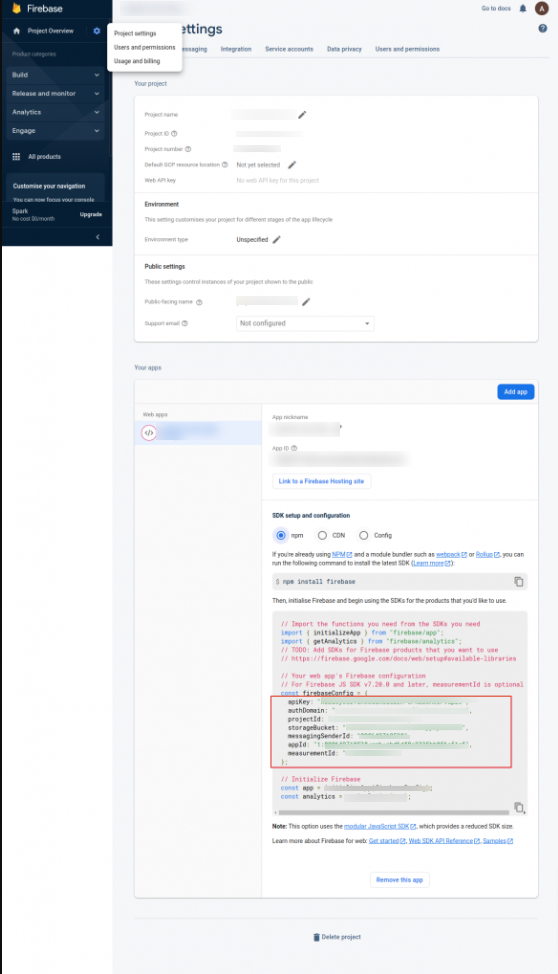
Firebase now shows the Add Firebase SDK block. Inside it is a firebaseConfig object holding exactly the values the module asks for. Copy them from here.
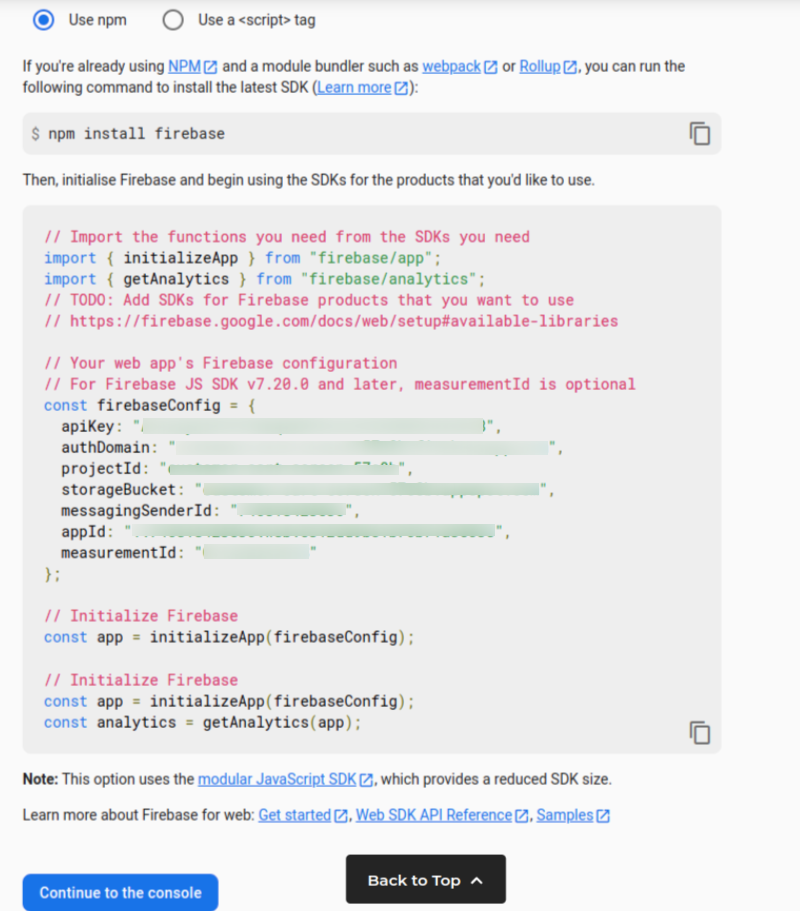
Select Continue to console when you have them.
Tips
You can come back to these values at any time. Open Project Overview → Project settings → General and scroll to Your apps; the same configuration block is shown there.
5. Enter the keys in WordPress
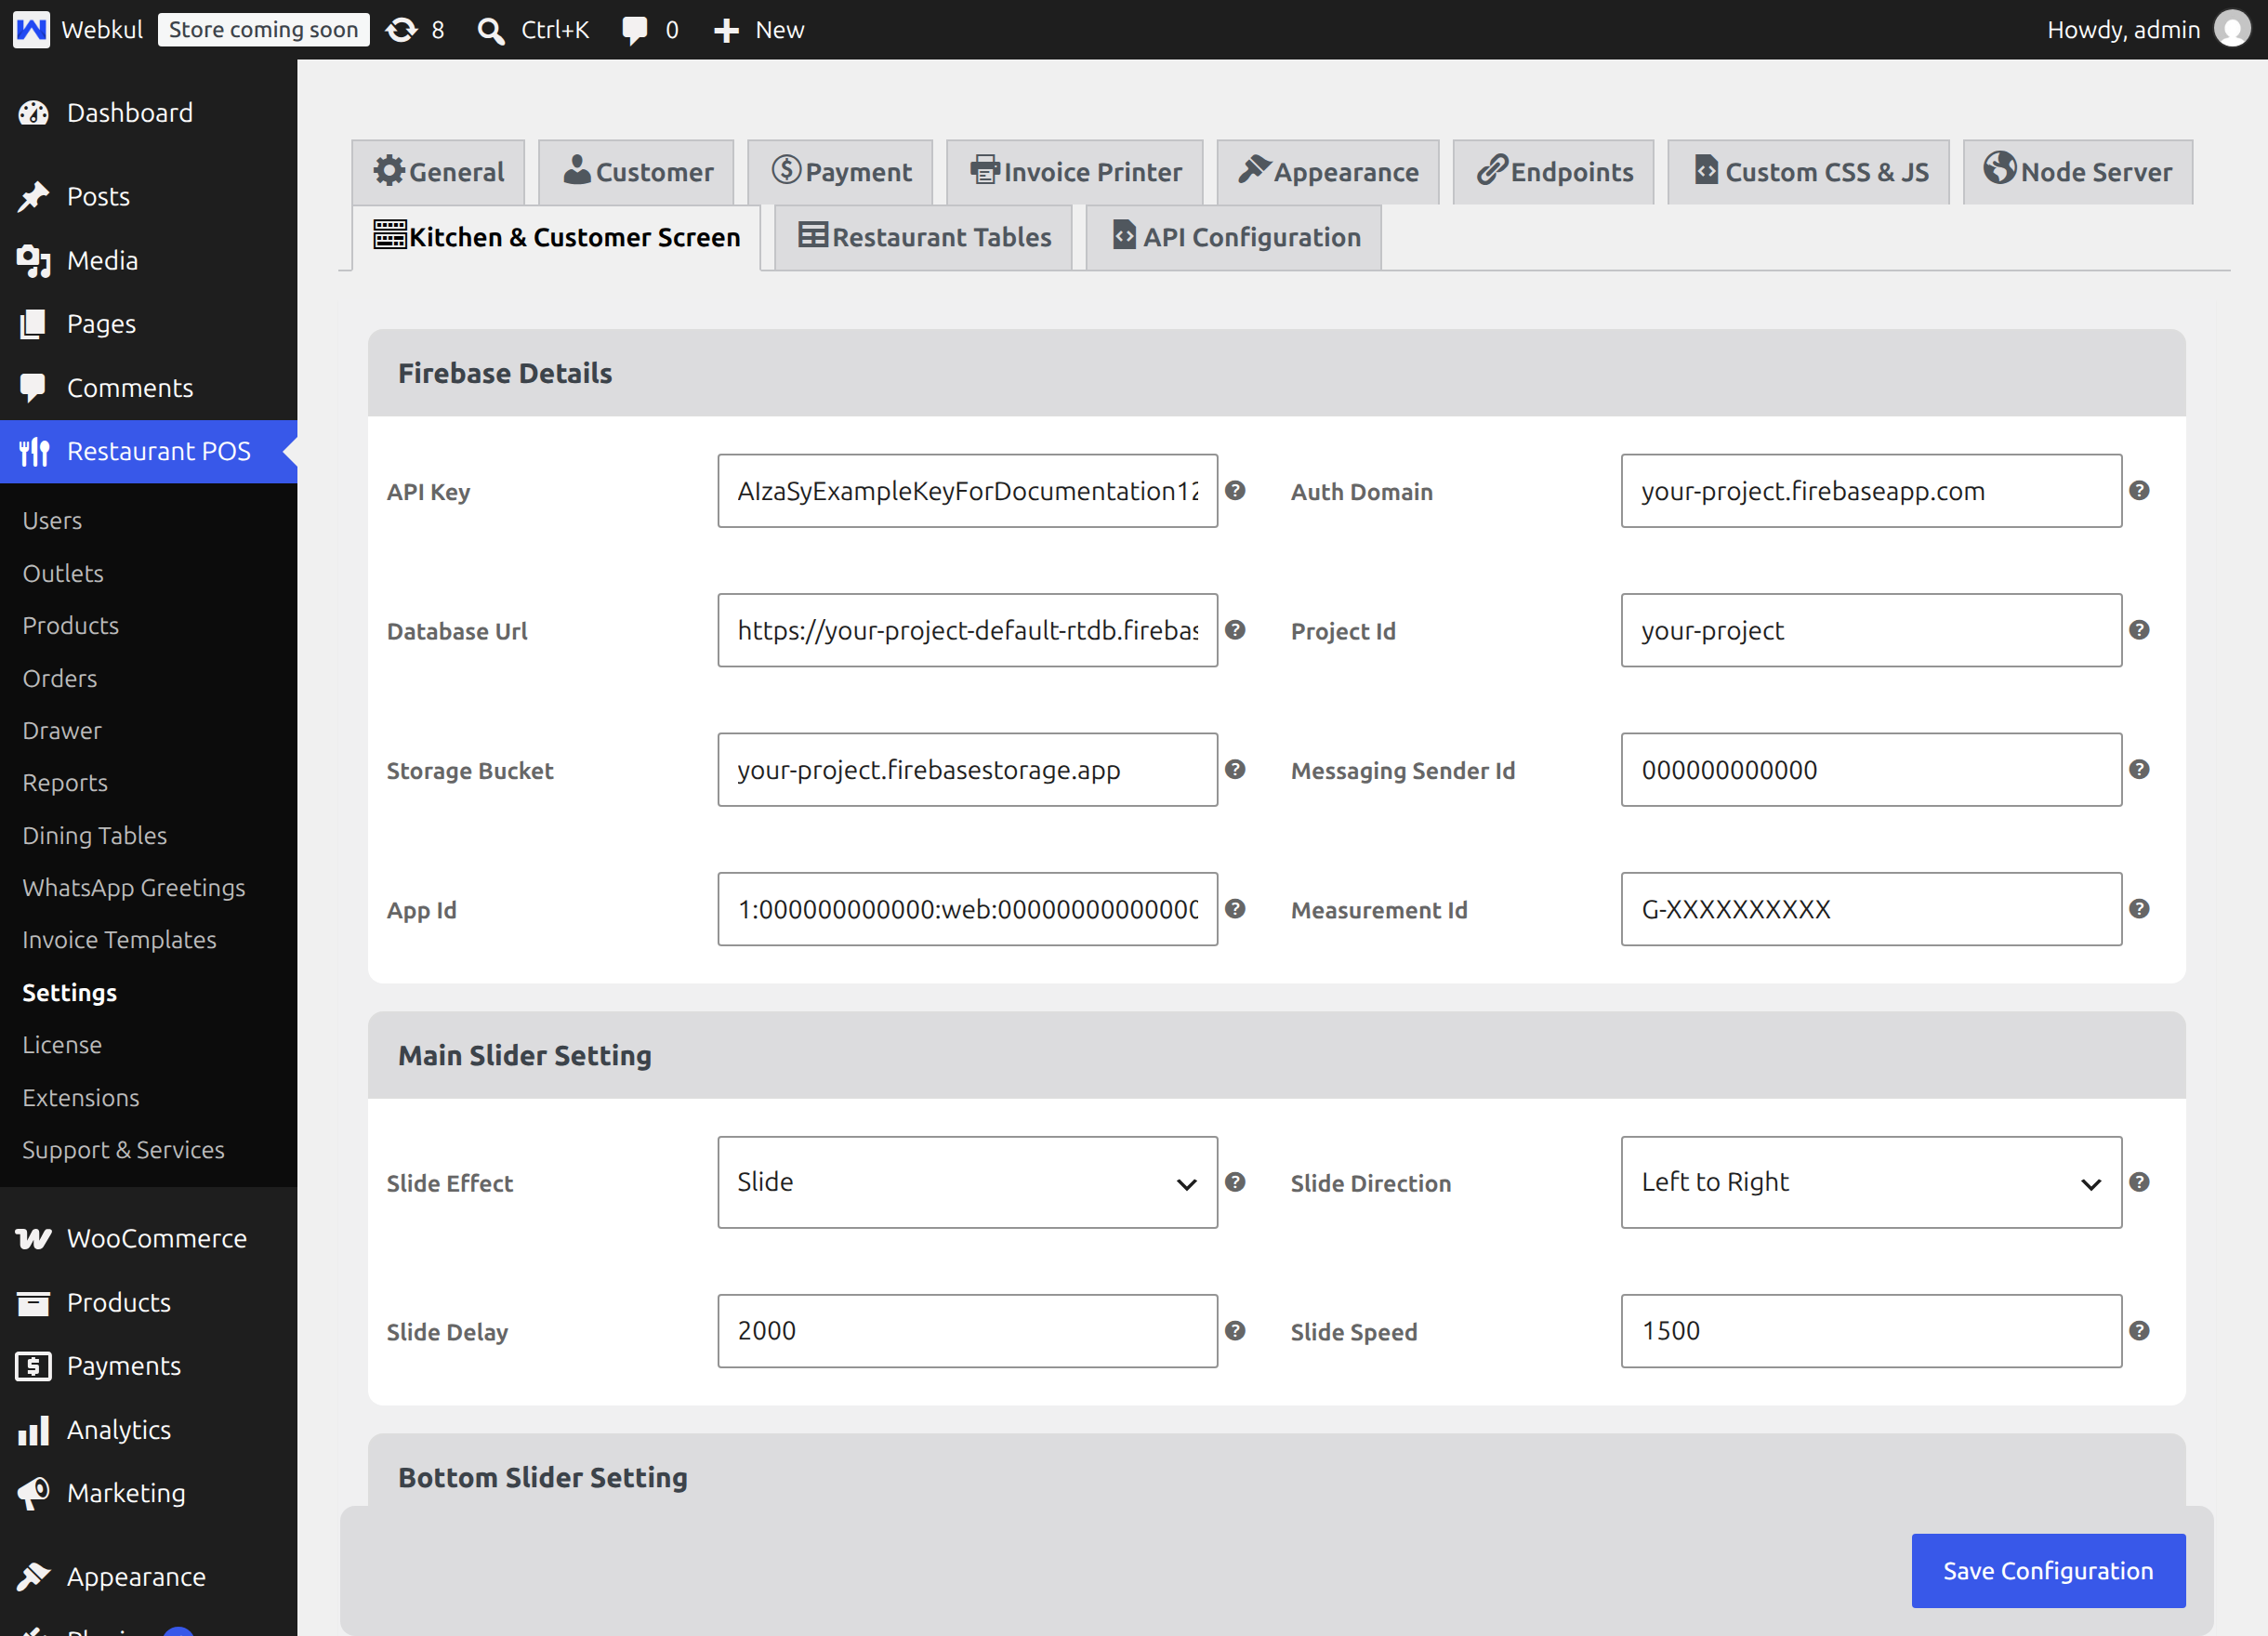
Back in Restaurant POS → Settings → Kitchen & Customer Screen, fill in the Firebase Details block and select Save Configuration.
| Field | Value from Firebase |
|---|---|
| API Key | apiKey |
| Auth Domain | authDomain |
| Database Url | databaseURL |
| Project Id | projectId |
| Storage Bucket | storageBucket |
| Messaging Sender Id | messagingSenderId |
| App Id | appId |
| Measurement Id | measurementId |
Warning
The values in the screenshot above are placeholders. Use the values from your own Firebase project. Treat the whole block as private configuration and do not share screenshots of it.
Note
The Firebase console is Google's product and its layout changes from time to time. The screenshots above come from Webkul's own guide for this plugin; if a button has moved, the wording in the steps is what to follow. The eight values themselves have not changed.
What Firebase stores
Only the working day's tickets: for each outlet, the tickets currently in On Hold, Preparing, Completed and Sent, plus the day's ticket counter. The first time a screen connects on a new day, the previous day's records are deleted automatically, so the database does not grow over time. Nothing about your customers' accounts or payments is written there.
Watch the free plan limits
Firebase's free tier caps the number of screens that may be connected at the same time, the amount of data stored and the amount downloaded per day. A single restaurant with a kitchen board, a customer screen and a till is well inside those limits, but several outlets each running two or three displays can reach the connection cap, and a screen that is refused a connection simply shows nothing.
The current allowances are published on the Firebase pricing page. Check them against the number of screens you plan to run before you go live, and move to a paid plan if you need more. This is Google's pricing, not Webkul's.
Socket
The Socket option reuses the Node server that WooCommerce Point of Sale already provides, so nothing leaves your own infrastructure and no Google account or Firebase keys are needed.
Before you start
The Start Server button runs Node.js on the same machine as WordPress, so check these with your host first:
- Node.js 14 or newer is installed on the web server;
- PHP's
shell_execorexecfunction is enabled; - the port you pick for the Node server is open to the devices running the kitchen, customer and POS screens;
- if your store runs on HTTPS, you have the SSL certificate and private key for the server address.
If your hosting cannot run Node.js — common on shared hosting — use Firebase instead.
1. Configure the Node server
Go to Restaurant POS → Settings → Node Server.
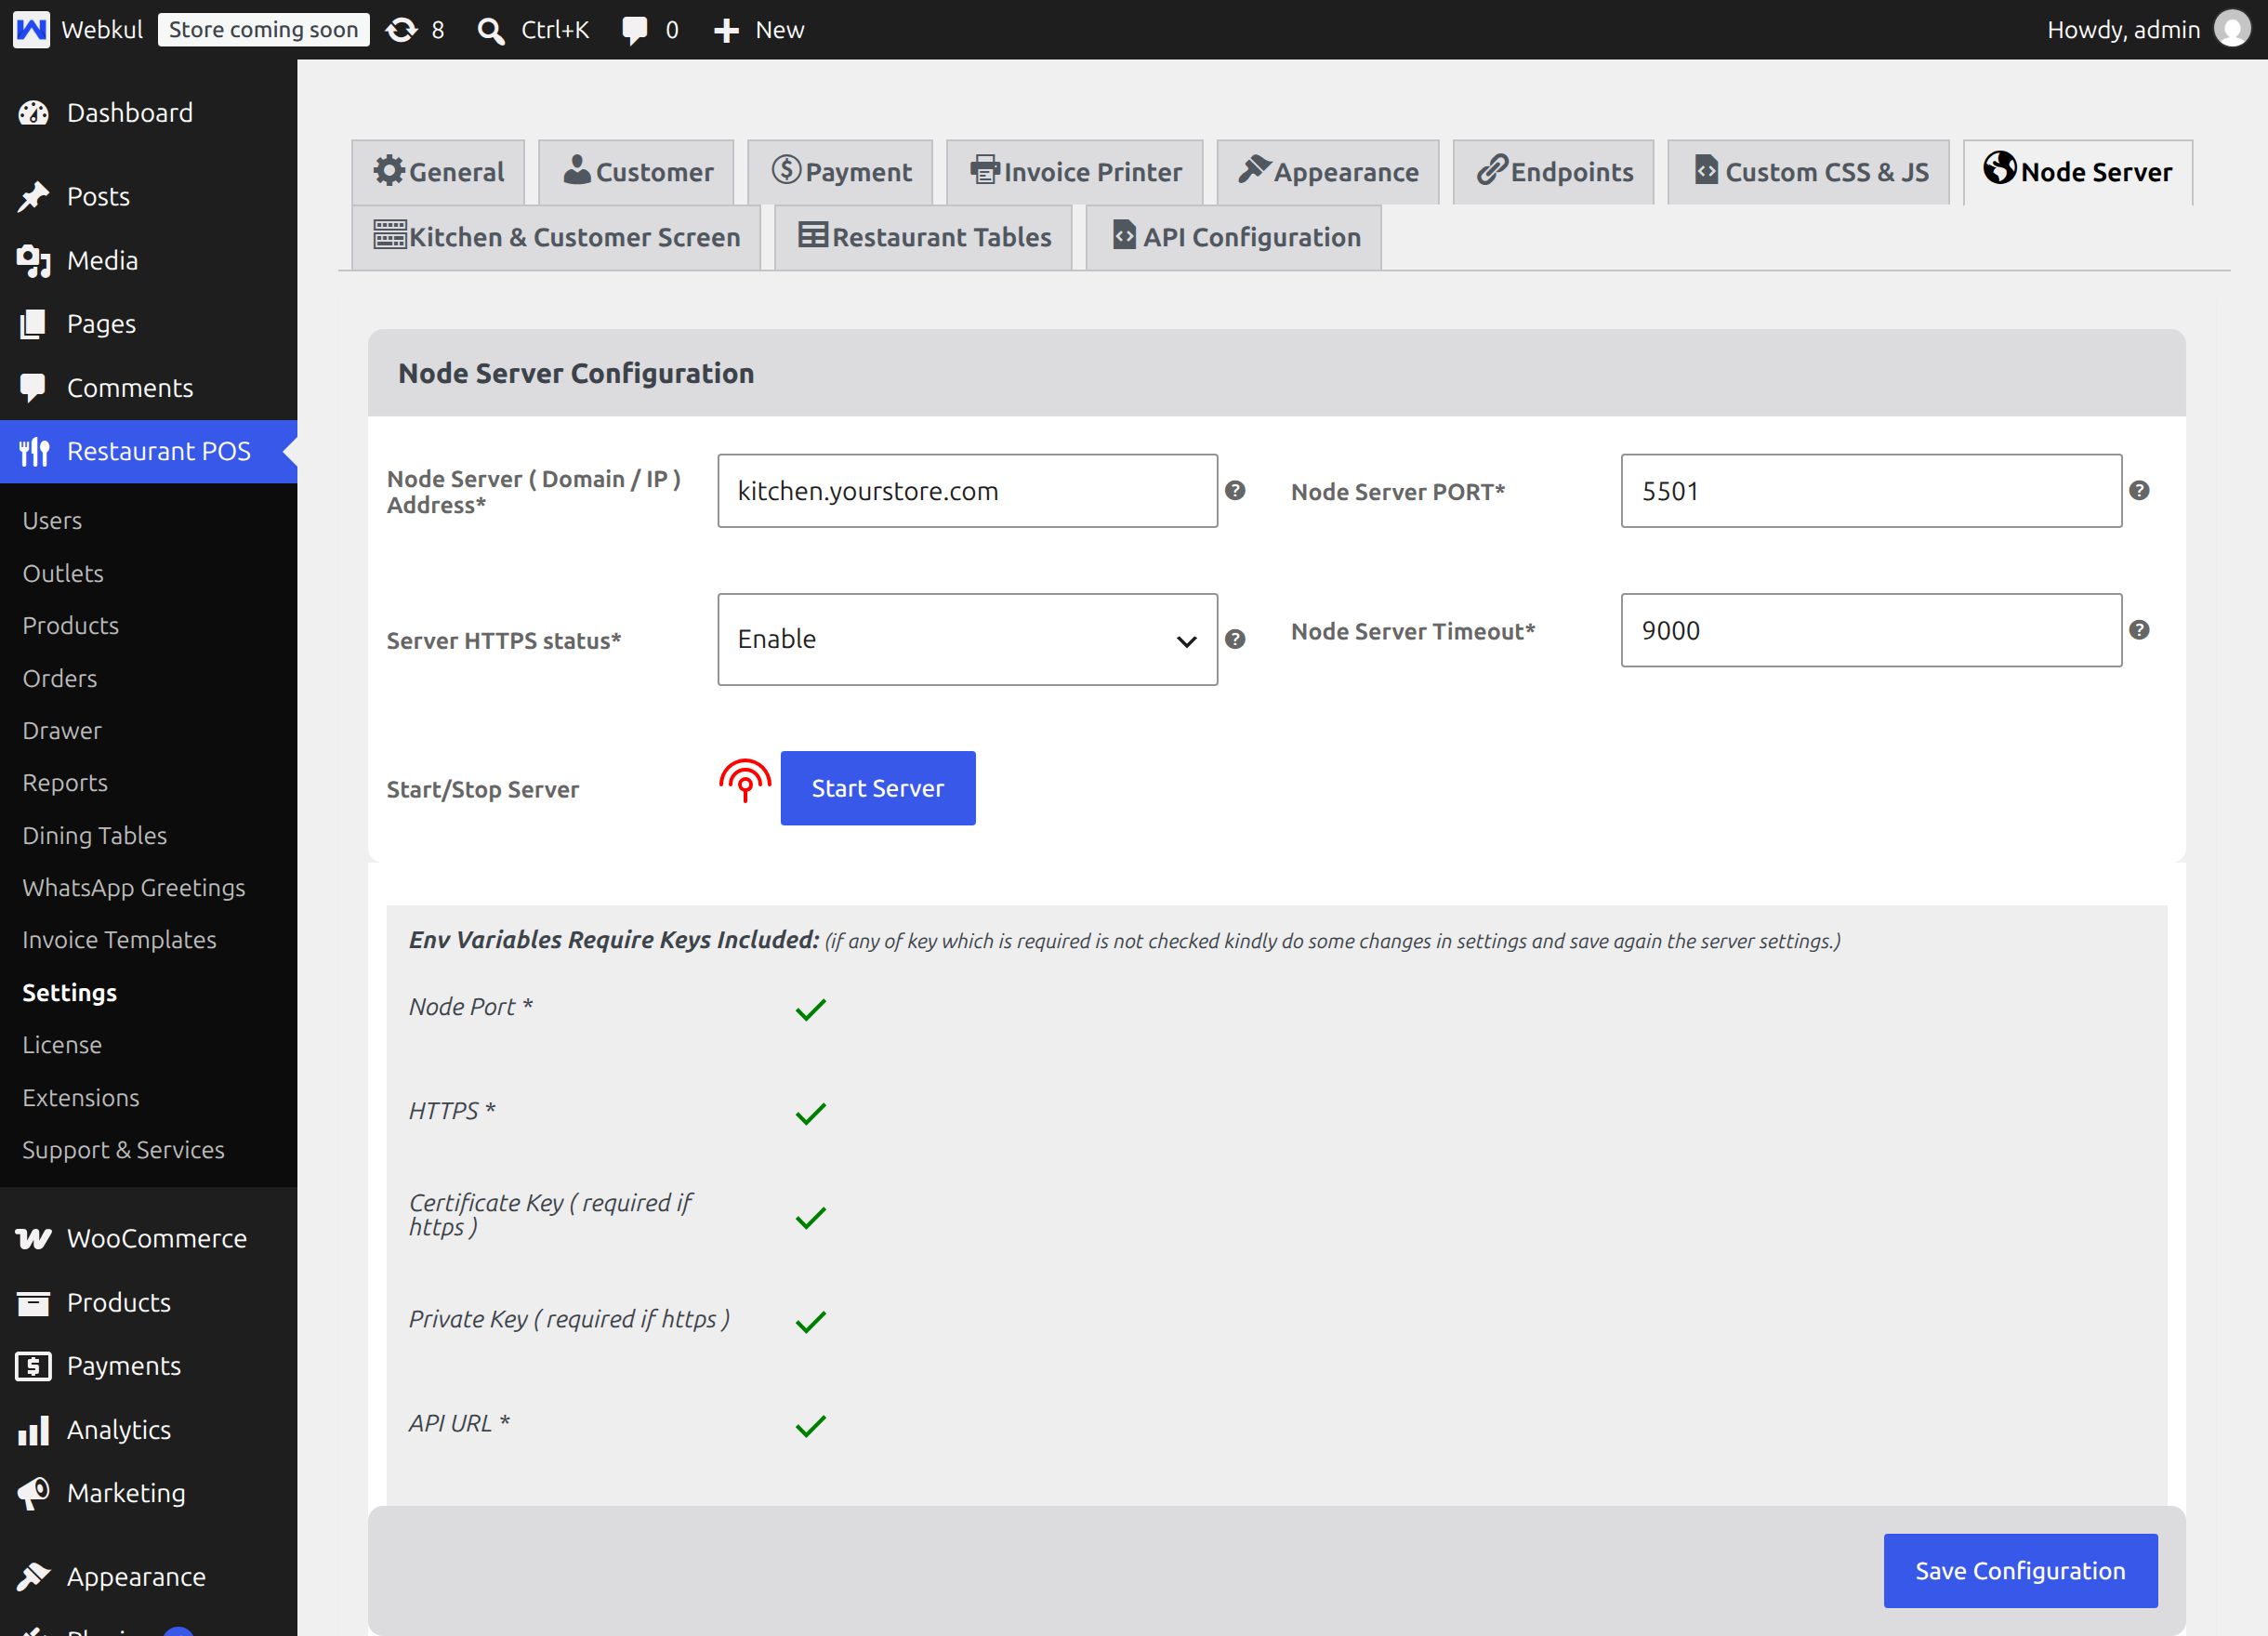
| Field | What to enter |
|---|---|
| Node Server ( Domain / IP ) Address | The domain or IP the server answers on, with no http or www prefix |
| Node Server PORT | The port the server listens on |
| Server HTTPS status | Enable when the server is reached over HTTPS, otherwise Disable |
| Node Server Timeout | How long a client waits before retrying, in milliseconds |
| SSL Certificate Keys | The certificate, required when HTTPS is enabled |
| SSL Private keys | The matching private key, required when HTTPS is enabled |
Save with Save Configuration. The tab then shows an Env Variables Require Keys Included checklist — Node Port, HTTPS, Certificate Key, Private Key and API URL — with a tick beside each value that reached the server's environment file. If any item is unticked, change something on this tab and save again so the file is rewritten.
2. Start the server
Use the Start Server button beside Start/Stop Server. The same button stops it again once it is running.
Important
The kitchen and customer screens are served over the same protocol as your site. A site on HTTPS cannot open a socket to a server on plain HTTP, so enable Server HTTPS status and supply the certificate and private key when your store runs on HTTPS.
3. Switch the module to Socket
Return to Kitchen & Customer Screen, set Select App Access Type to Socket and select Save Configuration.
The module registers its own handler with the Node server automatically. On the Socket channel the tickets are kept in your own WordPress database rather than in Firebase, and they are not cleared by date — see Order Lifecycle.
Note
The Node server is restarted whenever the handler registration changes, so expect a short pause the first time you switch to Socket.
Checking that the channel works
- Open the kitchen display at
/kitchenand sign in as a Kitchen User. - From the POS, send a ticket to the kitchen — see Sending Orders From The POS.
- The ticket should appear in On Hold within a second, without refreshing.
If it does not, the Troubleshooting page lists the messages the module shows and what each one means.
Next step
Continue with General Settings.