Sending Orders From The POS
This page is for the person on the till. Everything here happens inside the Point of Sale at /pos — you never need the WordPress admin.
There are two ways to send an order to the kitchen, and which one you use depends on whether the order is for a seated table or for take away.
Dine in — send before the bill
A seated table is sent to the kitchen as soon as the order is taken, long before anybody pays.
1. Open the table
Go to Dining Tables → Tables. Tables are colour coded: green is vacant, red is occupied. Select a green table to open the booking box, choose the customer — or Create New Customer — pick the Booking Date and an Available Booking Slot, and select BOOK.
The slot list tells you what is available at a glance: a slot somebody already holds is marked Booked, and a slot whose time has passed is marked Expired. Neither can be chosen.
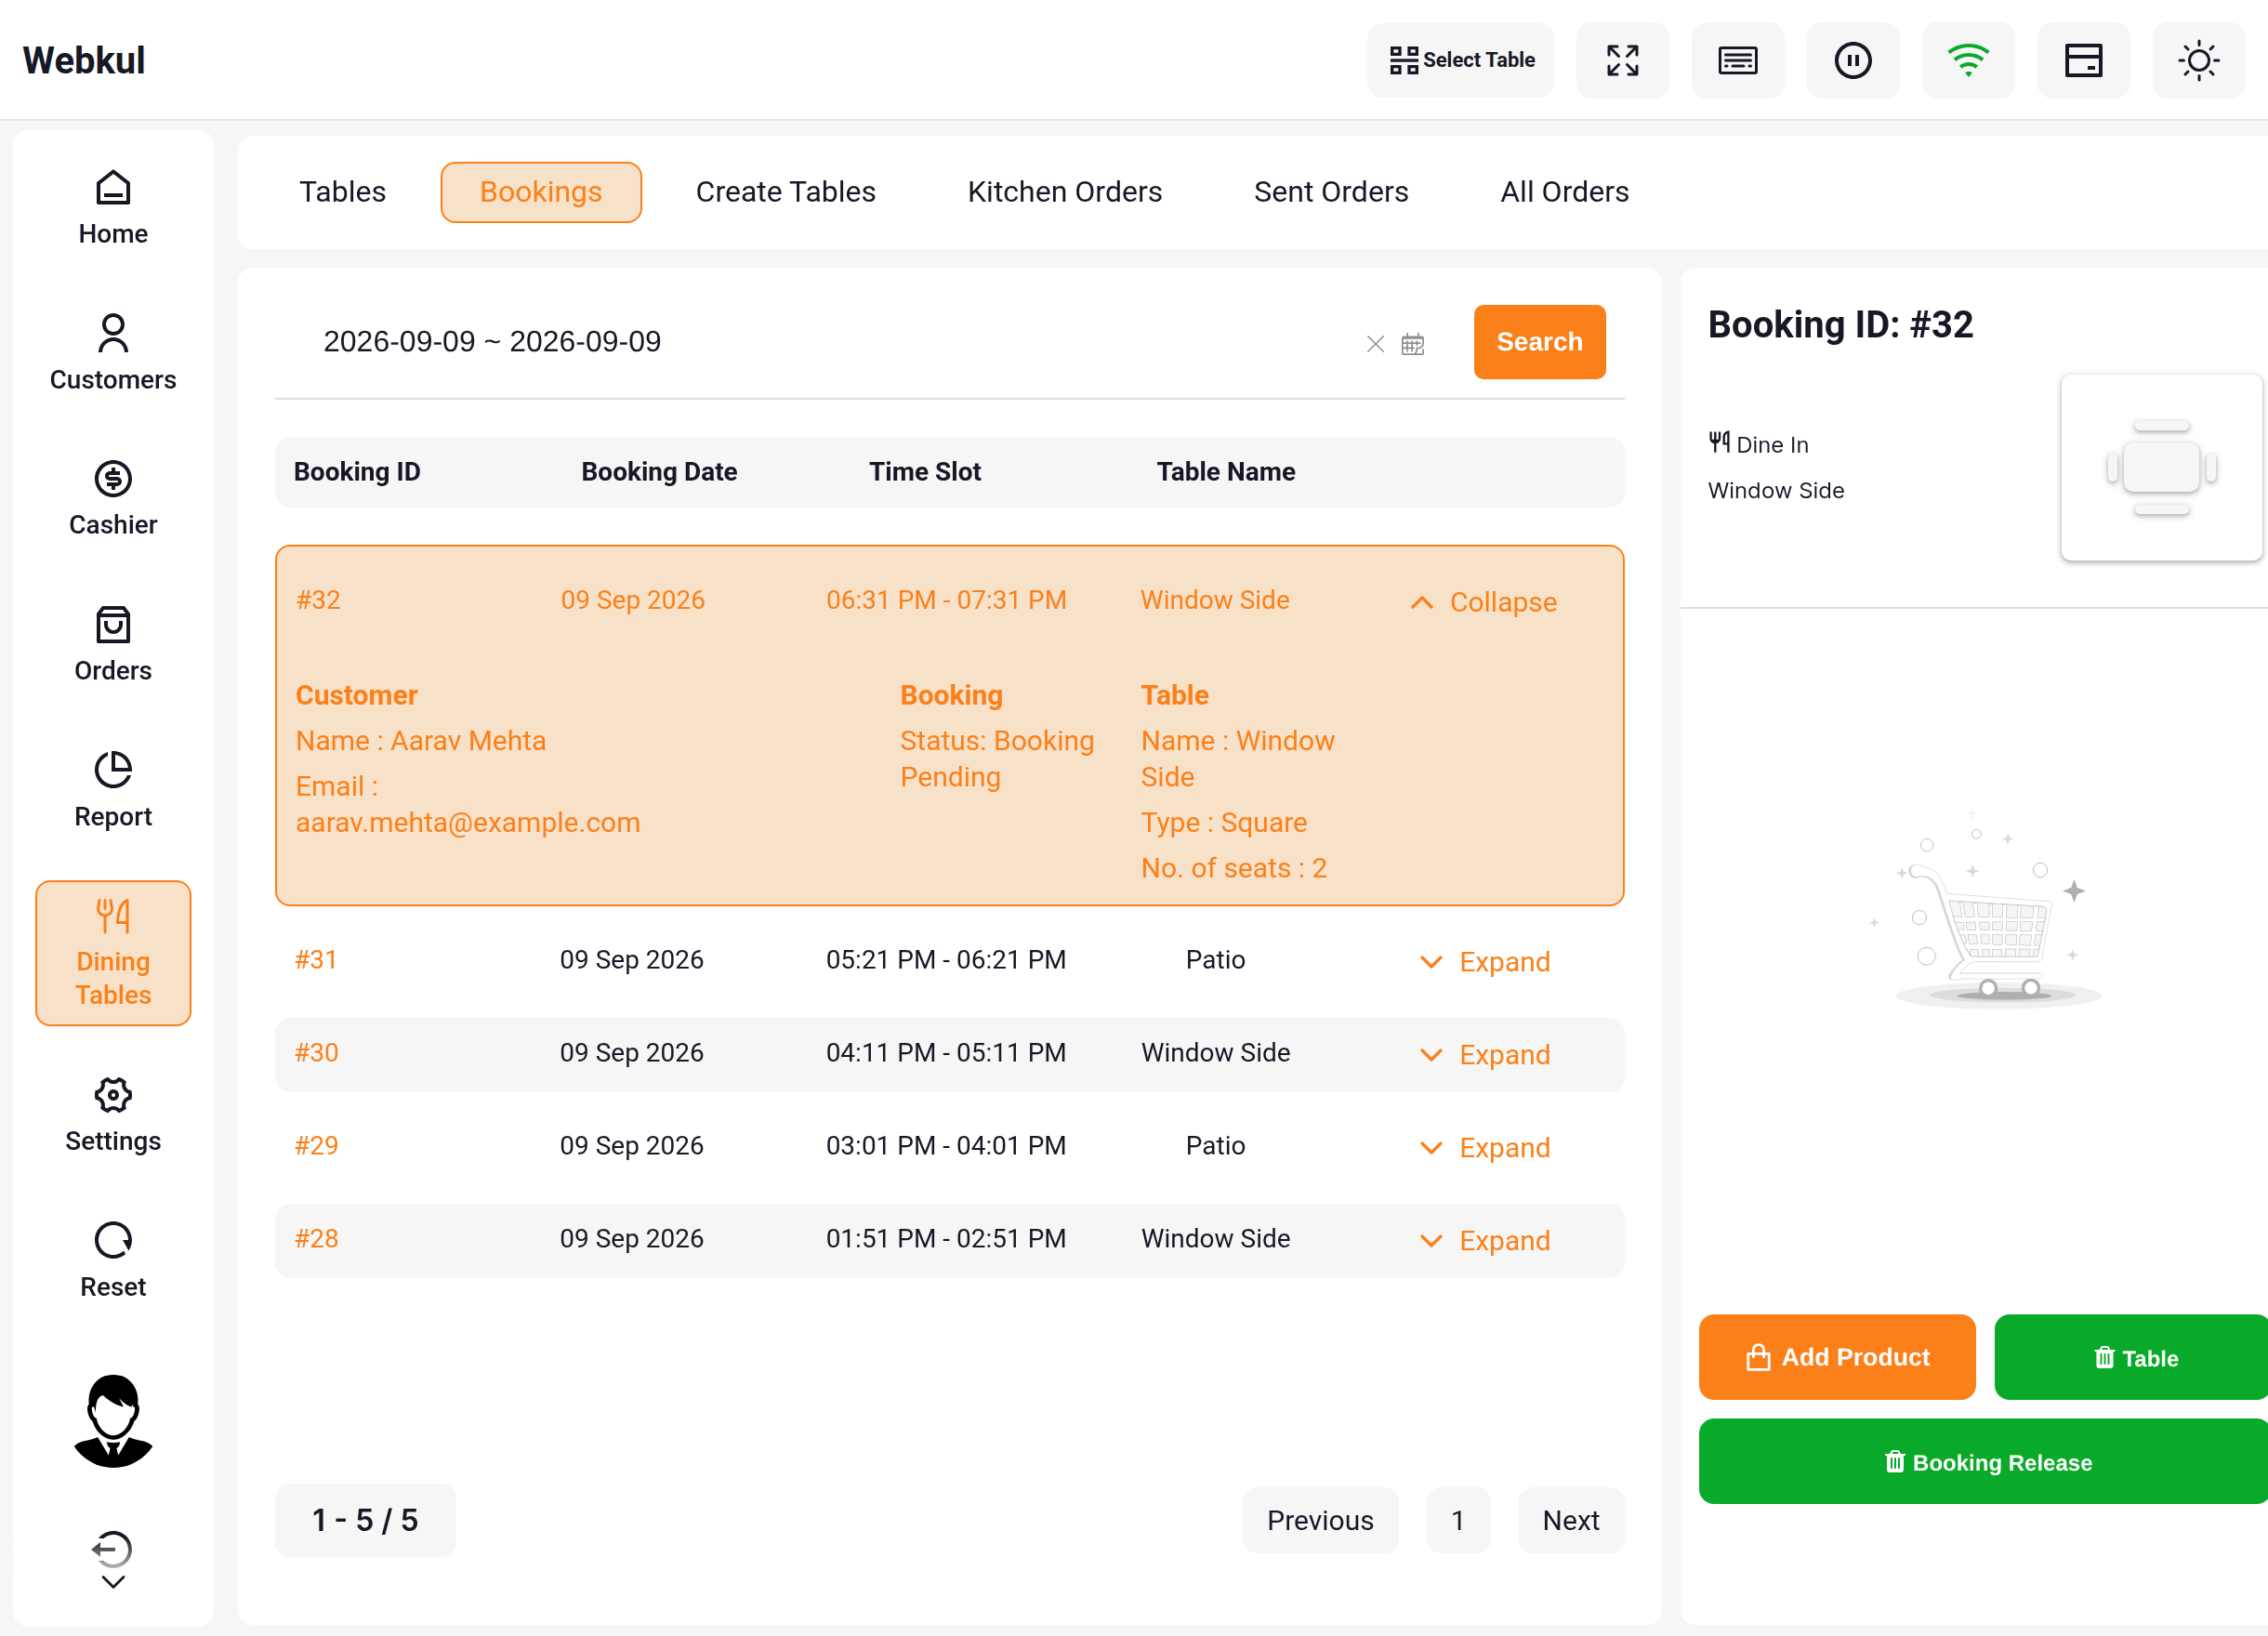
Once the table is booked, open the Bookings tab, expand the booking for the table you are serving and select Add Product.
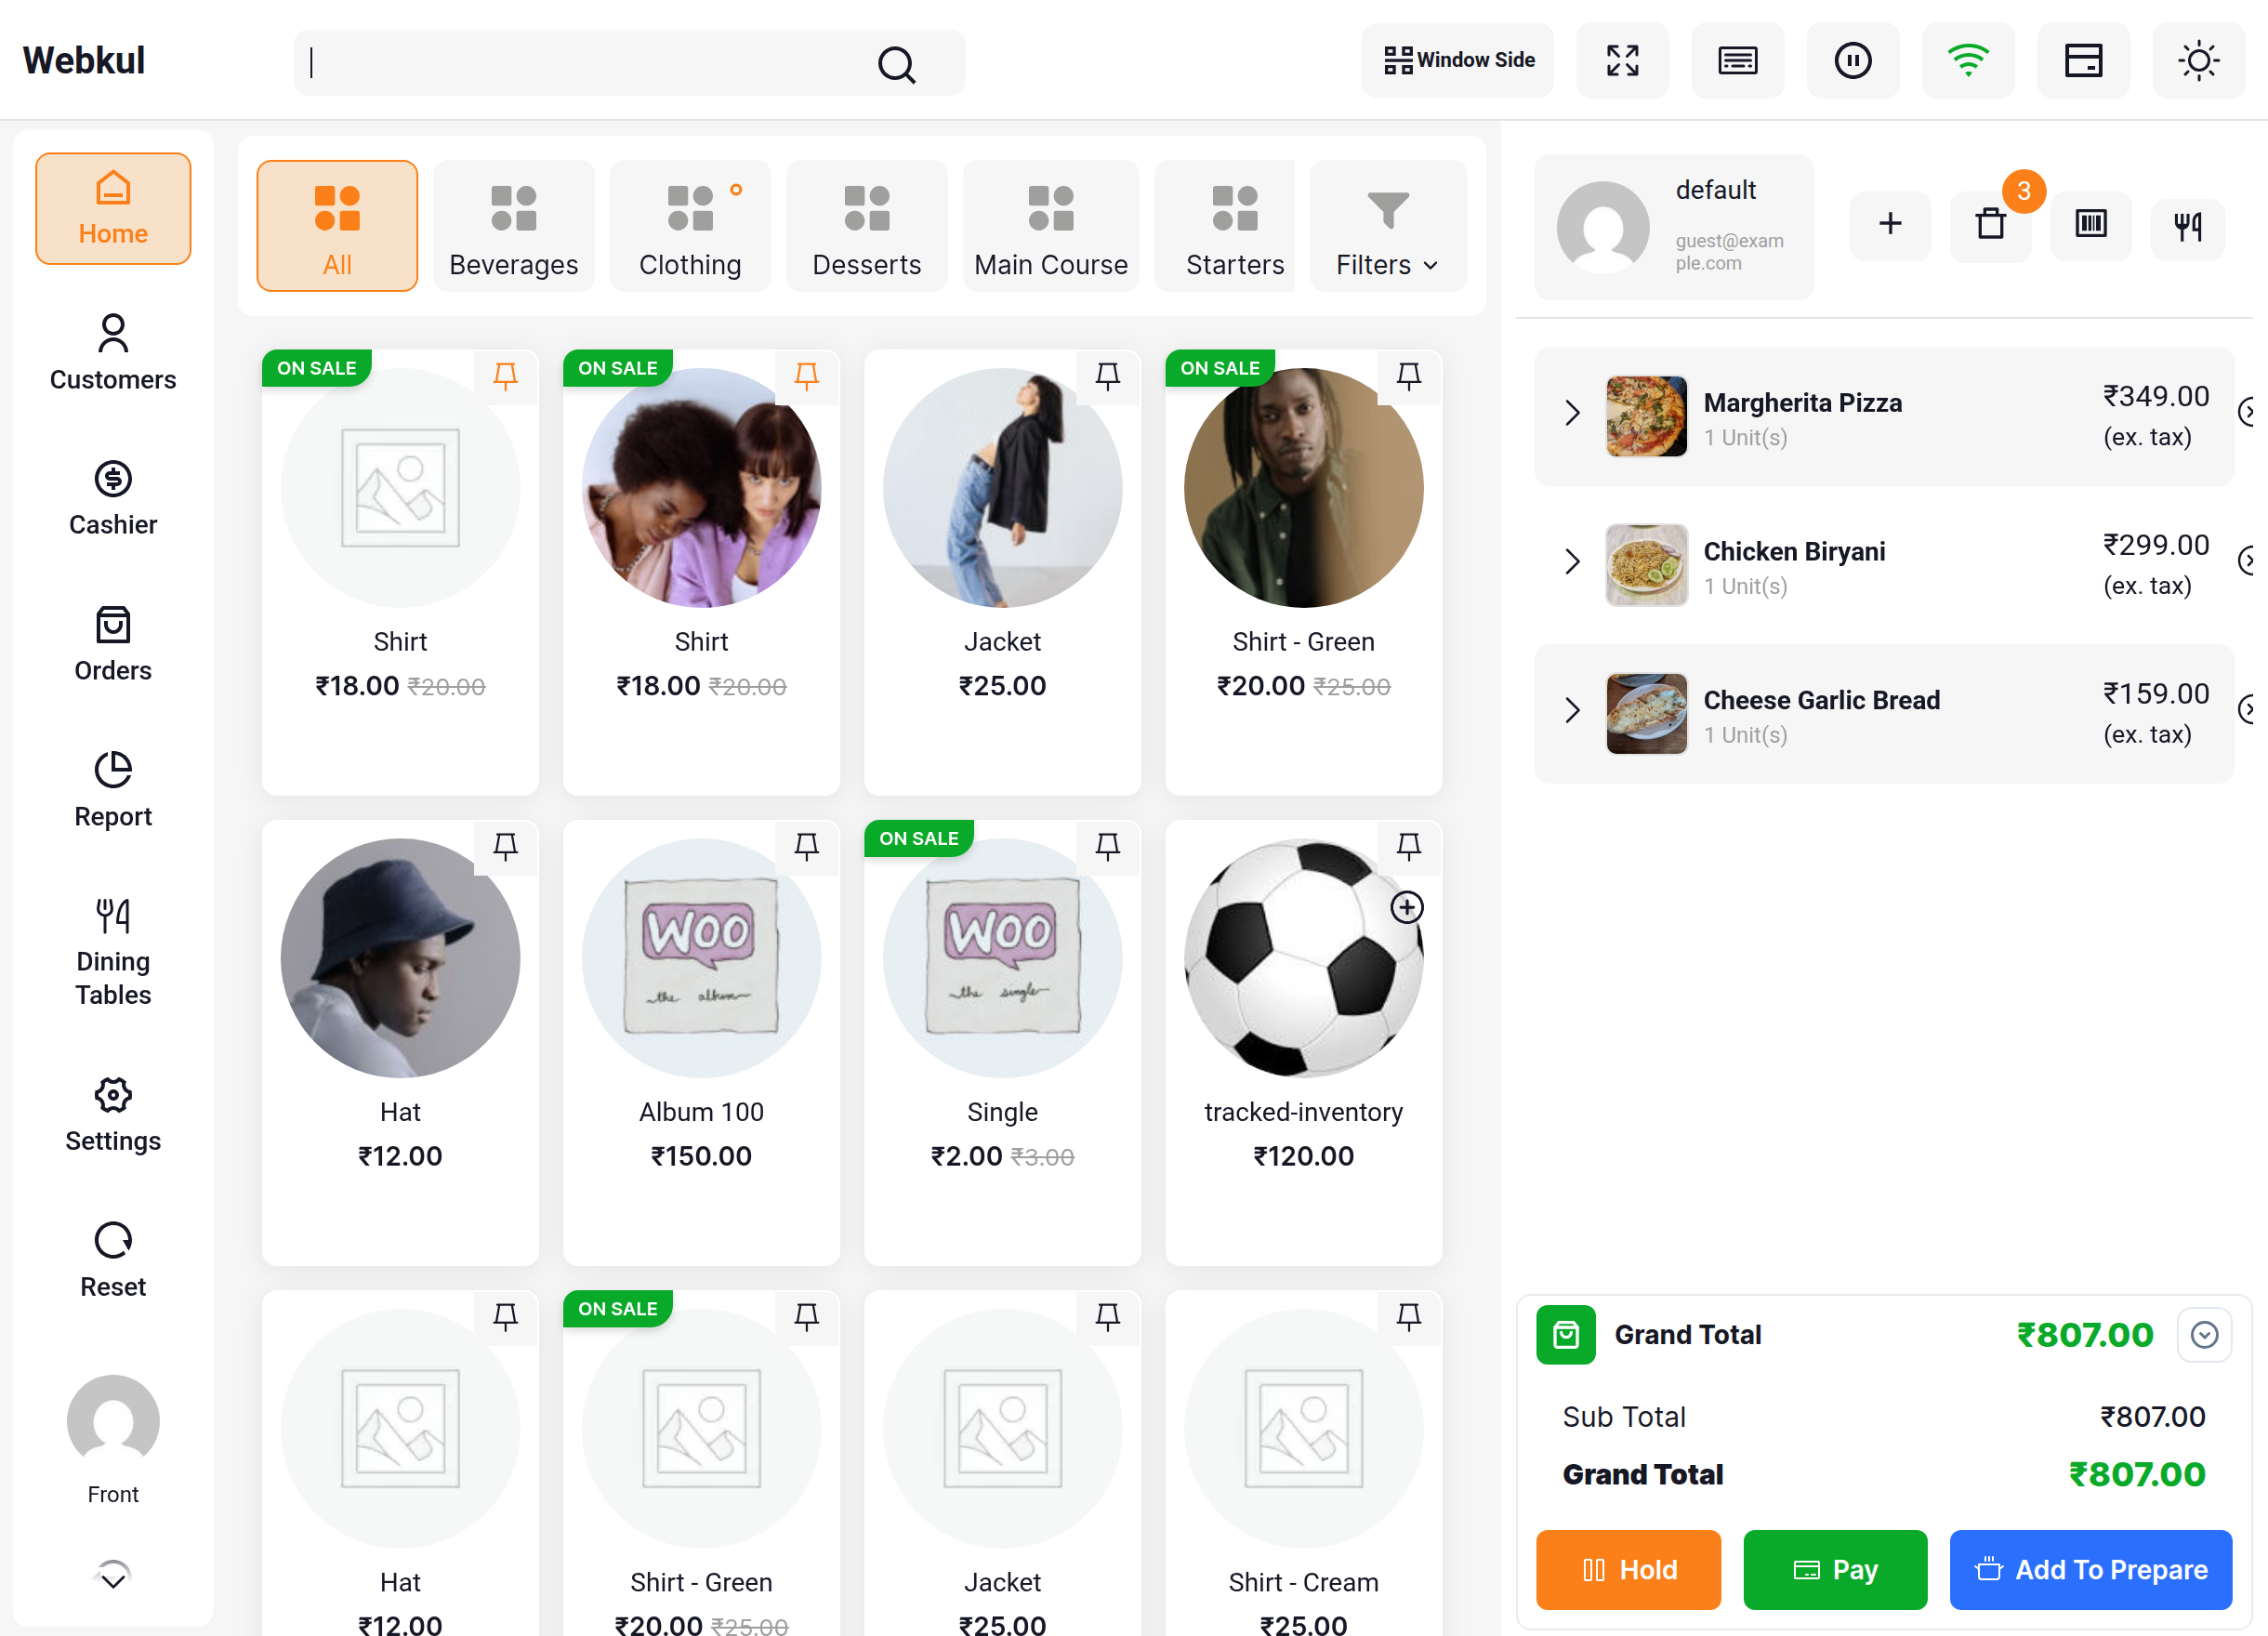
The POS returns to the product screen with that table now shown in the header, which is what tells the module the order is dine in.
Tips
If the party does not turn up, expand the booking and select Booking Release. The table goes back to green and its slot becomes available for somebody else straight away.
2. Build the cart
Add the dishes as normal. The cart panel on the right lists them with quantities and the running total.
3. Select Add To Prepare
Add To Prepare sits at the bottom of the cart panel, under Hold Cart and Pay.
4. Add a note for the kitchen
Selecting the button opens Add Note For Kitchen. Type anything the kitchen needs to know — an allergy, a cooking preference, a request to serve two courses together — or leave it blank.
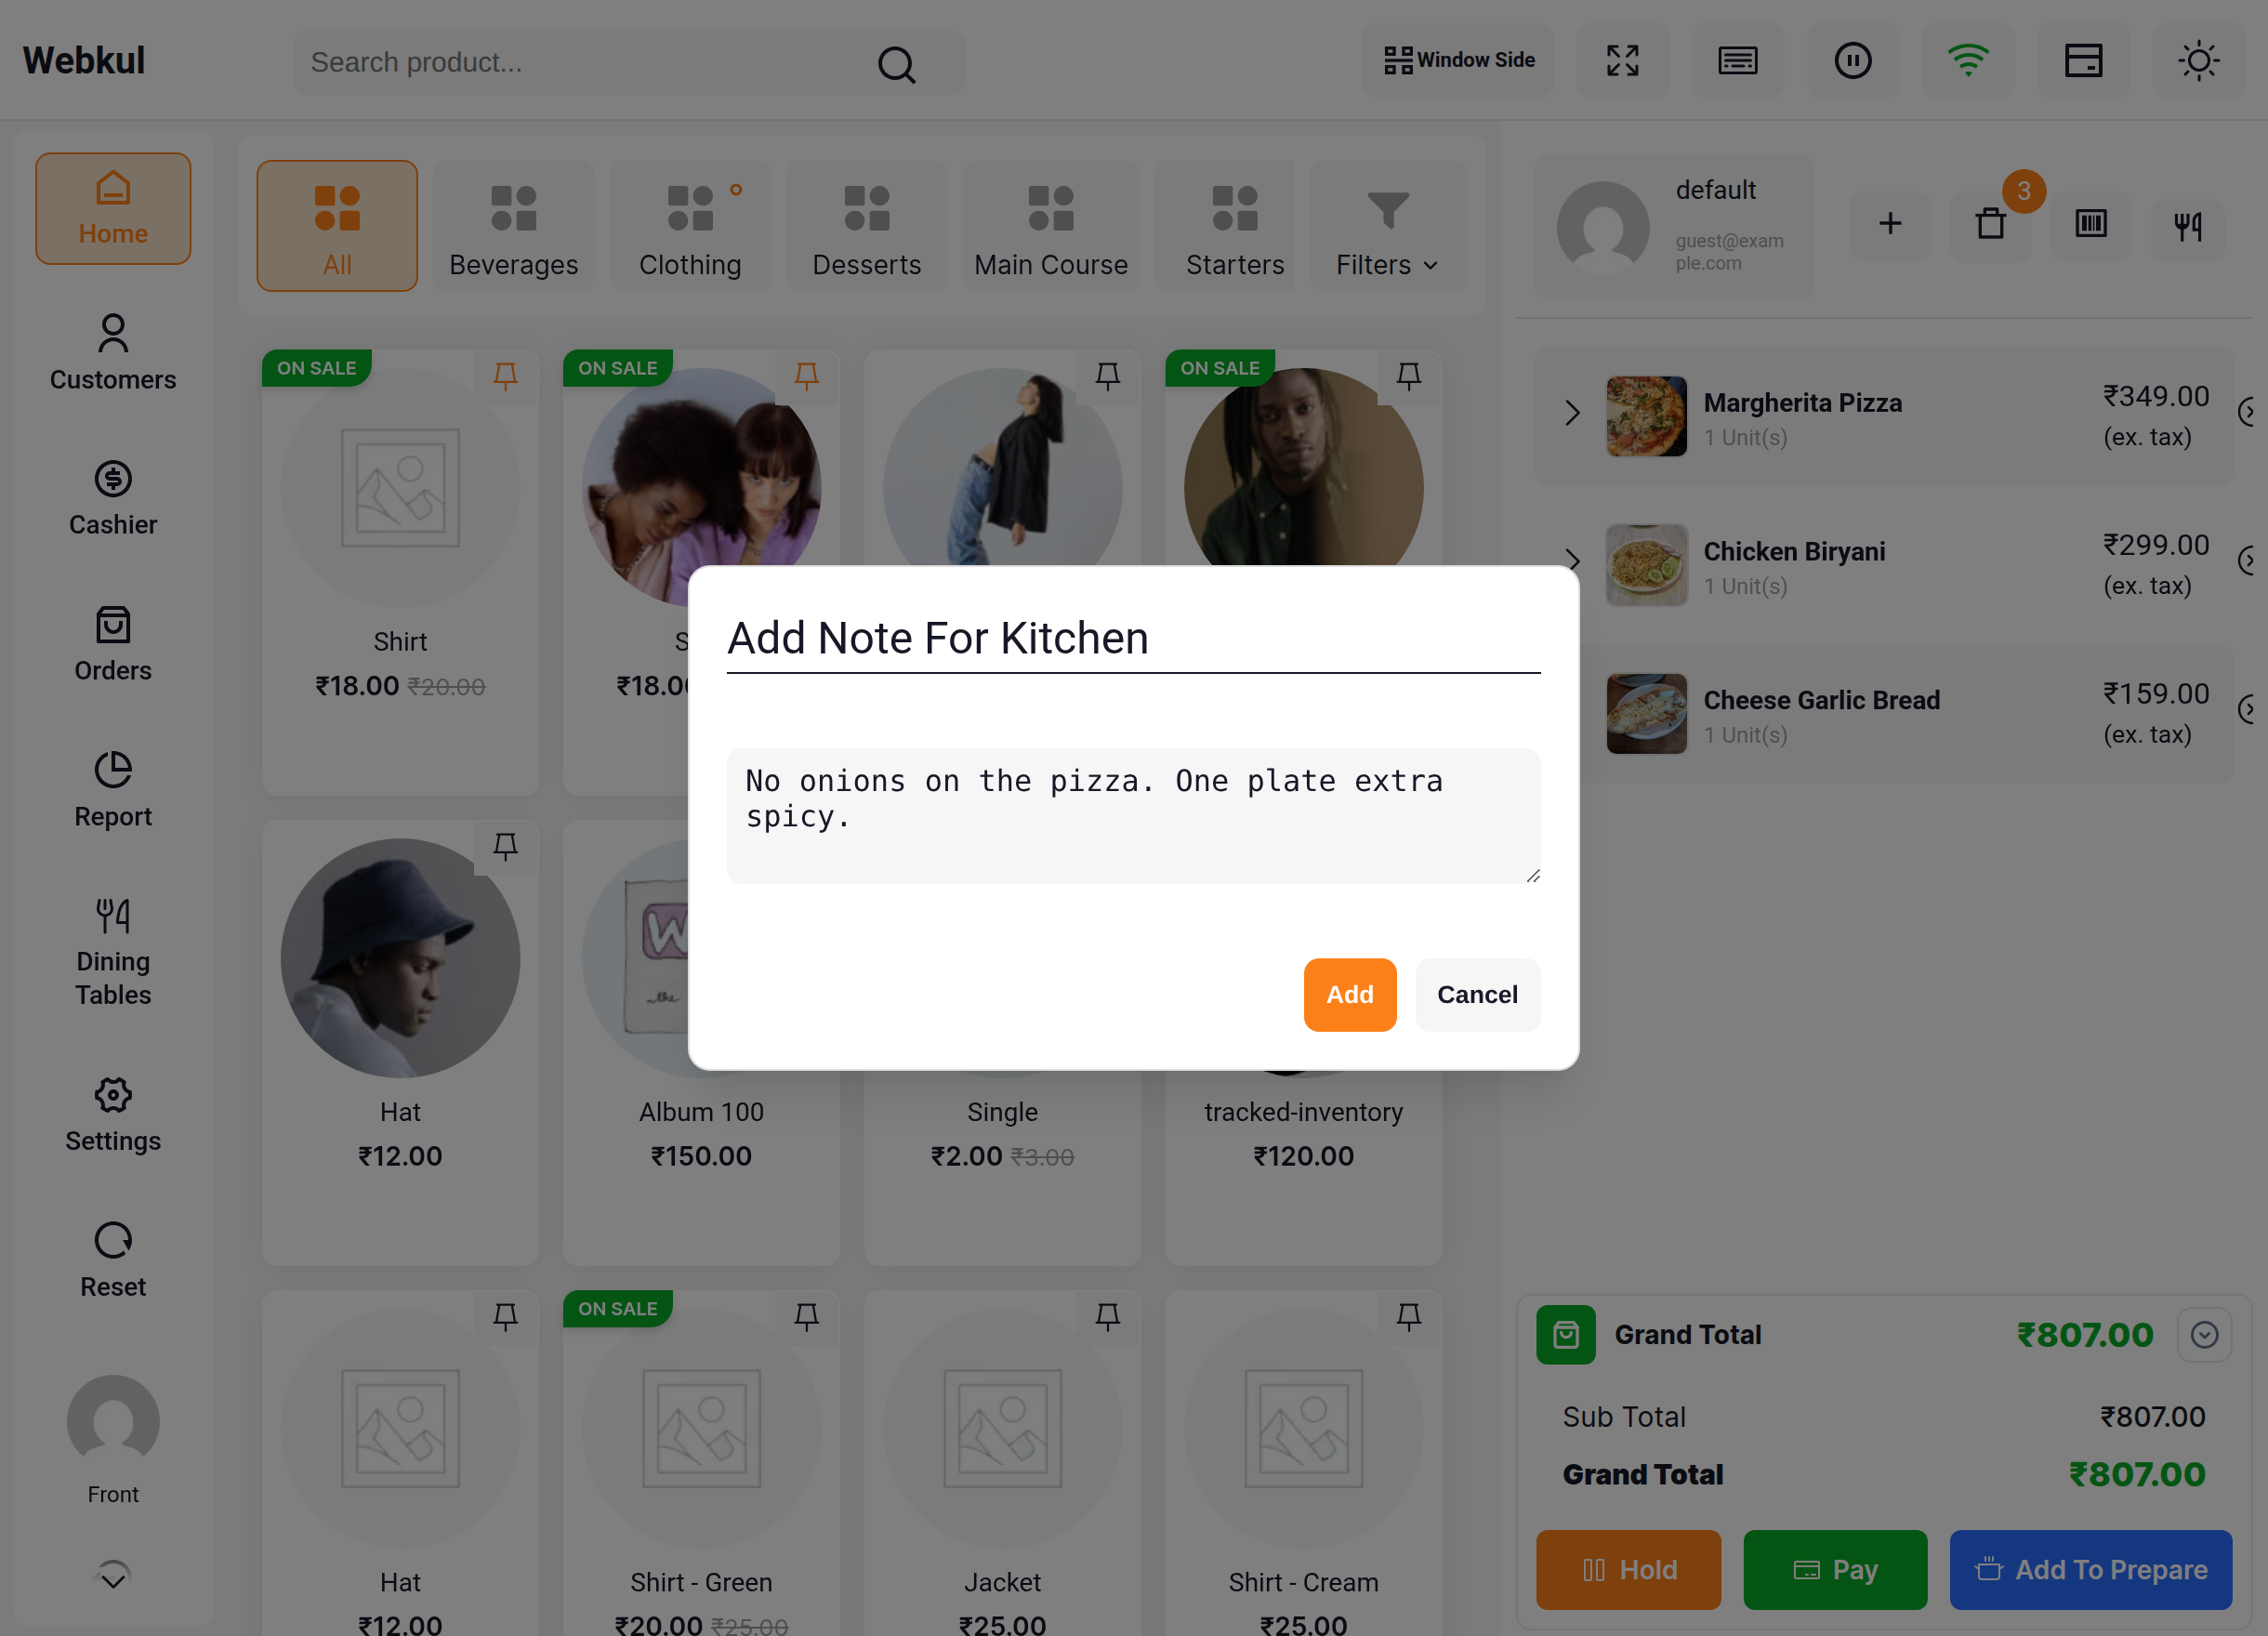
Select Add. The ticket is created, the cart is cleared, and the POS moves you to the Kitchen Orders tab where you can see it waiting. Cancel closes the popup and leaves the cart untouched.
Note
No WooCommerce order exists yet. A dine in ticket is a kitchen instruction; the WooCommerce order is created later, when you raise the bill.
Take away — send at payment
A take away order is sent to the kitchen when it is paid for, not before.
- Build the cart in take away mode.
- Select Pay.
- On the payment page, tick Add To Prepare.
- Take the payment as usual.
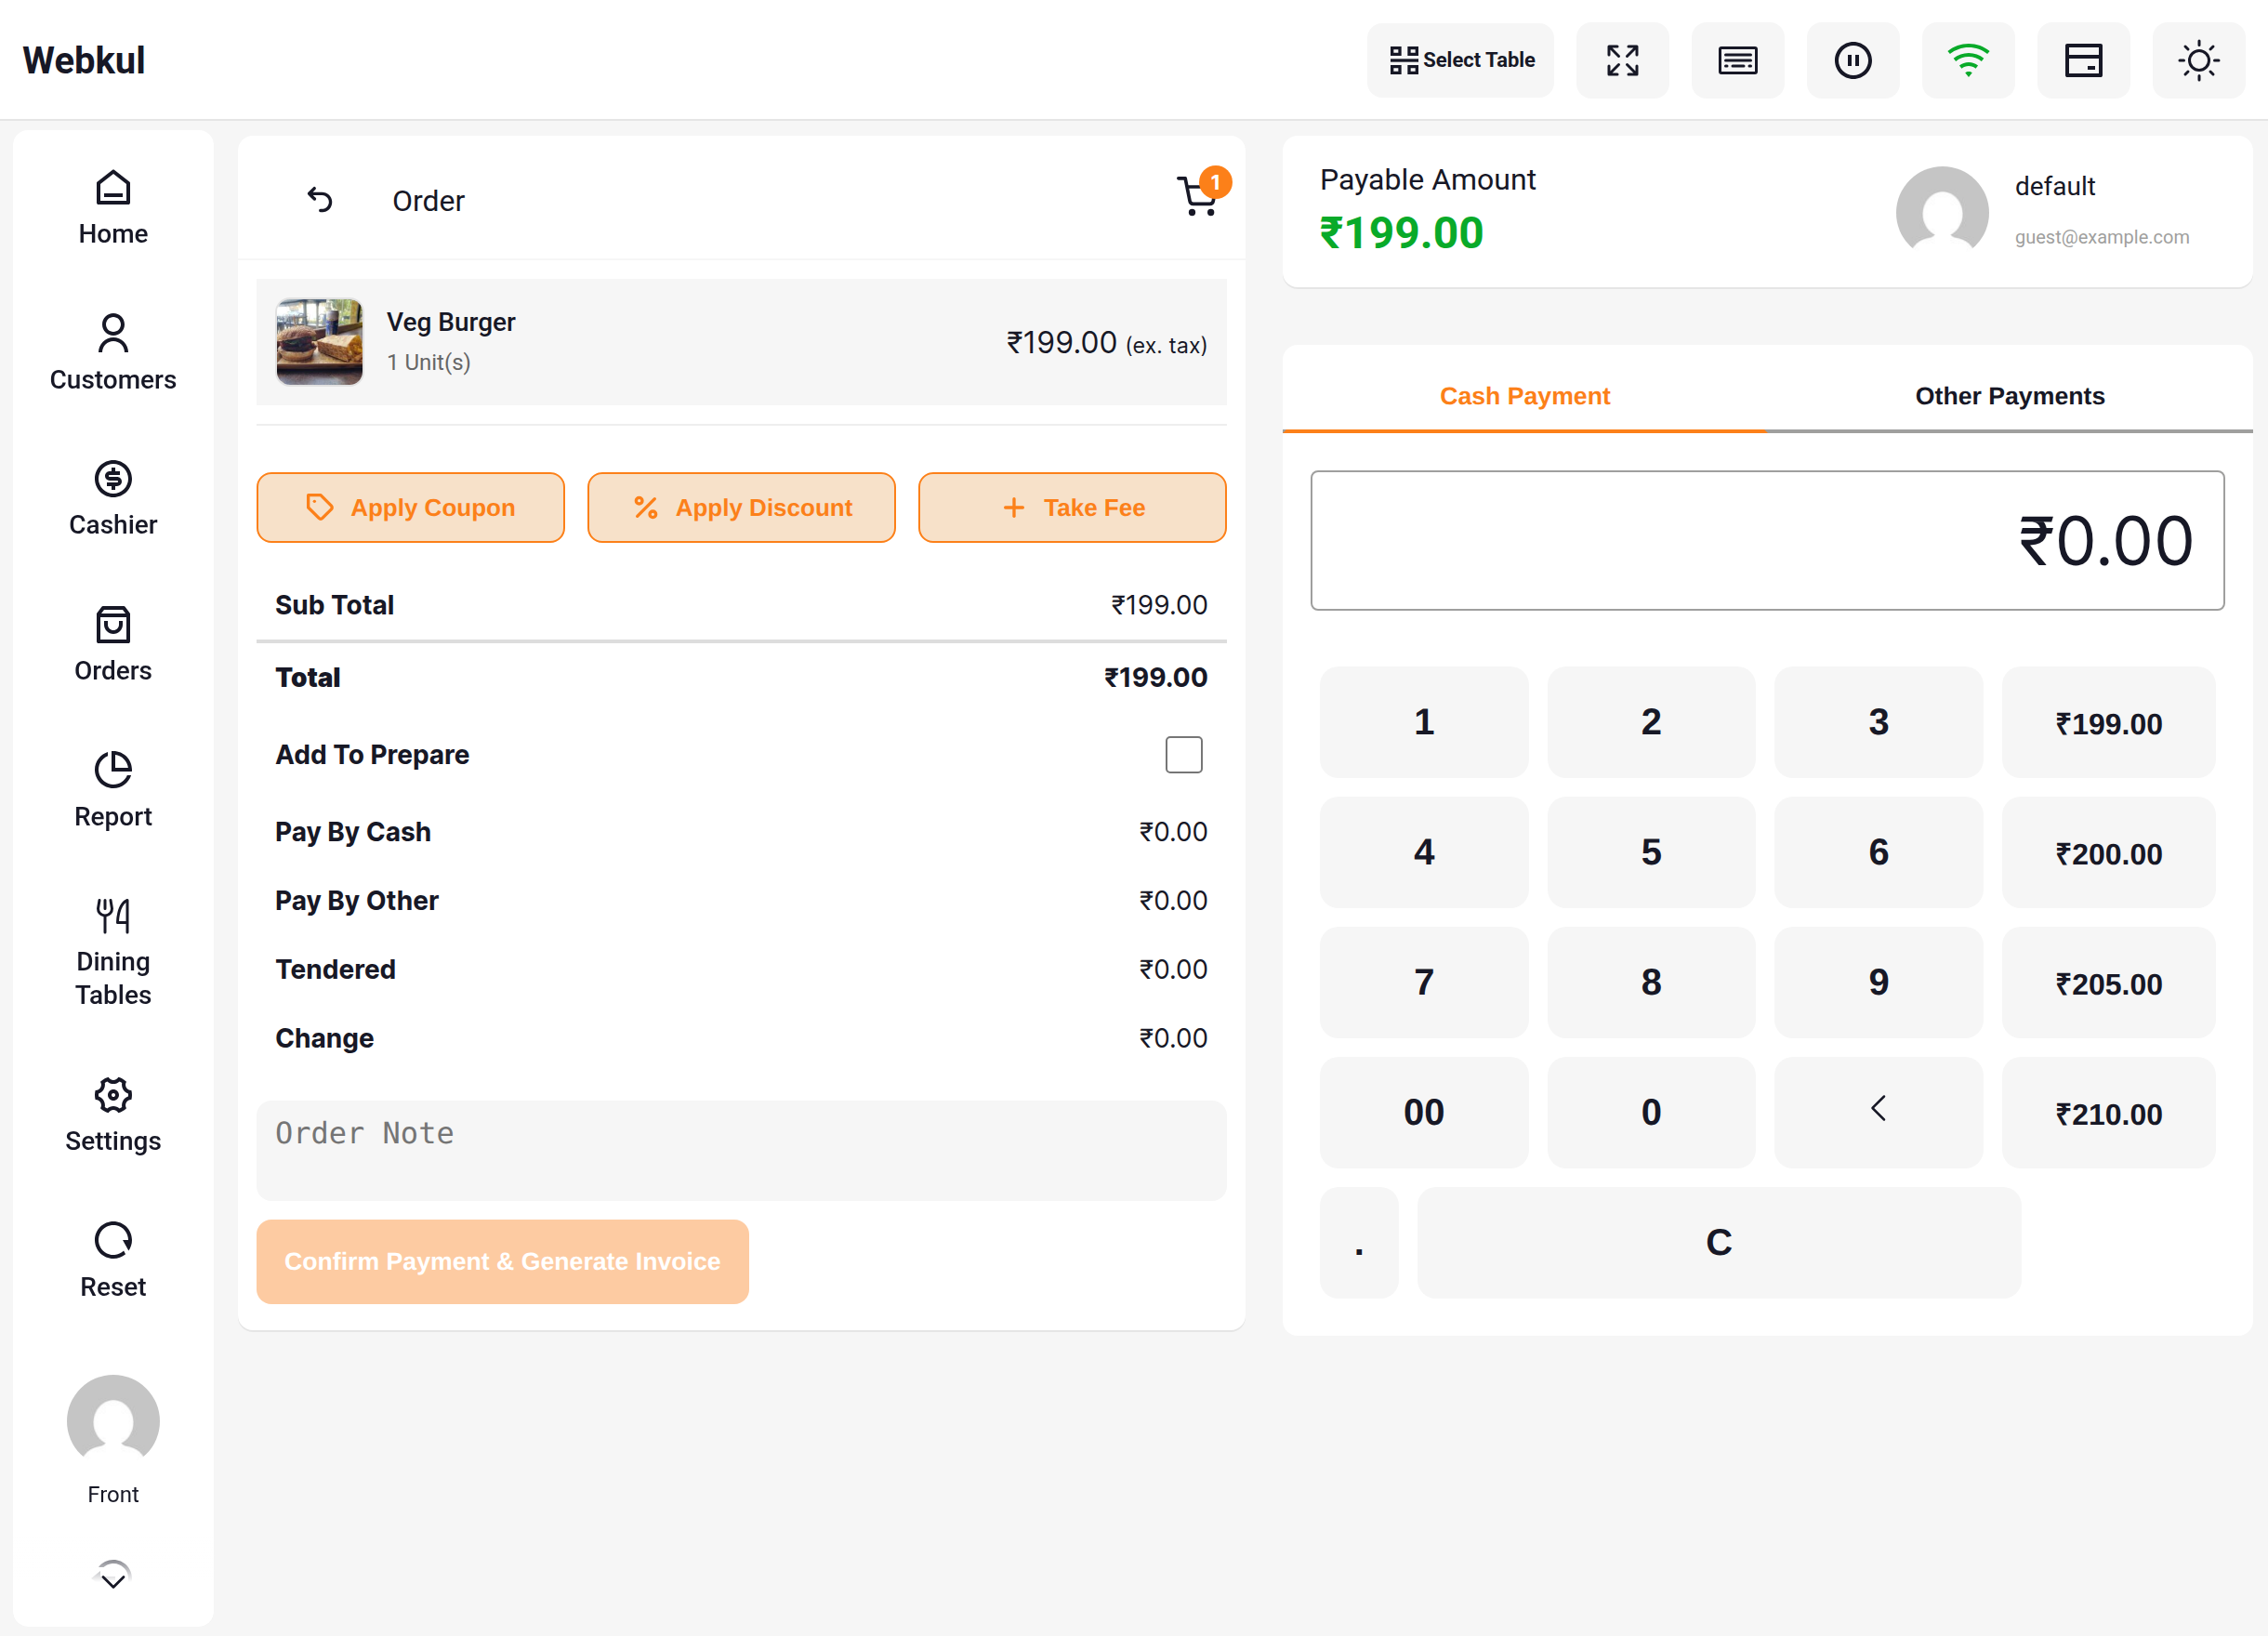
As soon as the order is created, the ticket appears on the kitchen board carrying the WooCommerce order number, so the counter and the kitchen are talking about the same number.
If you leave the box unticked, the order is completed normally and the kitchen never sees it — useful for items that need no preparation.
Tips
The cart Add To Prepare button refuses a take away cart with "You can not send order for preapare in take away mode." That is the module pointing you at this checkbox instead.
The three kitchen tabs
With Restaurant Point of Sale active, the module adds three tabs to Dining Tables.
| Tab | What it lists |
|---|---|
| Kitchen Orders | Tickets still waiting to be started |
| Sent Orders | Tickets the kitchen has finished and sent out |
| All Orders | On Hold, Preparing and Completed side by side |
Without Restaurant Point of Sale these same three views appear under a Kitchen entry in the POS side menu instead.
Kitchen Orders
Expand a ticket to see its items and its actions.
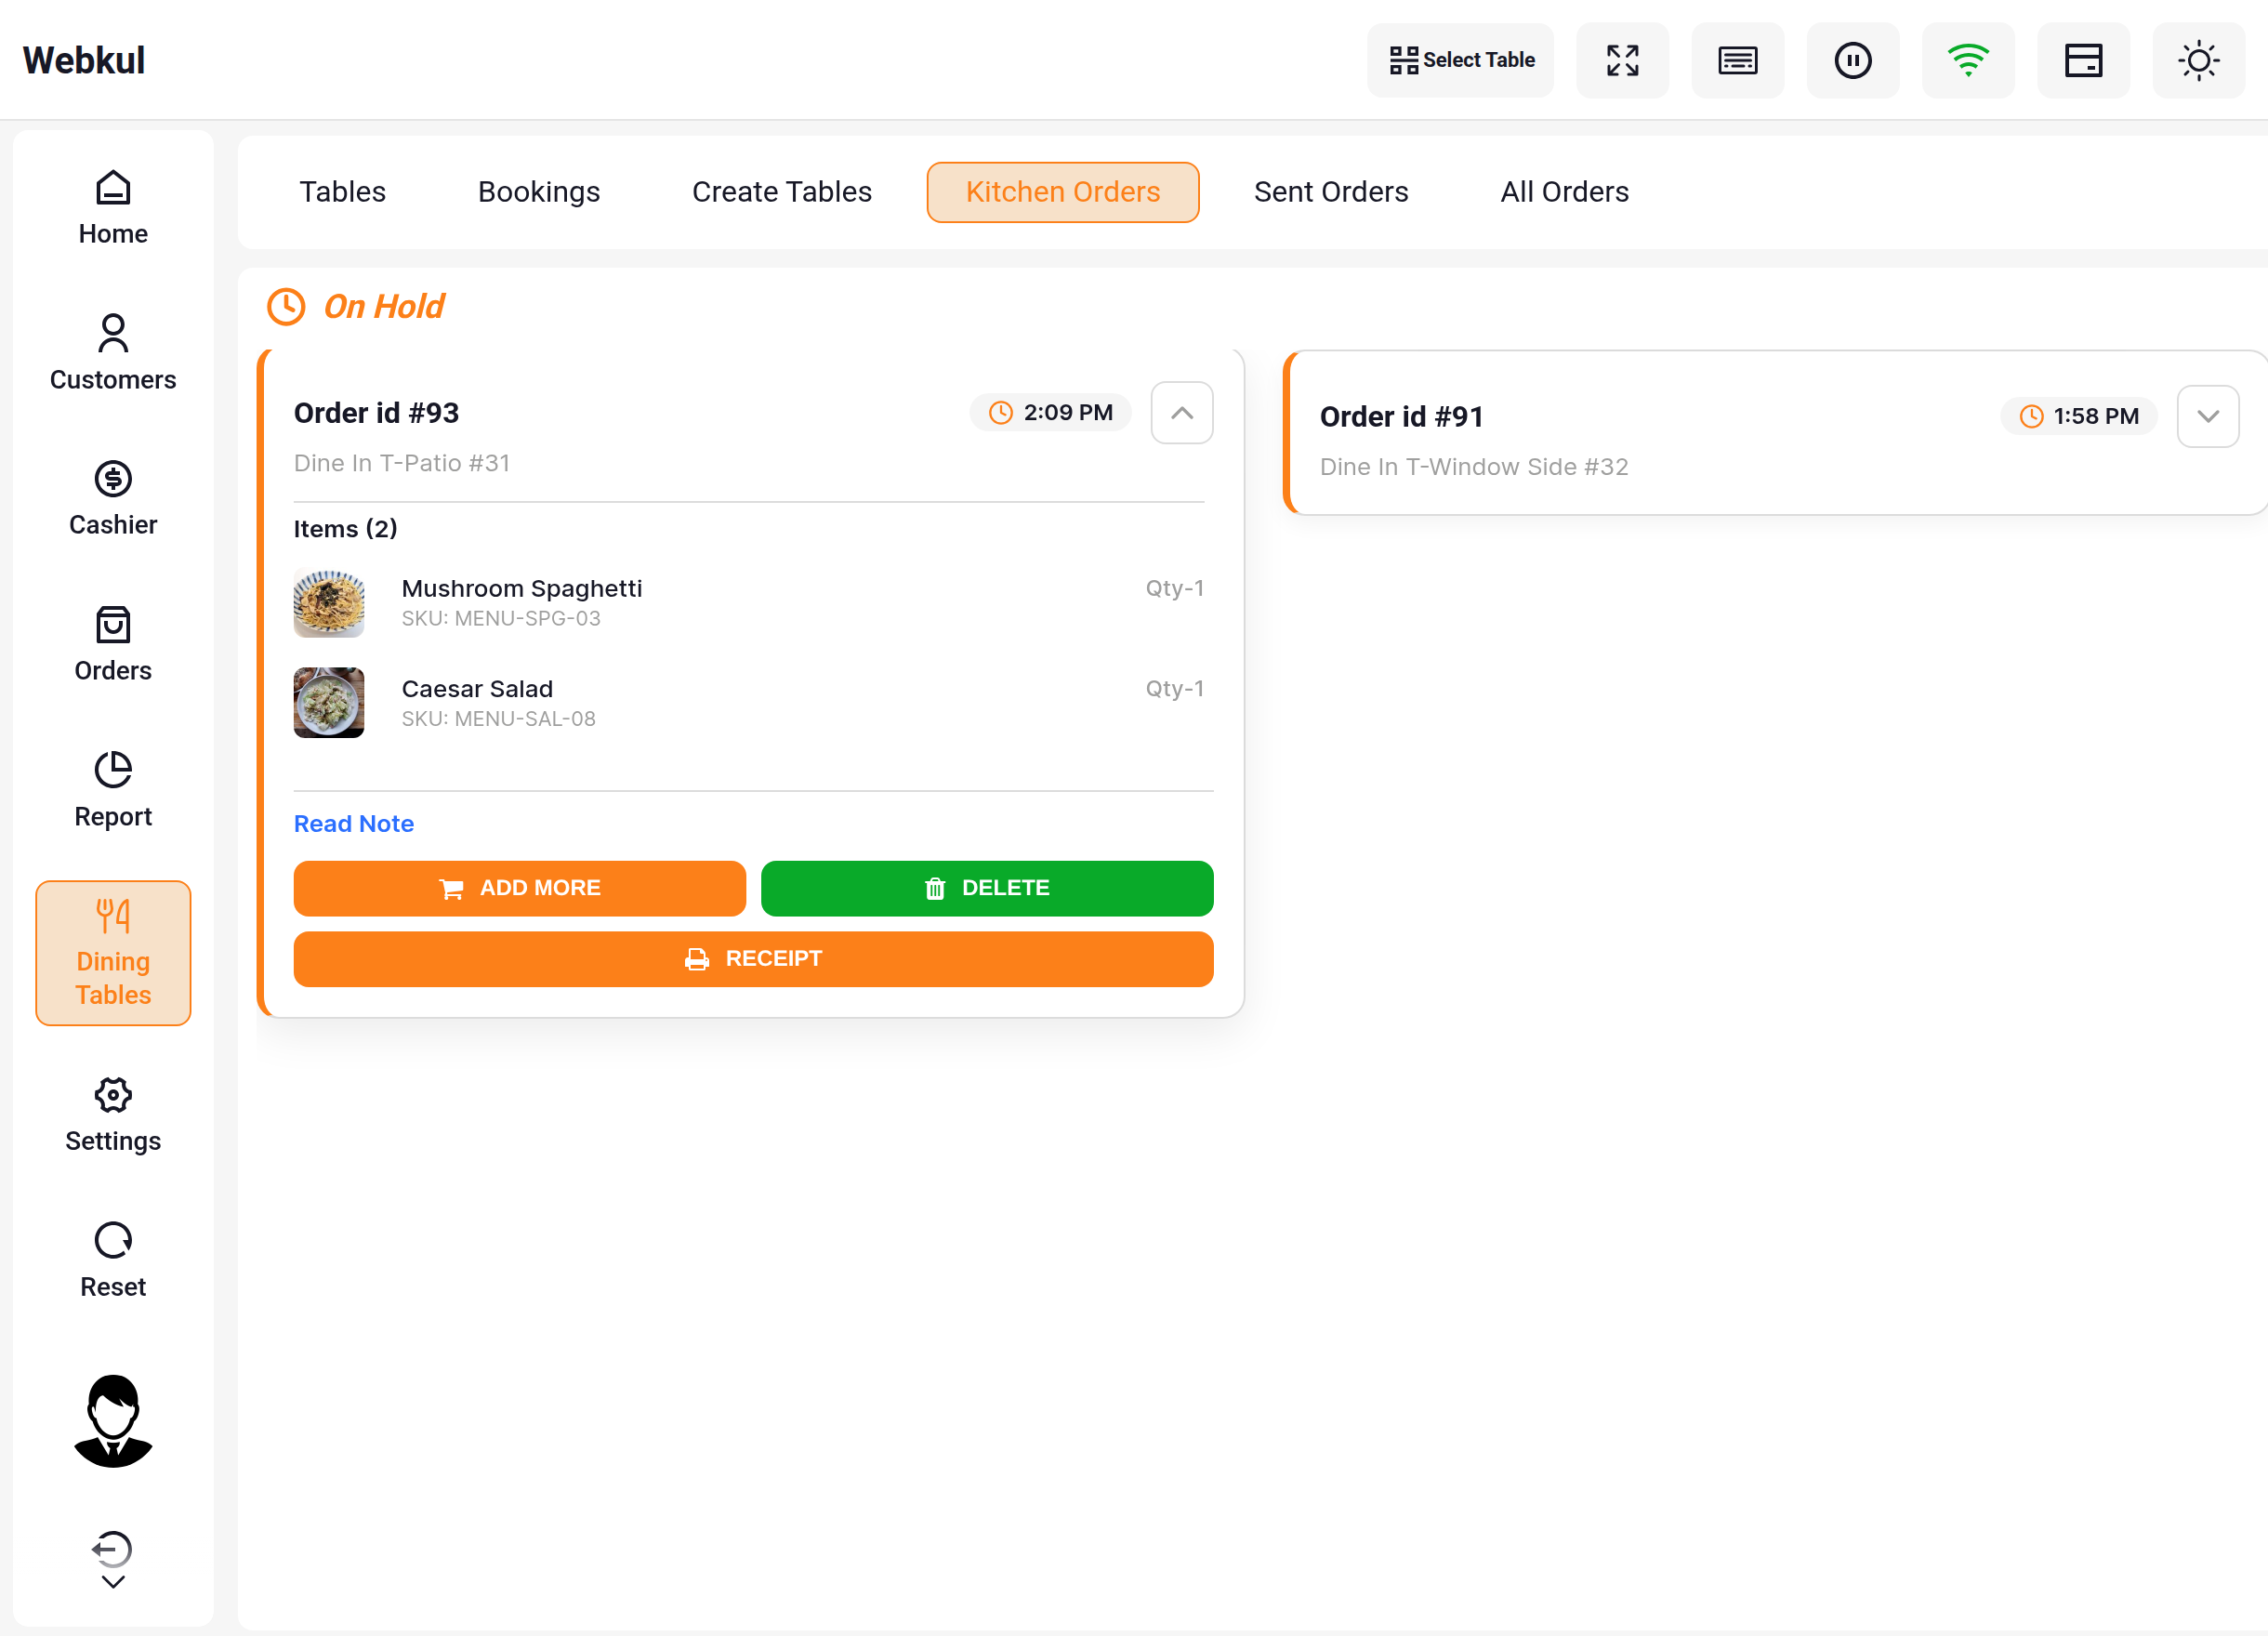
| Action | What it does |
|---|---|
| ADD MORE | Loads the ticket back into the POS cart so you can add more dishes to the same table. Dine in only, and the cart must be empty first. |
| DELETE | Removes the ticket from the kitchen. Use it when a table cancels before the food is started. |
| RECEIPT | Prints the kitchen ticket — product names, quantities, the order number, the date, the customer, the cashier and the note. Prices are deliberately left off. |
| THERMAL RECEIPT | The same ticket sent to a thermal printer. This extra button appears only when the WooCommerce POS Thermal Printer add on is active. |
Note
With the thermal printer add on active you also get a Print Thermal Receipt button when you open a past order under Orders in the POS, so a customer bill can be reprinted from the sales history without going back through the kitchen tabs. That button belongs to the thermal printer add on, not to this module.
Sent Orders
The kitchen has finished these and handed them out.
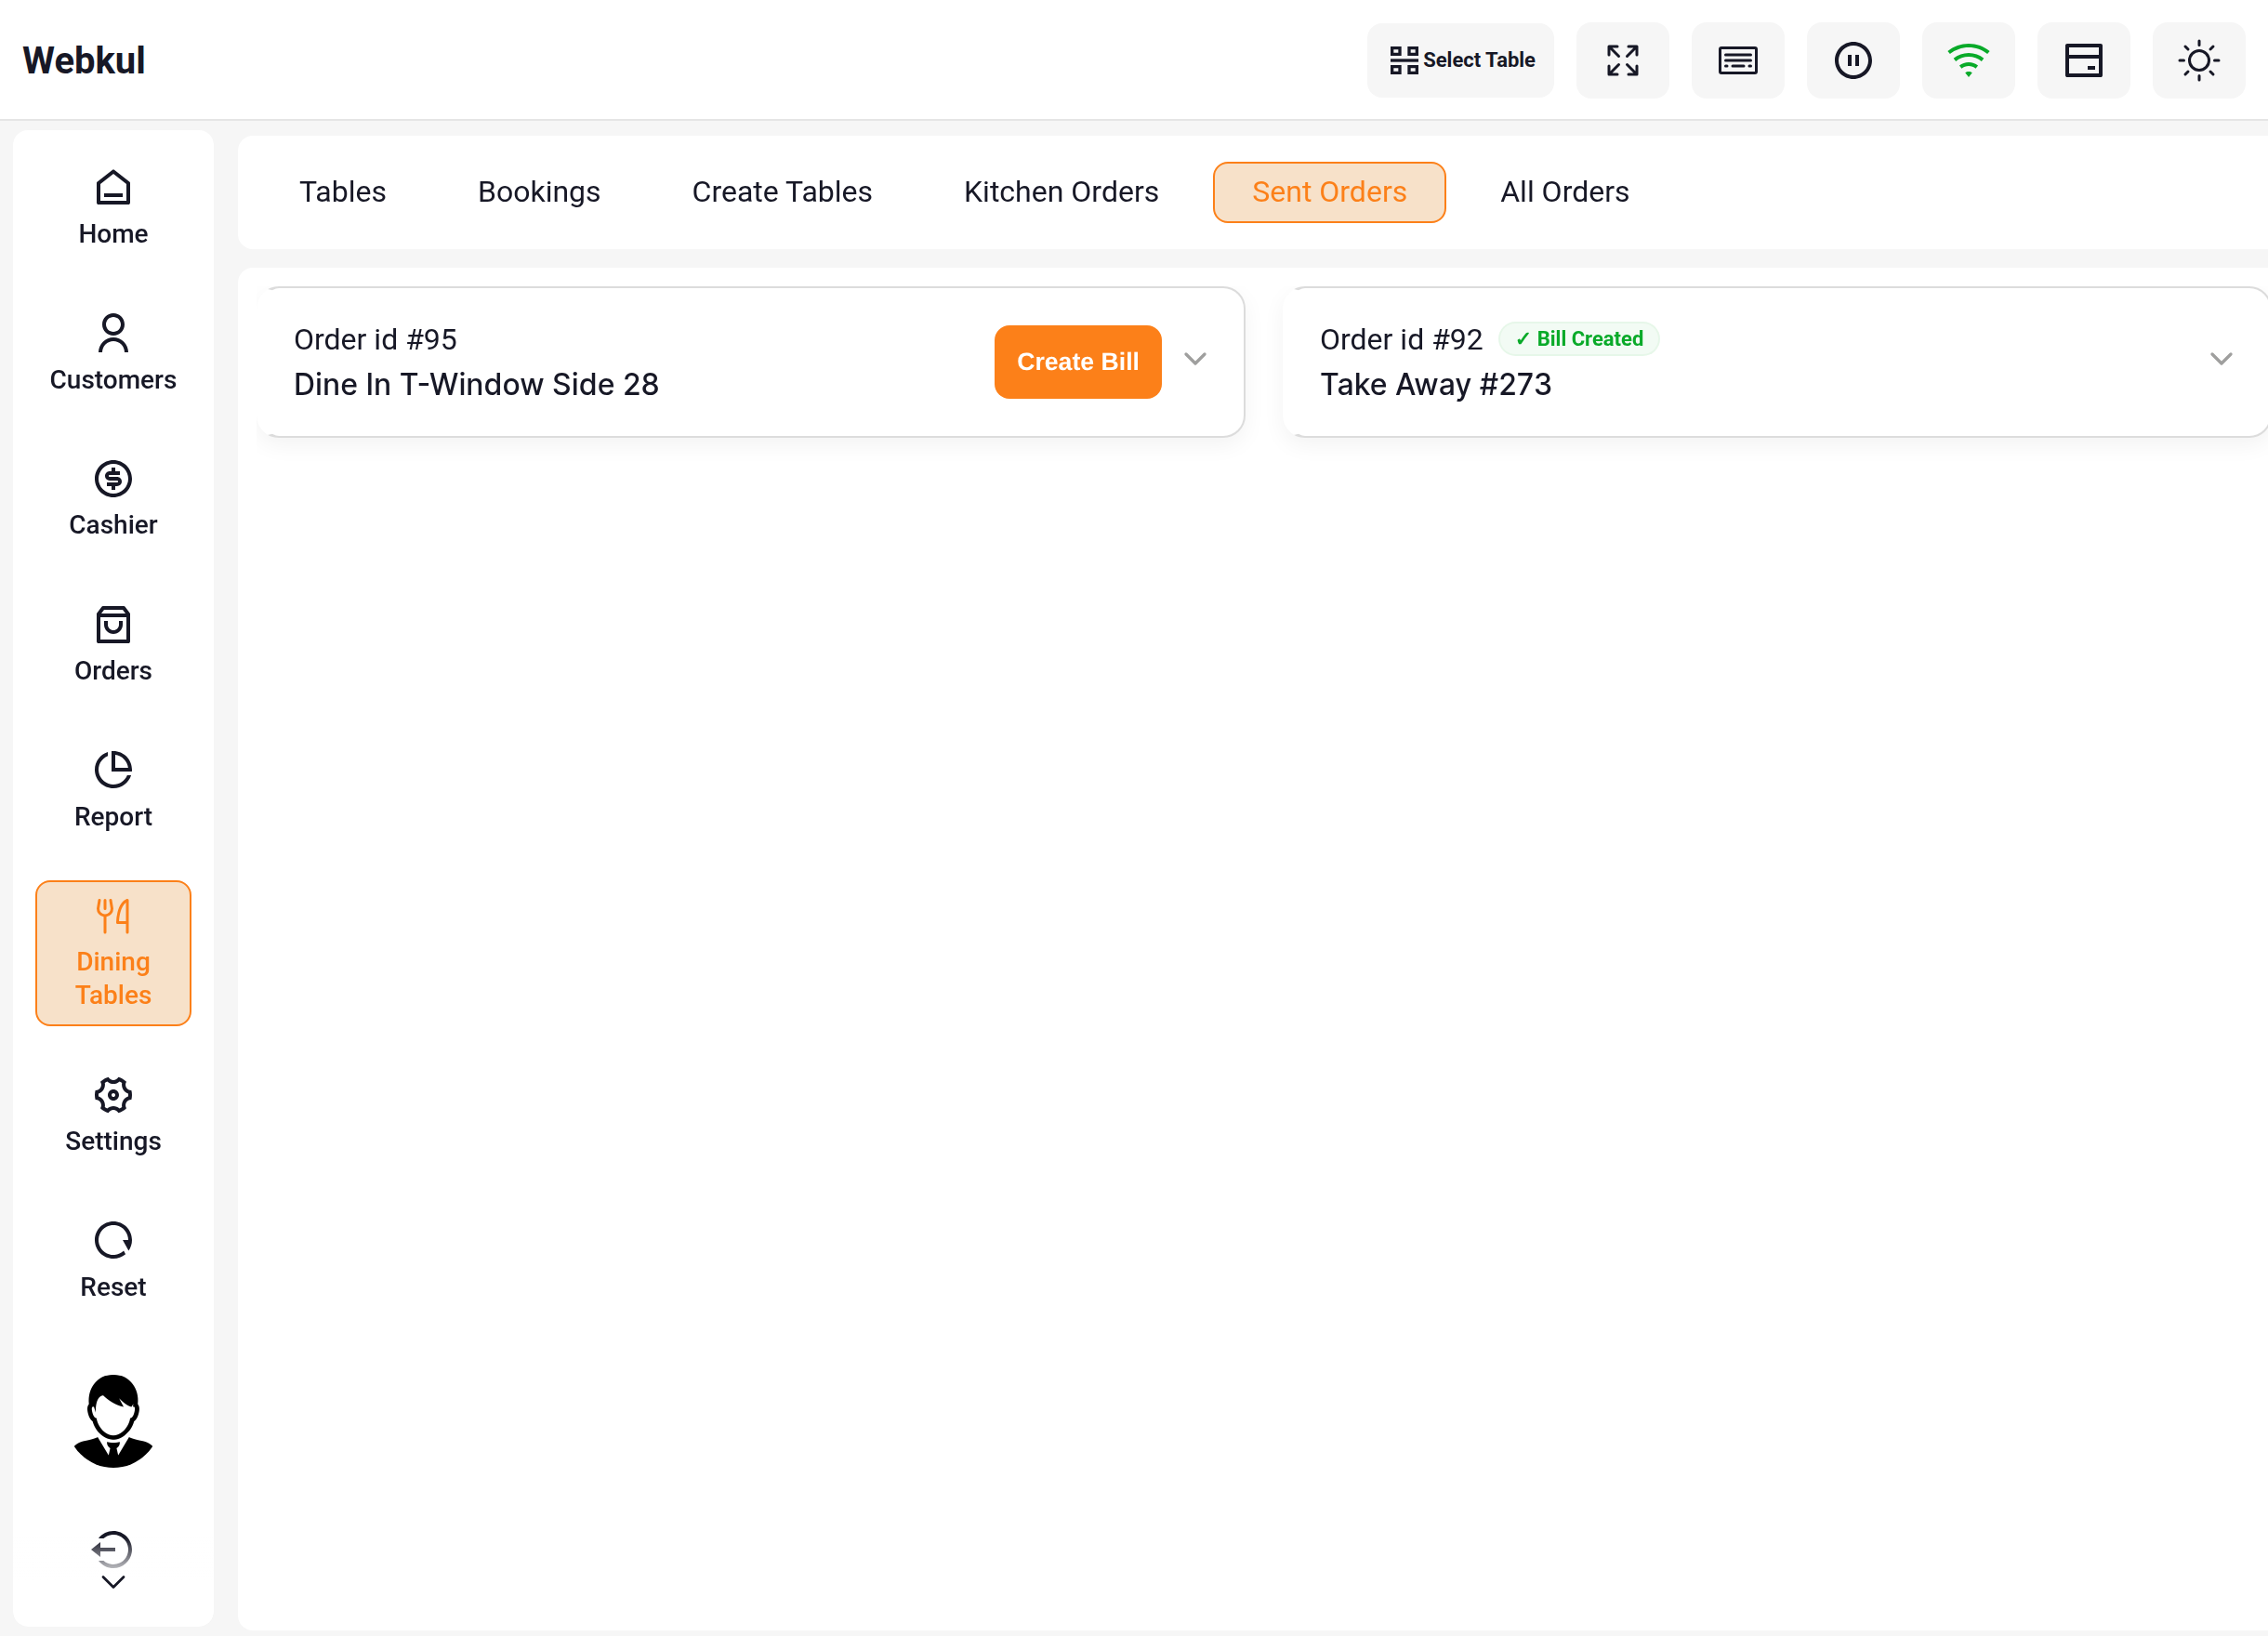
Select anywhere on a card to expand it and see the items, exactly as on the other tabs.
| Action | What it does |
|---|---|
| Create Bill | Loads the ticket back into the POS cart, restores the table and the customer, and jumps straight to the payment page. Dine in only. The card is then marked Bill Created. |
| Back to Hold | Returns the ticket to the kitchen's On Hold column, for a plate that has to be remade. |
| Read Note | Shows the kitchen note that was attached when the ticket was sent. |
Billing the same table twice
If Create Bill is used on a ticket that already carries the Bill Created badge, the POS stops and asks first:
Bill Already Created
Bill has already been created for Order #78. Do you want to create it again?
Cancel leaves everything alone. Create Again loads the ticket back into the cart and opens the payment page as normal. It is there to catch the accidental second tap, not to prevent a genuine re-bill.
All Orders
A read only view of the three working columns, so the counter can see how busy the kitchen is without walking over to the pass.
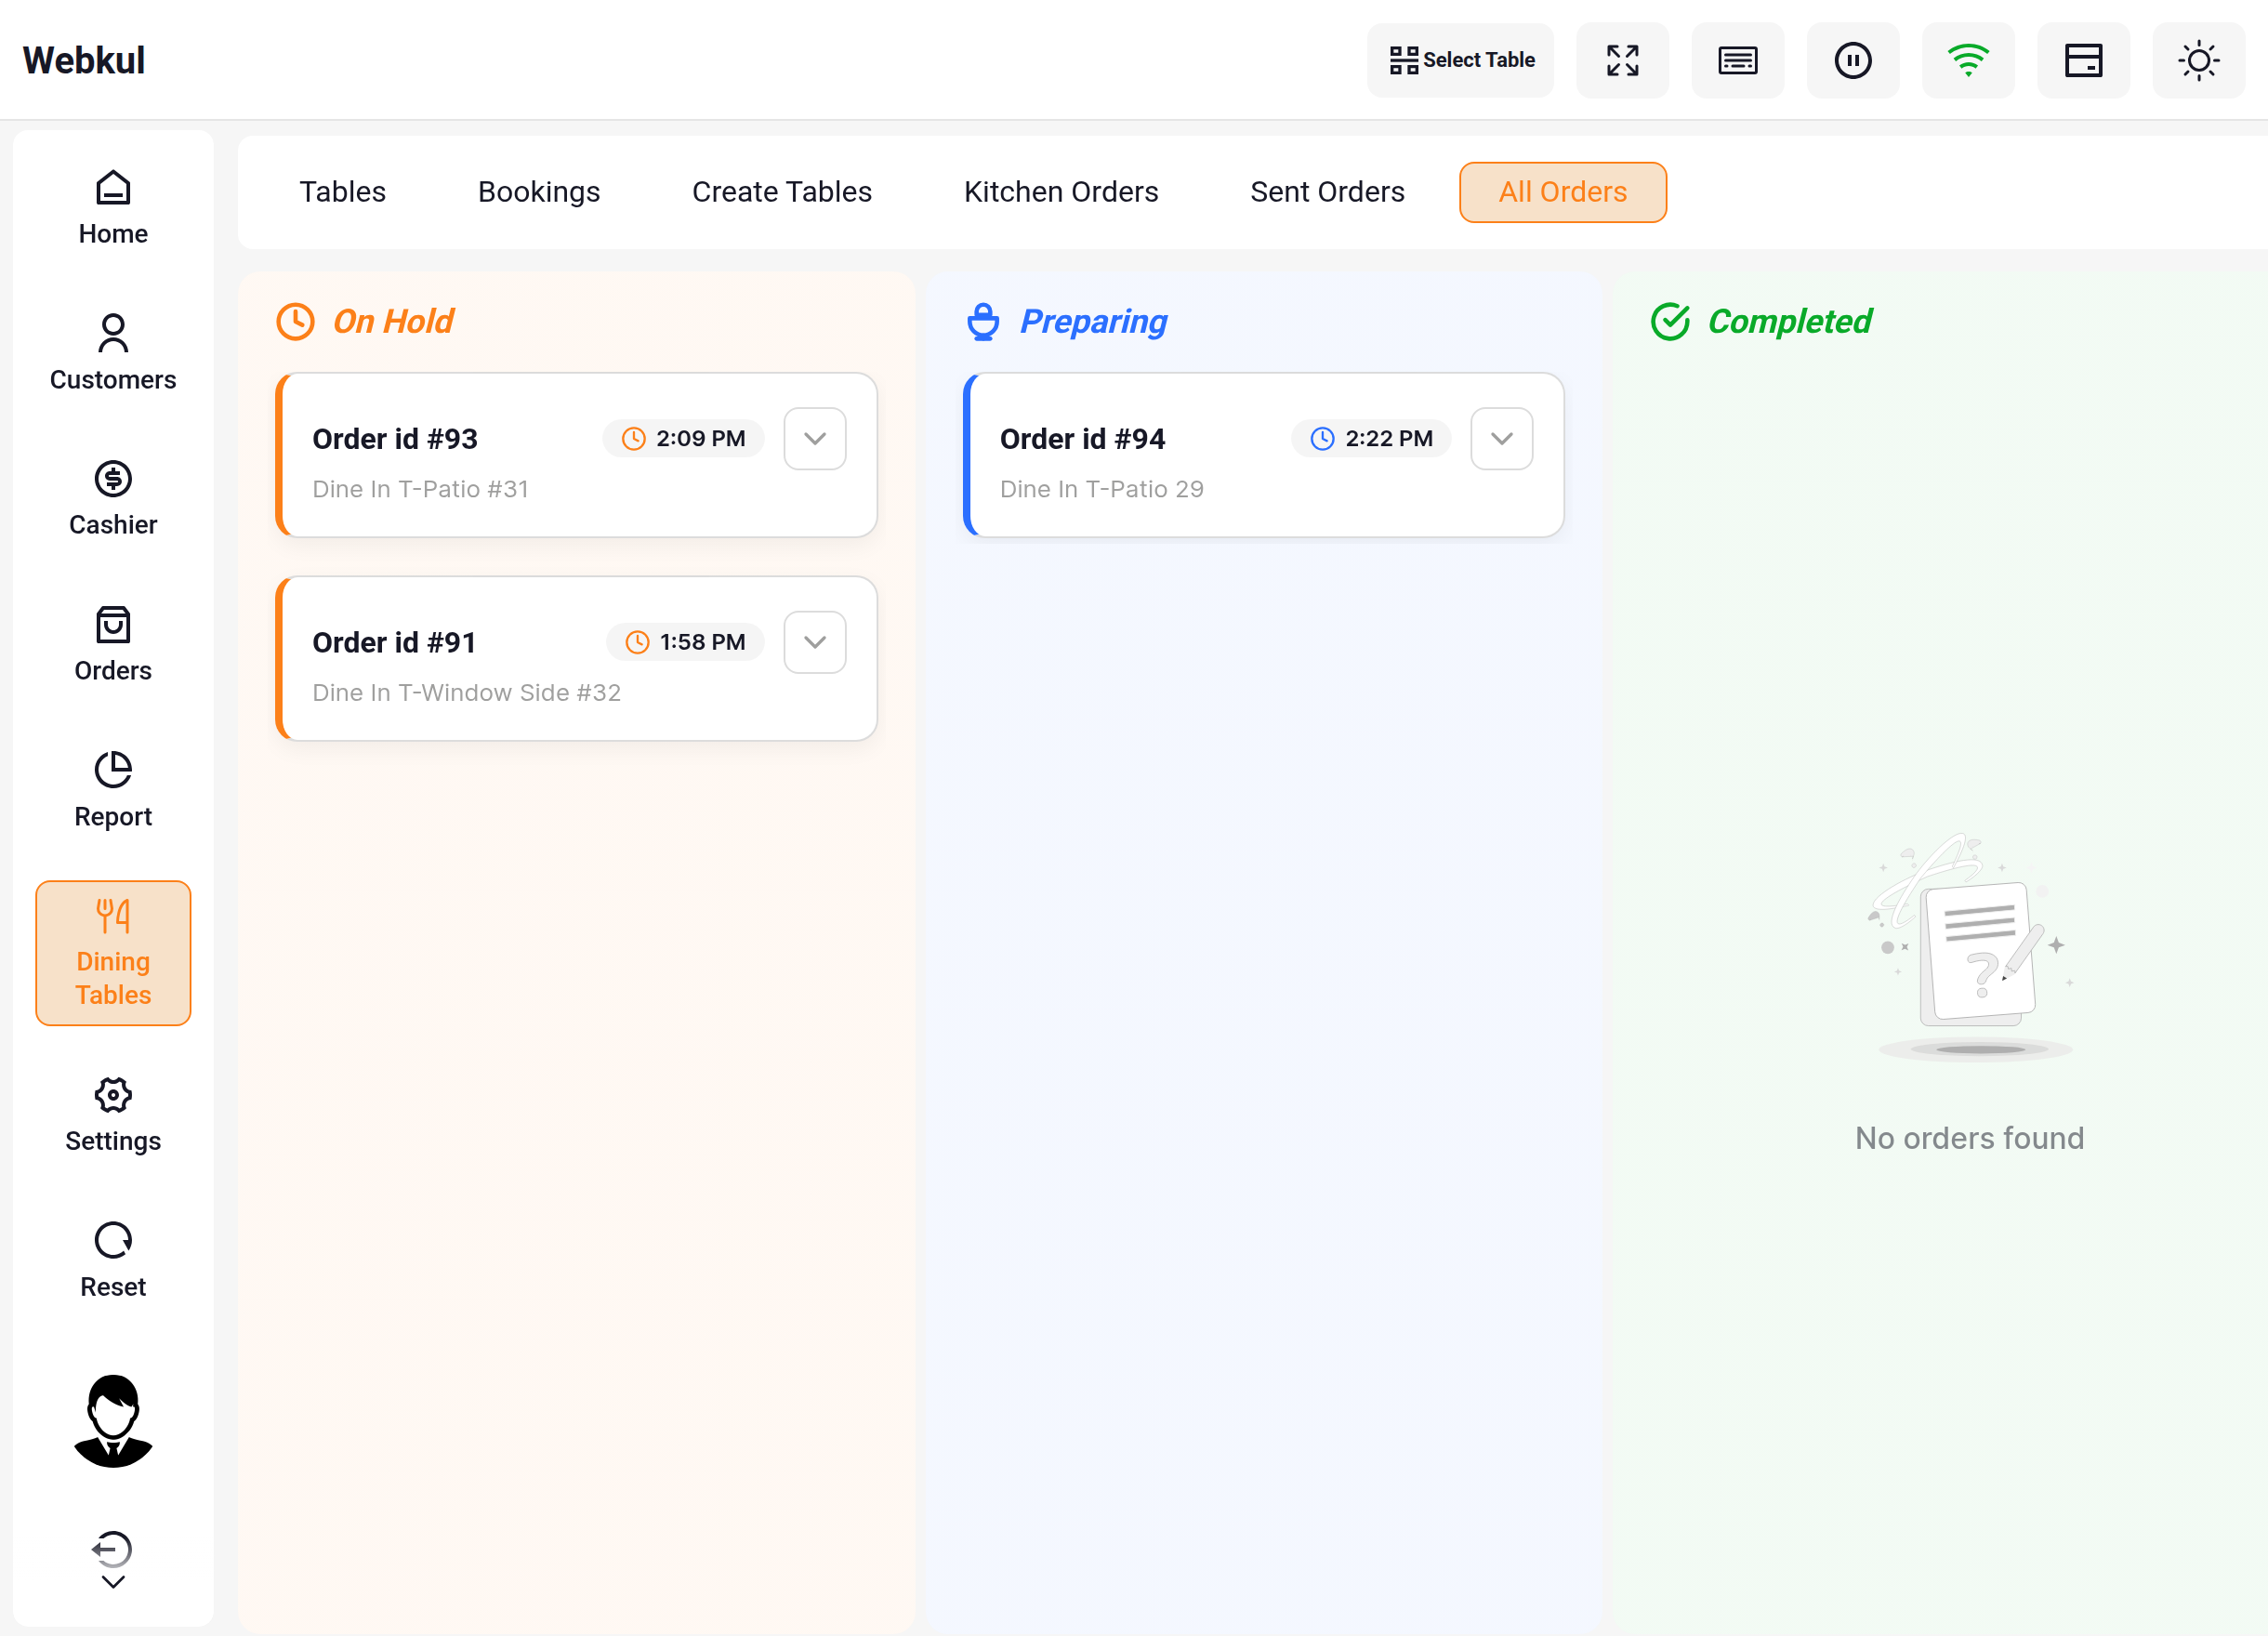
On a narrow screen the three columns collapse into one tab per status.
Raising the bill for a table
- Open Dining Tables → Sent Orders.
- Find the ticket for the table and select Create Bill.
- The POS loads the items into the cart and opens the payment page.
- Take the payment by cash or by any other method you have set up, then select Confirm Payment & Generate Invoice.
- A success message appears with a PRINT INVOICE button for the customer's bill.
If the cart is not empty, the POS refuses with "Your cart has some products first empty the cart." Clear the cart and try again.
The card is marked Bill Created once the ticket has been billed, so the same table is not billed twice by mistake.
Messages you may see
| Message | Why | What to do |
|---|---|---|
| Cart can not be empty. | Add To Prepare with nothing in the cart | Add the dishes first |
| You can not send order for preapare in take away mode. | The cart is a take away | Use the payment page checkbox instead |
| Please select booking table from booking tab first. | No table is open | Open the table from Dining Tables |
| You can not operate this in offline mode | The till has lost its internet connection | Restore the connection and try again |
| You can not add more products for take away orders. | ADD MORE on a take away ticket | Not supported. Send a second ticket instead |
| Your cart has some products first empty the cart. | ADD MORE or Create Bill with a cart already open | Clear or park the current cart |
Next step
See what the kitchen does with the ticket in Kitchen Screen.