
Customers
The Customers tab links the people who buy from your store with the customers in your QuickBooks company, so exported orders attach to the right customer record.
Open Webkul WC Addons → WC Quick Book Connector → Customers.
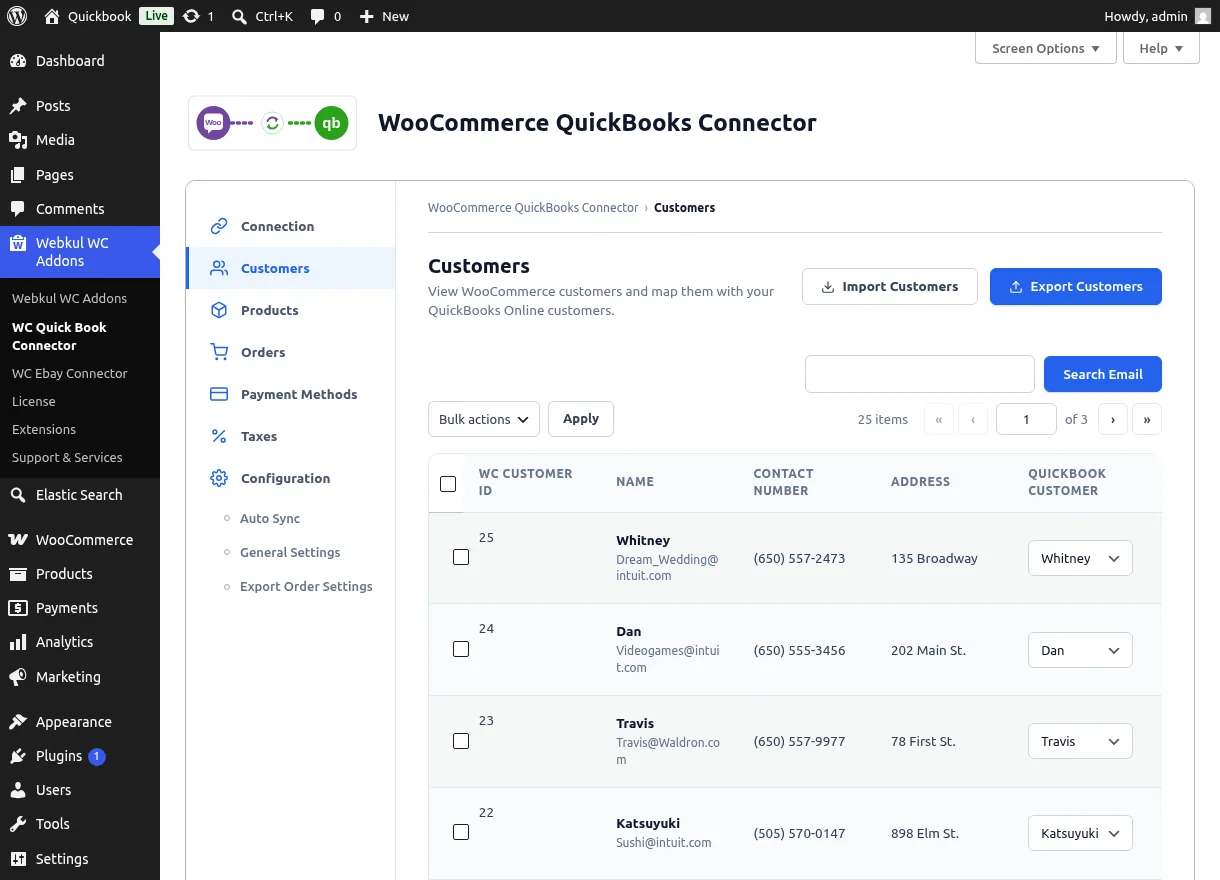
Reading the List
| Column | Meaning |
|---|---|
| WC Customer ID | The WooCommerce user ID |
| Name | Customer name and email |
| Contact Number | Phone from the customer profile |
| Address | Billing address |
| Quickbook Customer | The mapped QuickBooks customer, or Not Synced |
Use the search box to find a customer by email, and Screen Options (top right) to change rows per page.
Importing Customers from QuickBooks
- Click Import Customers in the page header.
- A progress panel appears — leave the page open while it runs.
- QuickBooks customers are created as WooCommerce users and mapped automatically. Existing mappings are recognized, so re-running an import does not duplicate customers.
Exporting Customers to QuickBooks
- Tick the checkbox for each customer you want to export.
- Click Export Customers.
- The progress panel shows each batch as it uploads. Exported customers appear in the Quickbook Customer column once done.
Selection required
Export works on the customers you tick. If nothing is selected, the connector asks you to select at least one record first.
Mapping a Customer by Hand
Already have the same person in both systems? Open the Quickbook Customer dropdown on their row, search the live QuickBooks customer list, and pick the match — the mapping saves immediately.
Row Actions
Hover a row's ID to reveal:
- Delete — removes the WooCommerce user and its mapping (a confirmation dialog explains this first).
- Clear Mapping — removes only the QuickBooks link; the customer stays untouched and can be re-mapped any time.
Related Features
- Orders — exported orders use these customer mappings
- Connection Settings — customer lists load live from the connected company