
Internal Transfers
Internal transfers move stock between your own warehouses with the same discipline as an order: request, approval, stock validation, picking, packing, dispatch and receiving — with a full audit trail and email notifications at every step.
Two sides take part in every transfer:
- the Requesting Warehouse — asks for stock and later receives it;
- the Supplying Warehouse — approves, picks, packs and dispatches it.
Approval decisions need a Warehouse Manager (or admin) of the relevant side; the physical steps (pick, pack, dispatch, receive) can also be done by that side's Warehouse Staff. Transfers move units between bins only — WooCommerce stock totals never change.
The transfer list
Open Purchasing → Internal Transfers.
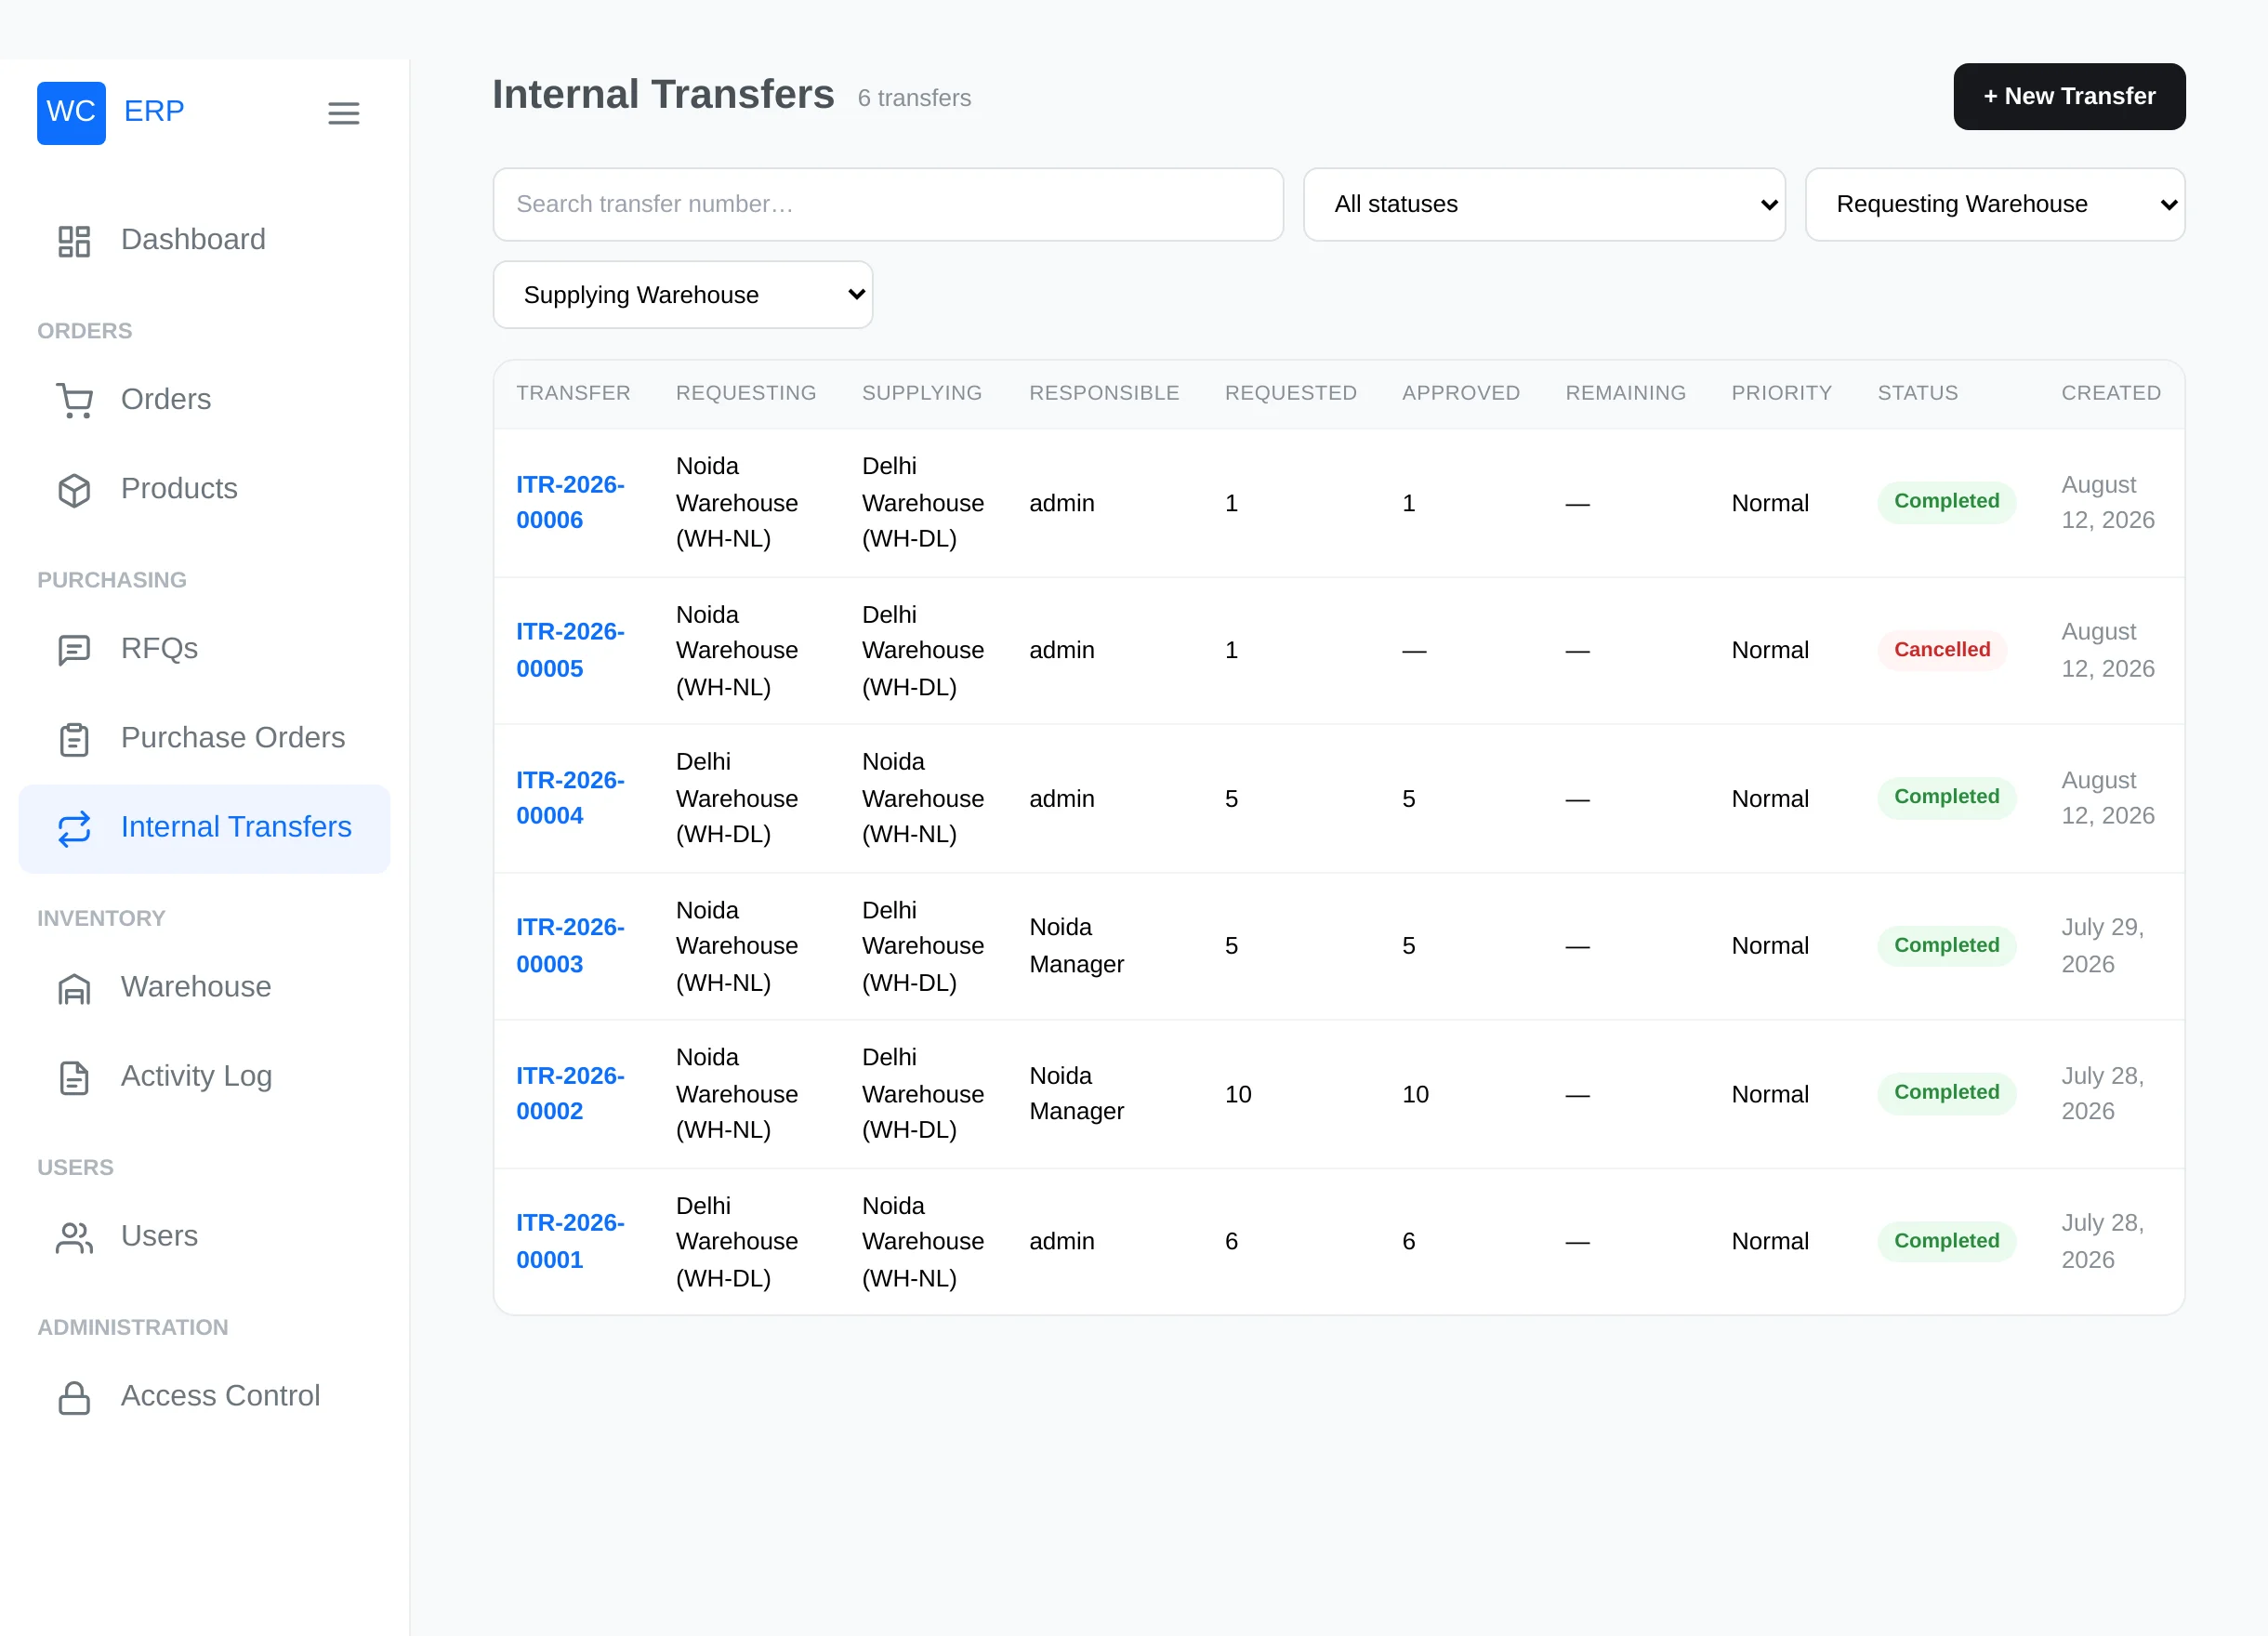
Search by transfer number; filter by status and by either warehouse. Columns include the requested / approved / remaining quantities and the priority. The sidebar badge on Internal Transfers counts the transfers waiting for your decision.
Create a transfer request
Click + New Transfer.
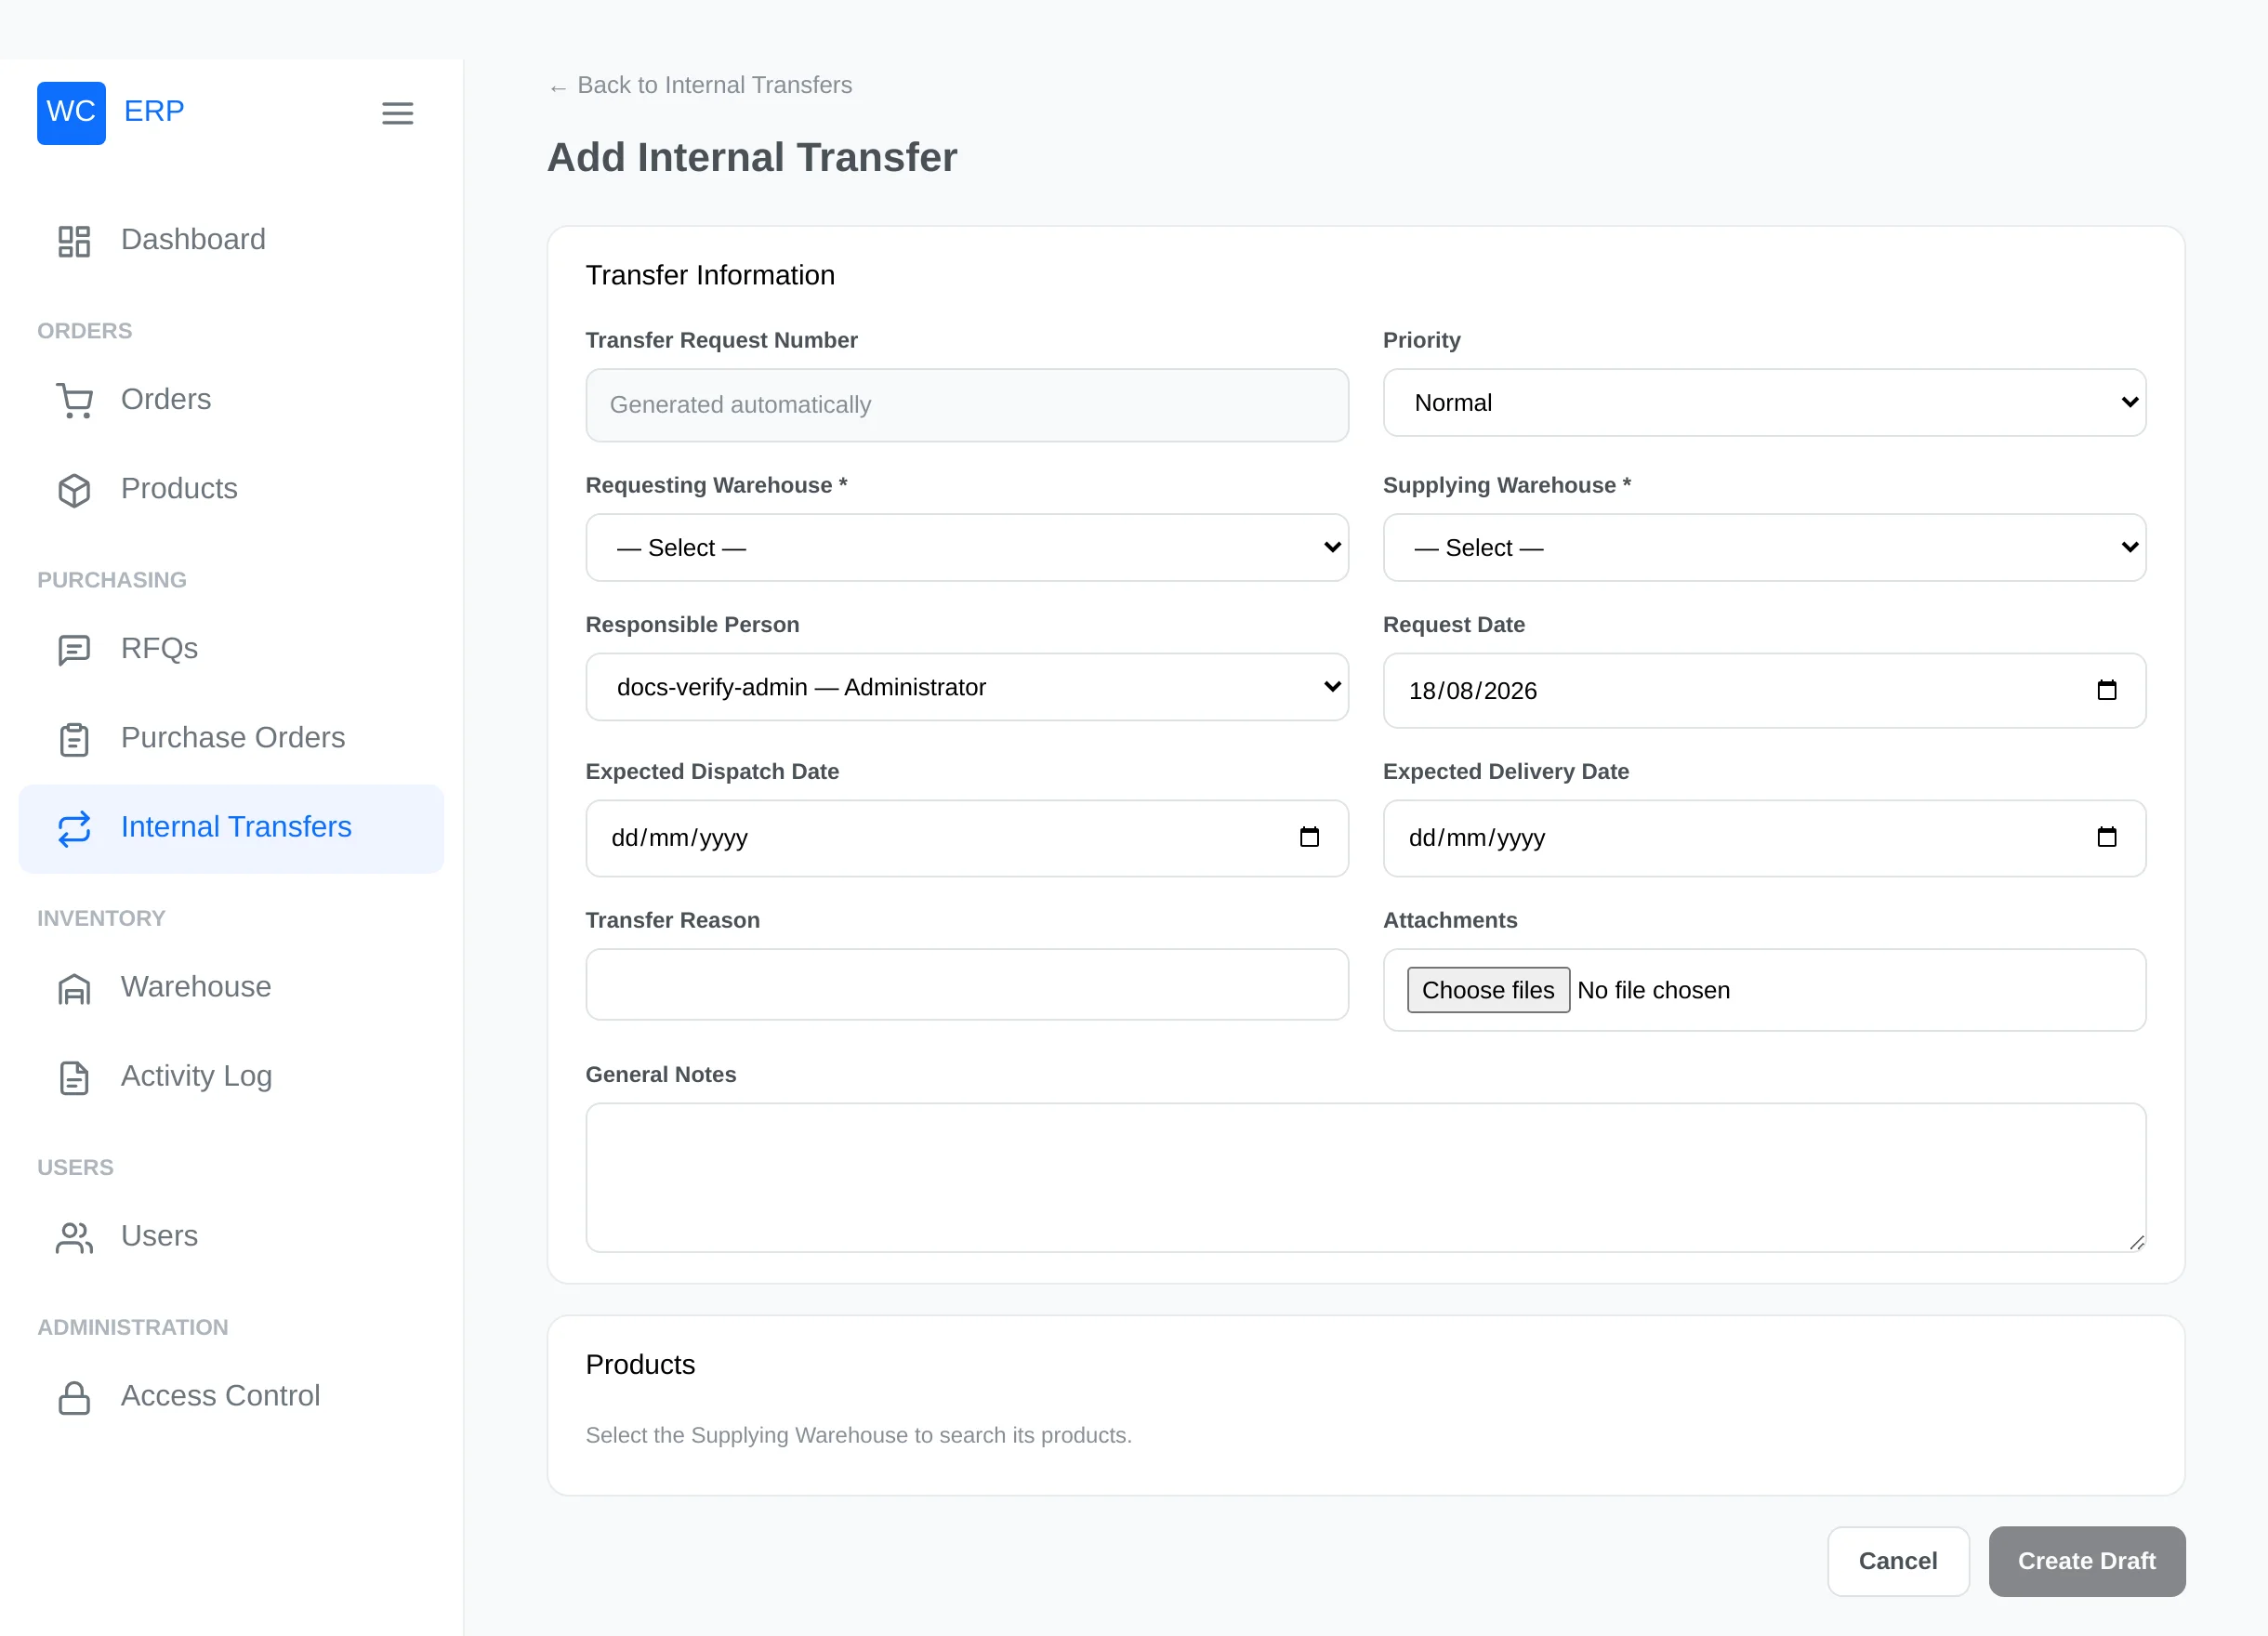
| Field | Notes |
|---|---|
| Transfer Request Number | Generated automatically (ITR-2026-00001, per year) |
| Priority | Low / Normal / High / Urgent |
| Requesting Warehouse* | Managers and staff are fixed to their own warehouse |
| Supplying Warehouse* | Must be a different warehouse |
| Responsible Person | Someone from either involved warehouse (or an admin) |
| Request / Expected Dispatch / Expected Delivery dates | |
| Transfer Reason, Notes, Attachments | Optional context |
Then add products: the search looks only inside the supplying warehouse — by name, SKU or bin code — and every result shows its Transferable quantity (physical stock minus order reservations minus what other transfers already claim). Enter the requested quantity per line and Create Draft.
Send it with Send to Supplying Warehouse — the supplying side is notified by email.
The lifecycle
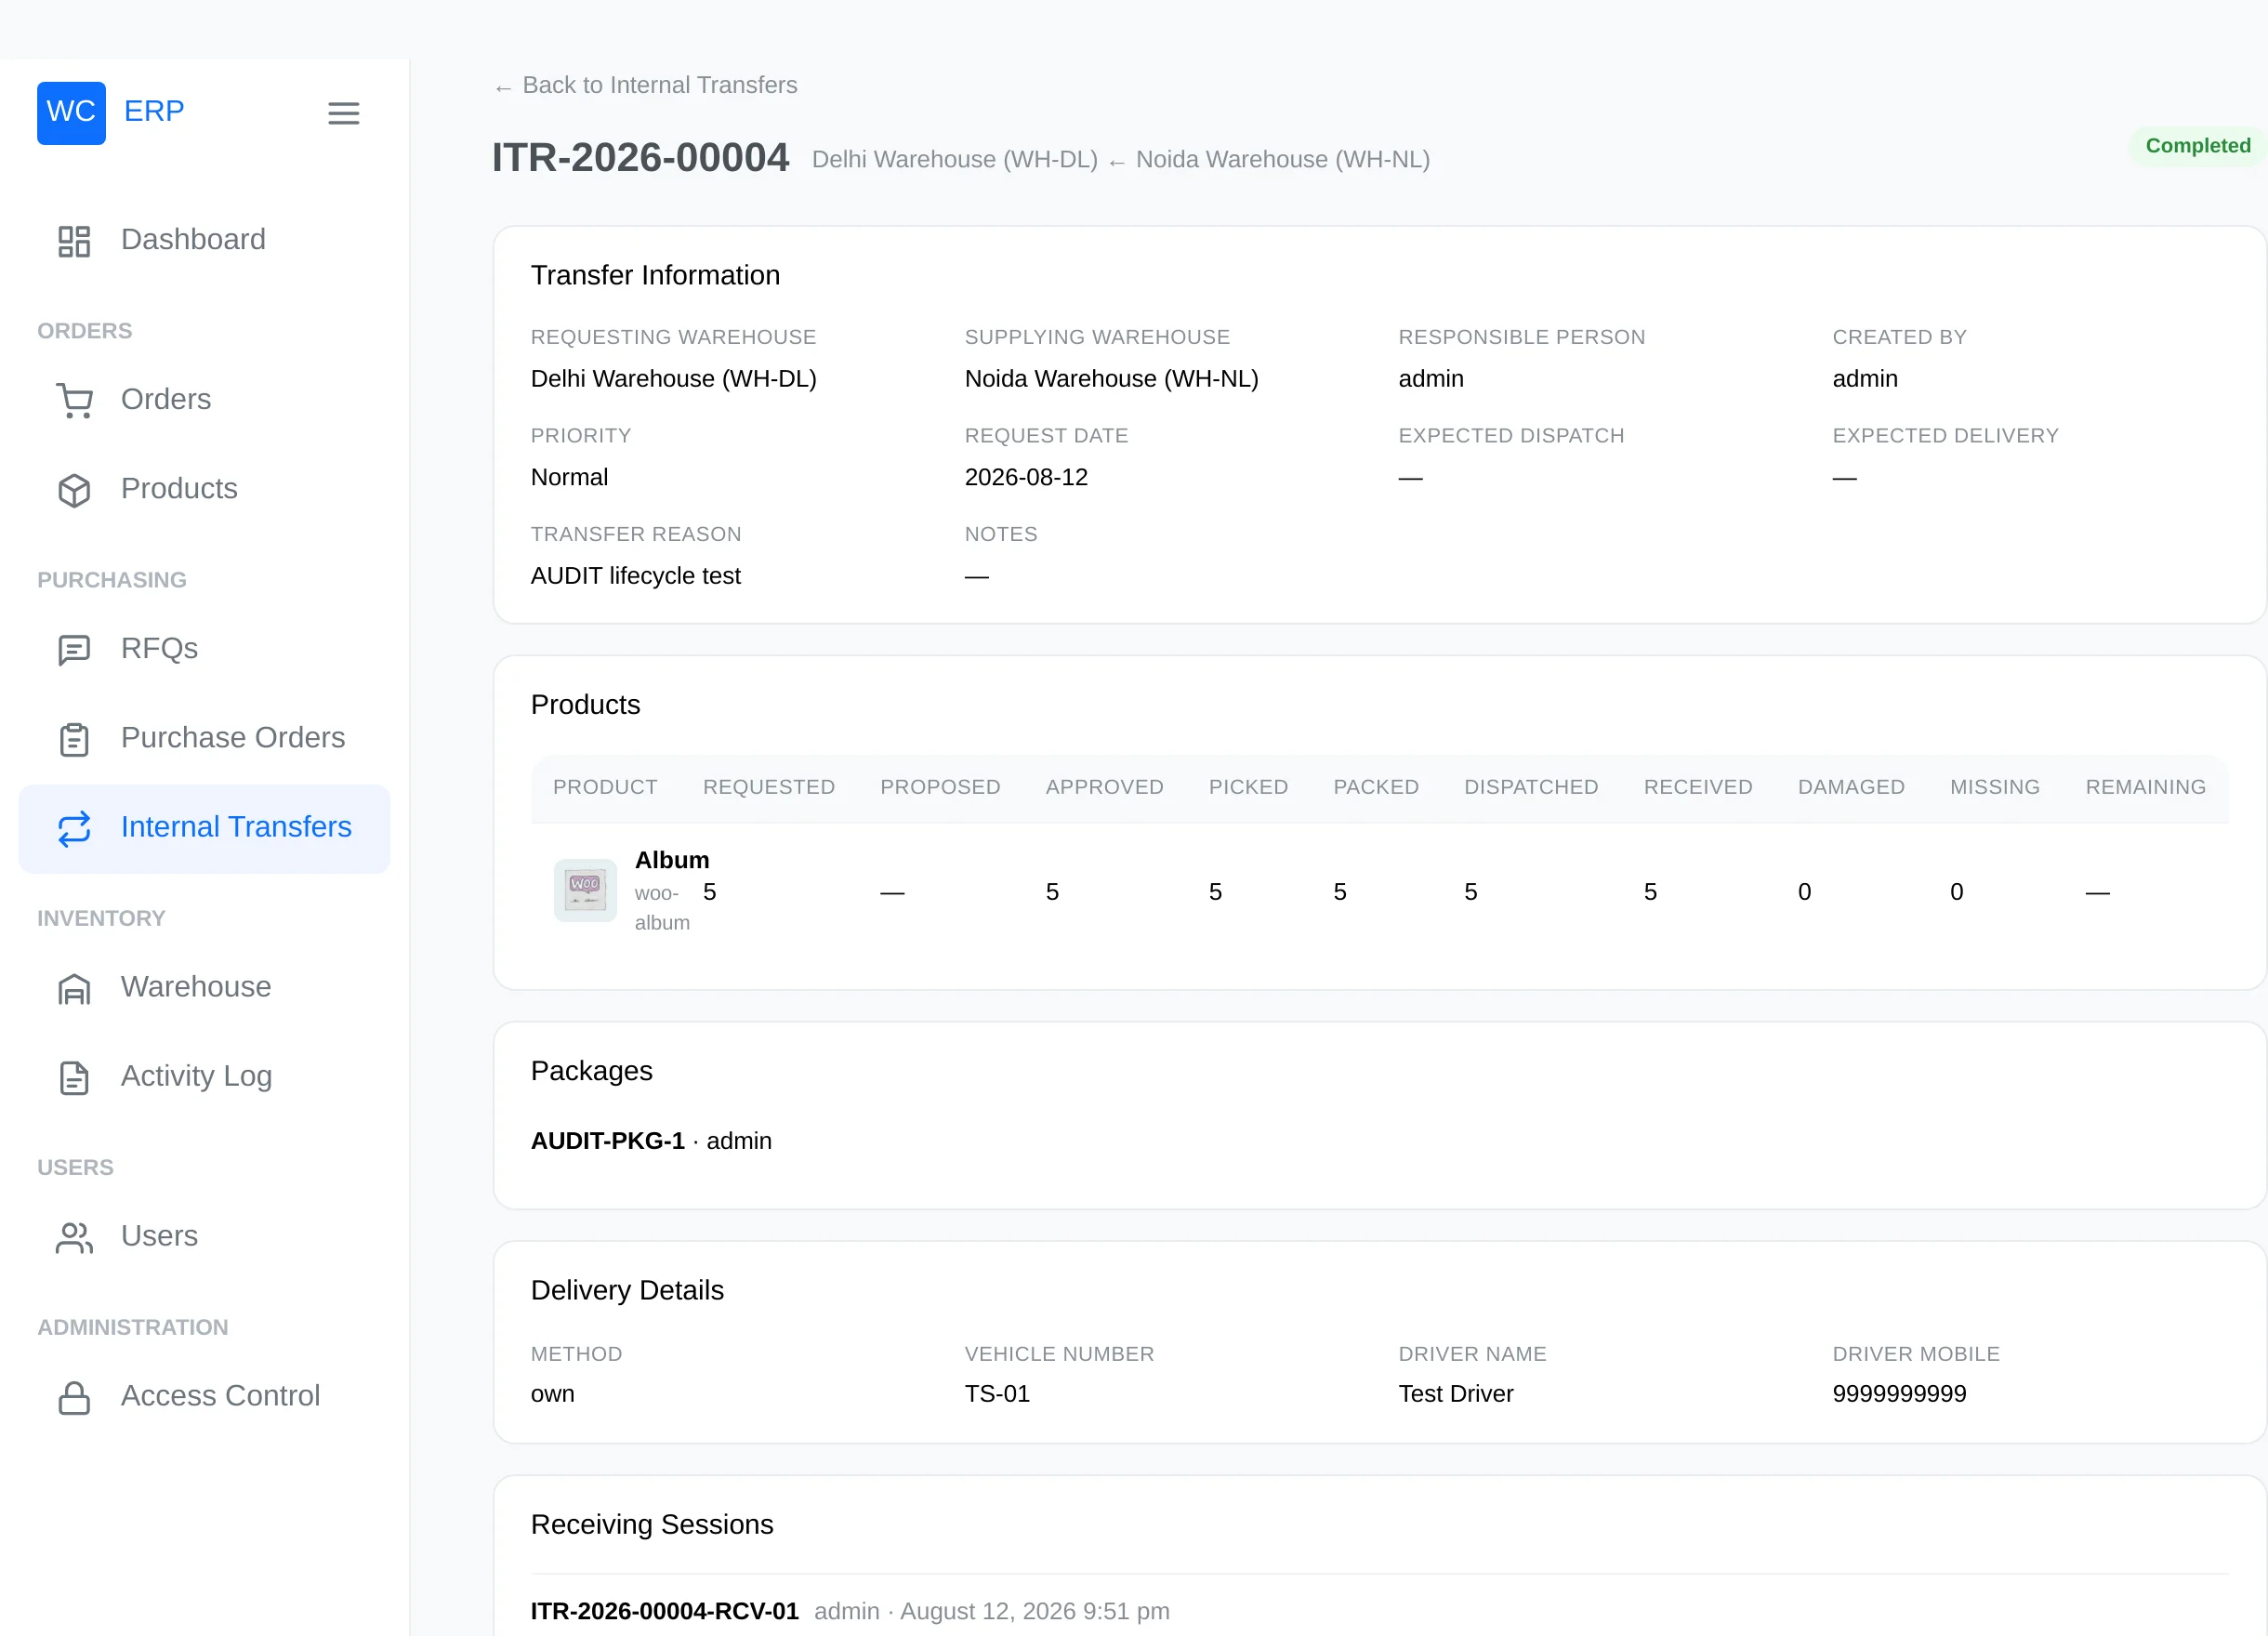
The transfer view shows the info grid, a per-product quantity matrix (Requested / Proposed / Approved / Picked / Packed / Dispatched / Received / Damaged / Missing / Remaining), and — crucially — only the action buttons your role and the current status allow.
1. Approve (supplying manager)
Approve Request — or Reject with a mandatory reason. A rejected transfer can be duplicated into a fresh draft by an administrator.
2. Validate stock (supplying side)
Validate Stock compares every line against the transferable stock. Full coverage → the transfer becomes Validated — Ready for Picking. Any shortfall → Stock Validation Failed, with a per-line breakdown ("requested X, transferable Y") and a pointer to the partial branch:
The partial branch (when stock is short)
- Propose Partial Transfer (supplying) — offer a quantity per line; any reduction below the request needs a written reason.
- The requesting manager then chooses: Approve Partial Transfer, Reject it, or Request Changes with a comment — sending it back for a revised proposal.
3. Pick (supplying side)
Pick Products opens a bin-by-bin allocator: each item shows the bins that hold it and their available units. The total picked per item must exactly equal the approved quantity. Completing the pick removes the units from the supplying bins (logged as transfer movements).
4. Pack (supplying side)
Pack Products — create one or more packages (number, type, weight, dimensions, note) and distribute the picked quantities among them. Everything picked must be packed.
5. Dispatch (supplying side)
Dispatch with one of two delivery methods:
- Own Delivery — vehicle number, driver name and mobile (required), plus optional vehicle/driver details and timings.
- Delivery Service — courier name and tracking number (required), plus optional tracking URL and contact details.
Delivery documents can be attached. The requesting side is notified that the goods are In Transit.
6. Receive (requesting side)
Receive Products records what actually arrived, per item:
- Accepted units are allocated into destination bins with a scanner-friendly bin-code field (only active bins of the receiving warehouse match) — capacity rules apply.
- Damaged and Missing quantities each require a written reason.
Each submission becomes a numbered receiving session (ITR-…-RCV-01). Partial arrivals are fine — receive again when the rest turns up (Partially Received → Received).
7. Complete (requesting manager)
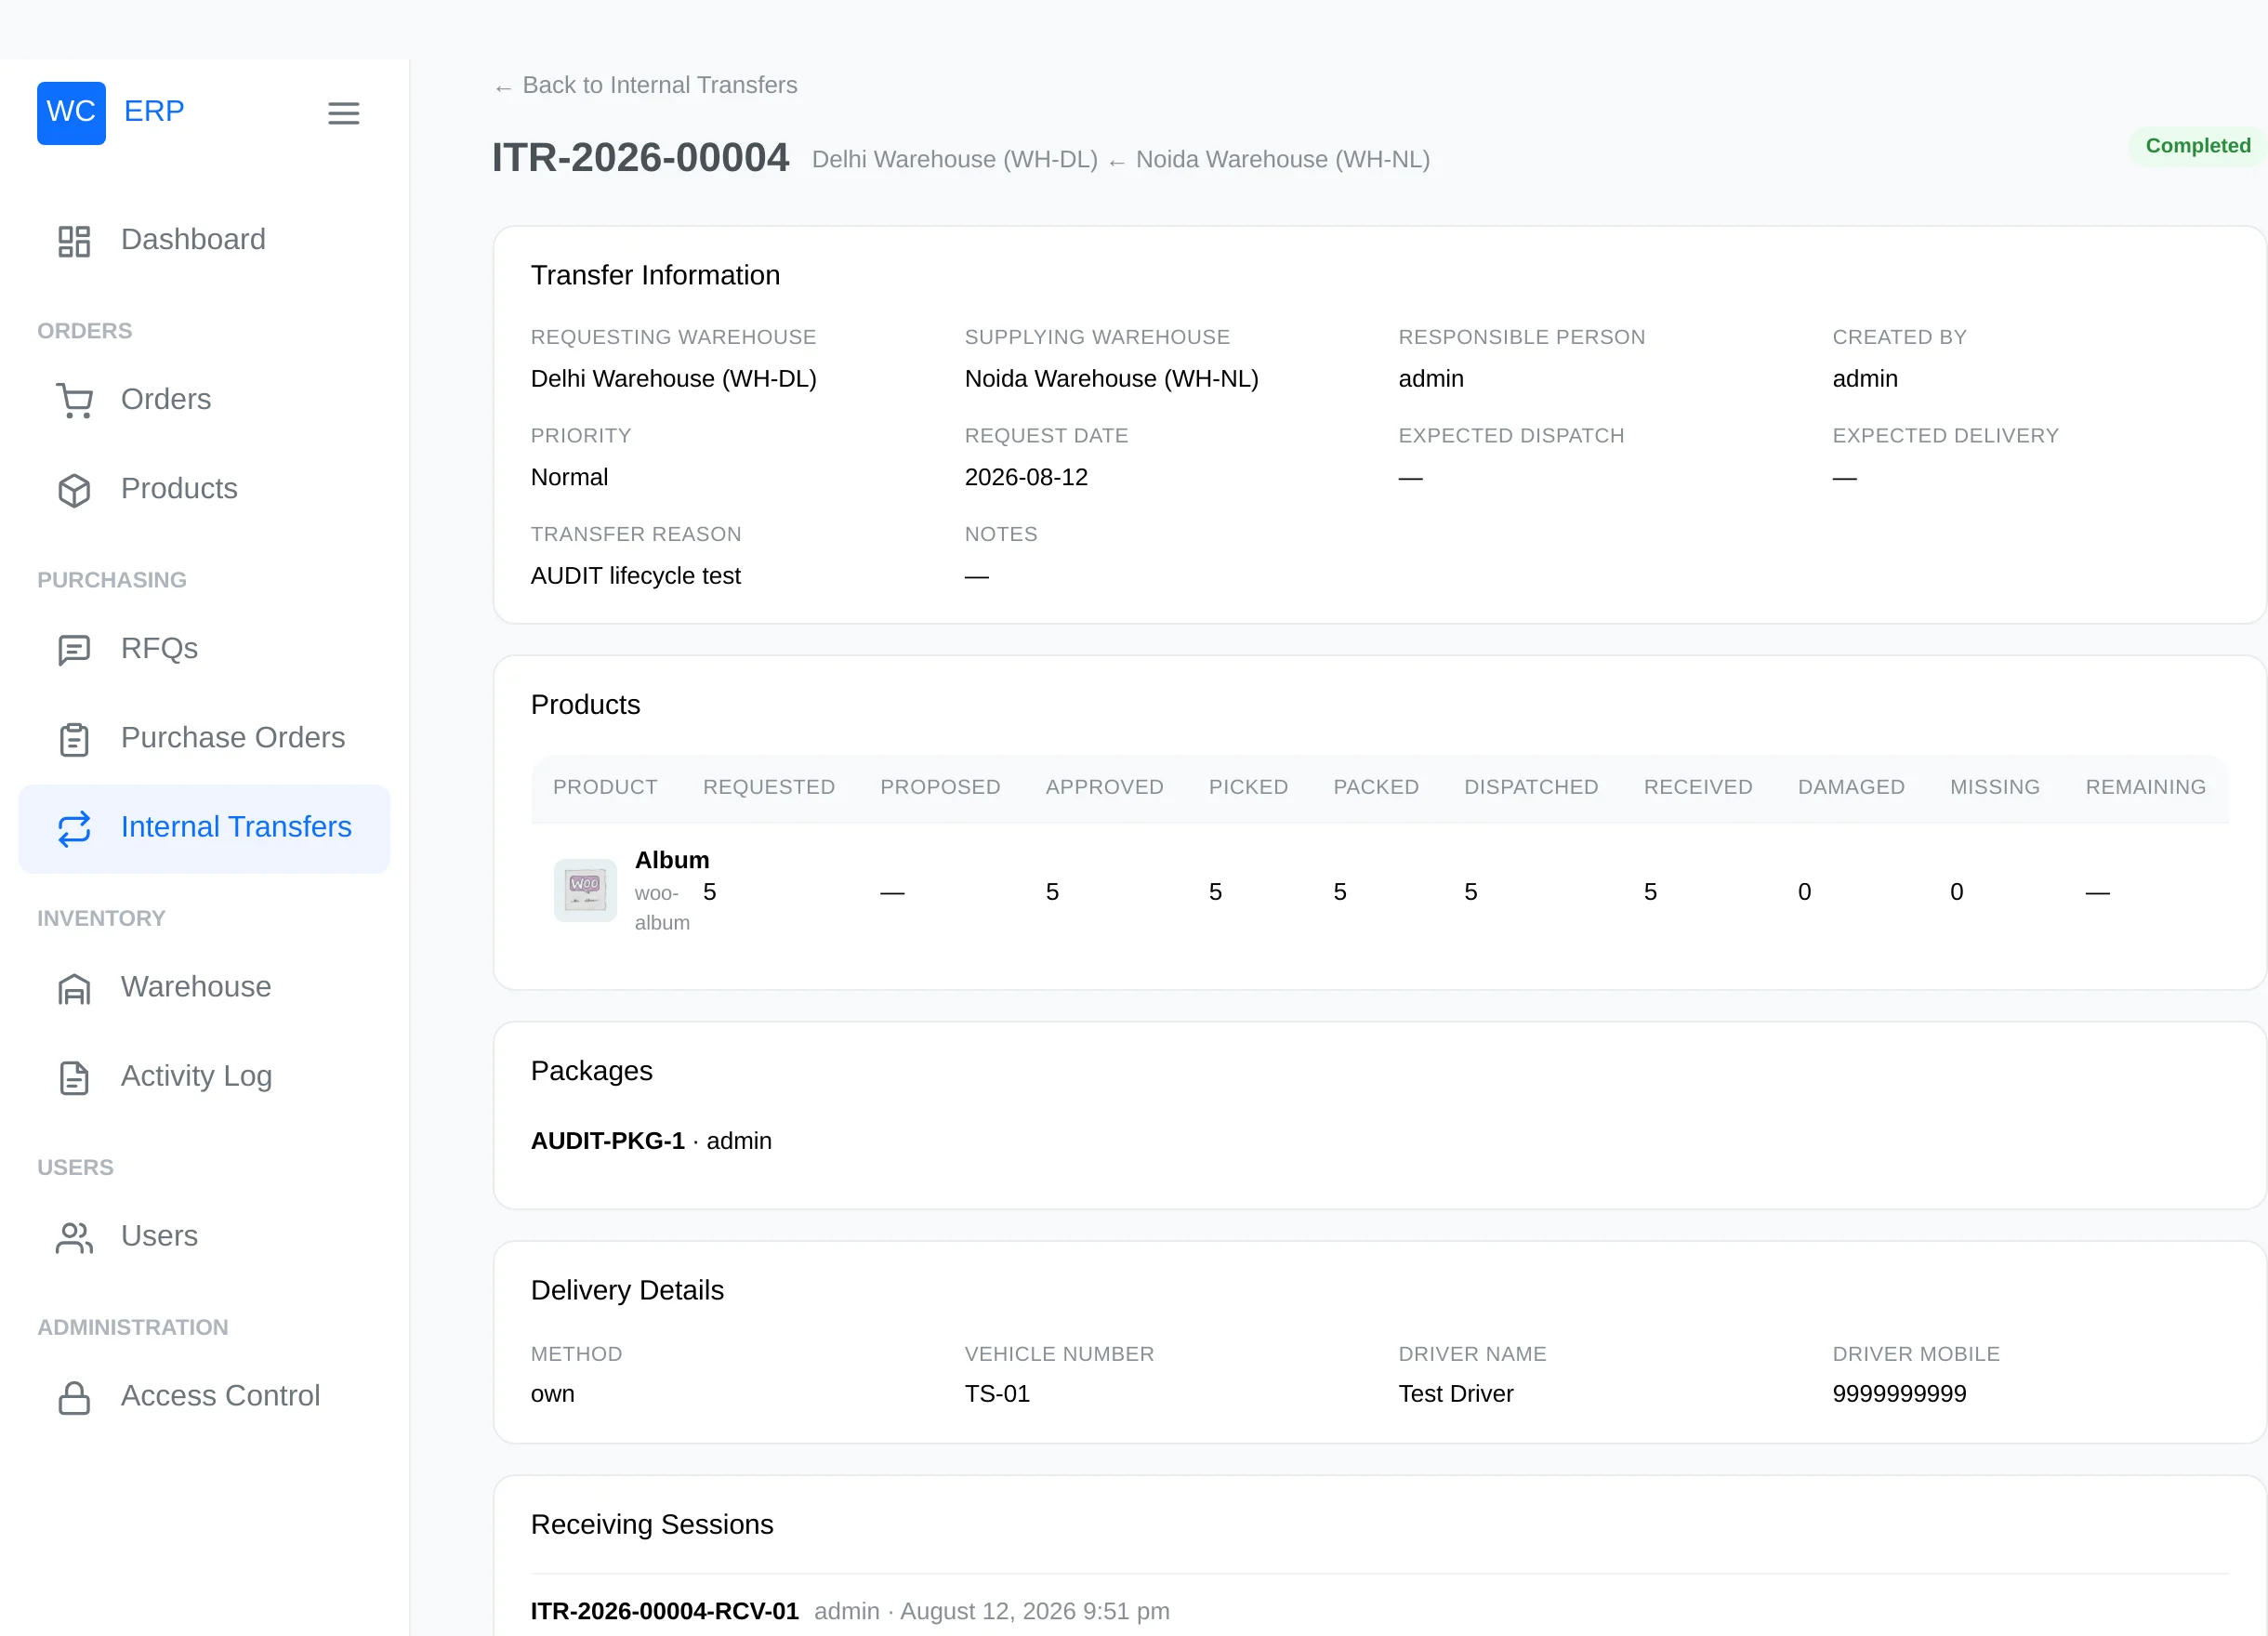
Mark Completed — allowed only when every dispatched unit is received or formally resolved as damaged/missing. The transfer's stage tracker shows the full journey:
Leftovers: follow-ups and RFQs
Whenever approved quantities ended below the request, the remaining units stay visible on the transfer, and the requesting manager can:
- Create Follow-up Transfer — a new request pre-filled with the remainders, linked to the original;
- Create RFQ for Remaining — buy the shortfall from a supplier instead (RFQ pre-filled and linked);
- Cancel Remaining Qty — write the remainder off with a reason.
Cancelling and deleting
- Cancel Transfer (with a reason) is available to the requesting manager while the transfer is Sent, and to administrators in most later pre-dispatch states.
- Delete Draft removes an unsent draft entirely.
Every action, note and email lands in the transfer's Activity Log, and each status change notifies the right side by email.