
WooCommerce Point of Sale - Installation & Setup Guide
Prerequisites
Essential Requirements
Before installation, ensure you have:
| Requirement | Specification |
|---|---|
| WordPress | Version 5.0 or higher |
| WooCommerce | Version 4.0 or higher |
| PHP | Version 7.4 or higher (8.0+ recommended) |
| MySQL | 5.6+ or MariaDB 10.1+ |
| Memory Limit | Minimum 256MB (512MB recommended) |
| WooCommerce Setup | Products, payment gateways, and shipping configured |
| User Permissions | Administrator access to WordPress |
Server Requirements
- SSL Certificate: Recommended for secure transactions
- Cron Job Access: For scheduled synchronization
- Node.js: Version 14+ (for full WhatsApp/Node features)
- File Permissions: Write access to WordPress directories
- API Access: REST API must be enabled
What You'll Need
✅ Purchase Code from Webkul ✅ WooCommerce Store with products ✅ Admin Credentials for WordPress ✅ Barcode Scanner (optional but recommended) ✅ Thermal Printer (optional for receipts)
Step-by-Step Installation
Method 1: WordPress Admin Dashboard (Recommended)
Step 1: Access Plugin Installation
- Log in to your WordPress Admin Panel
- Navigate to: Plugins → Add New
- Click "Upload Plugin" button at top

Step 2: Upload the Plugin
- Click "Choose File" button
- Select the downloaded
woo-point-of-sale.zipfile - Click "Install Now"
 Step 3: Activate the Plugin
- After successful installation, click "Activate Plugin"
- Wait for activation confirmation message

Check how to activate your WooCommerce plugin through the purchase code.
Method 2: FTP Installation (Alternative)
Step 1: Prepare Files
- Unzip the downloaded package
- Extract the
woo-point-of-salefolder
Step 2: Upload via FTP
- Connect to your server via FTP/SFTP
- Navigate to:
/wp-content/plugins/ - Upload the
woo-point-of-salefolder
Step 3: Activate
- Go to WordPress Admin → Plugins
- Find "WooCommerce Point of Sale"
- Click "Activate"
Post-Installation Checks
✅ Clear WordPress cache if using caching plugins ✅ Check for PHP errors in debug log ✅ Verify plugin appears in installed plugins list ✅ Ensure no conflicts with other plugins
Initial Configuration
The POS Wizard
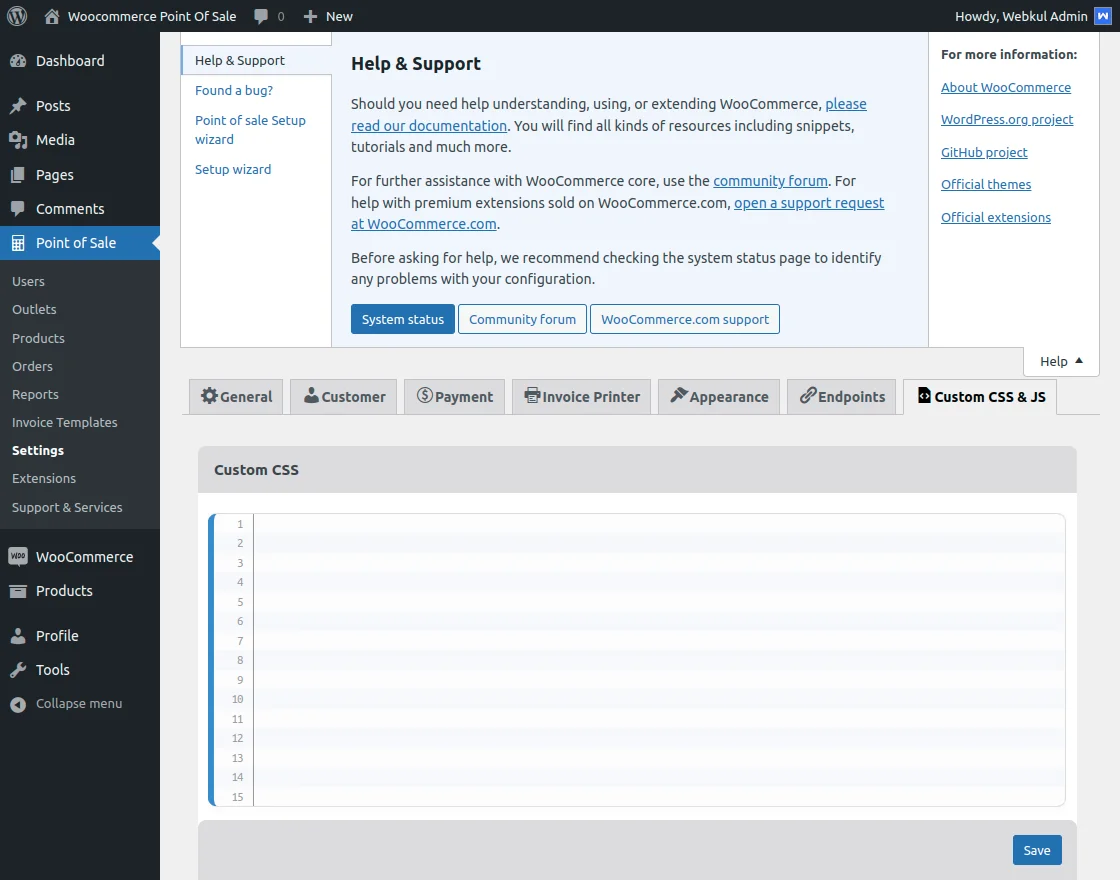
After activating the plugin, under General Settings, the admin will find the Help icon in the top-right menu bar. Once the admin clicks on it, a menu will open as shown in the image below.
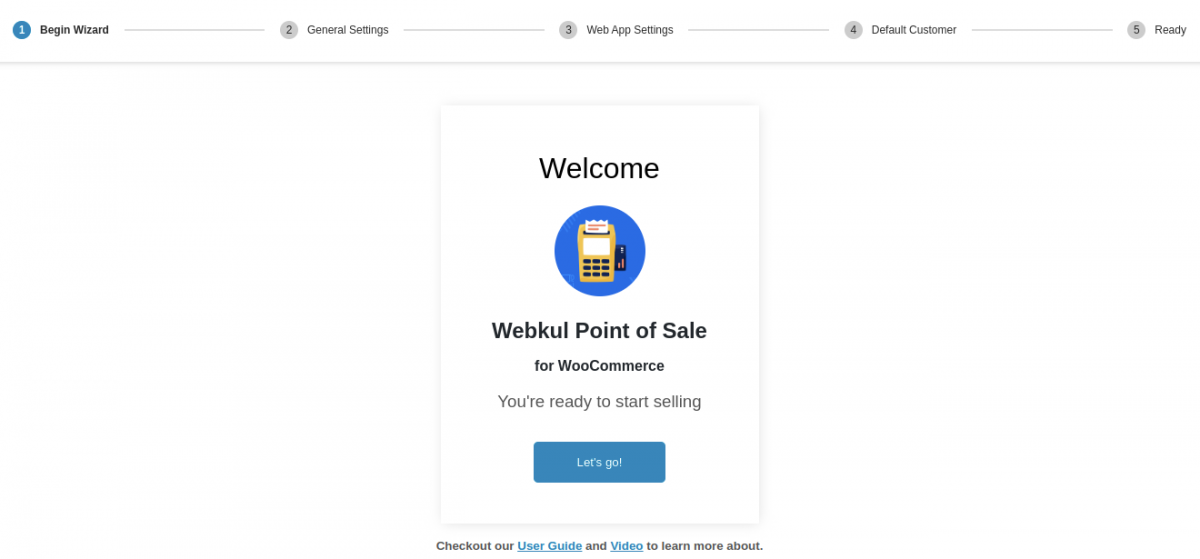
Setup Wizard
When the admin clicks on the Setup Wizard tab, it redirects to the Wizard Configurations page, as shown in the image below.
Initially, the admin will see the Begin Wizard menu option. To start configuring the POS, the admin needs to click on Let’s go!.
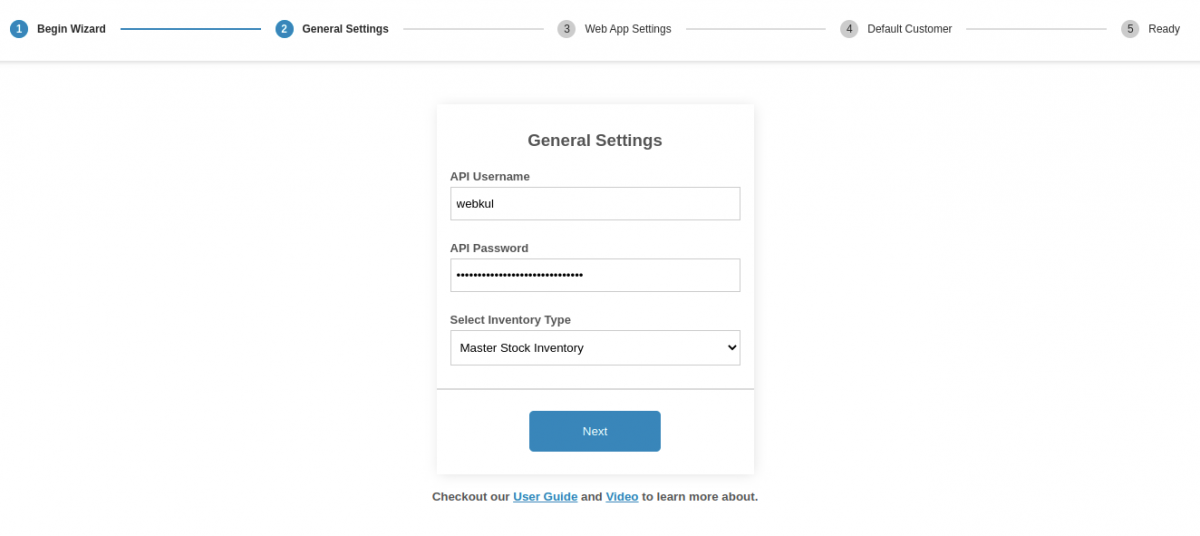
General Settings Configuration
Clicking on Let’s go! navigates the admin to the General Settings page, as shown in the image below. For more details, you can refer to our User Guide and Video Tutorial.
Under General Settings, the admin needs to configure the following:
- API Username
- API Password
- Inventory Type
- Default Product Status
- Enable Unit Price Feature
- Enable Emails at POS End
After filling in the details, click on Next! to proceed to the next step.
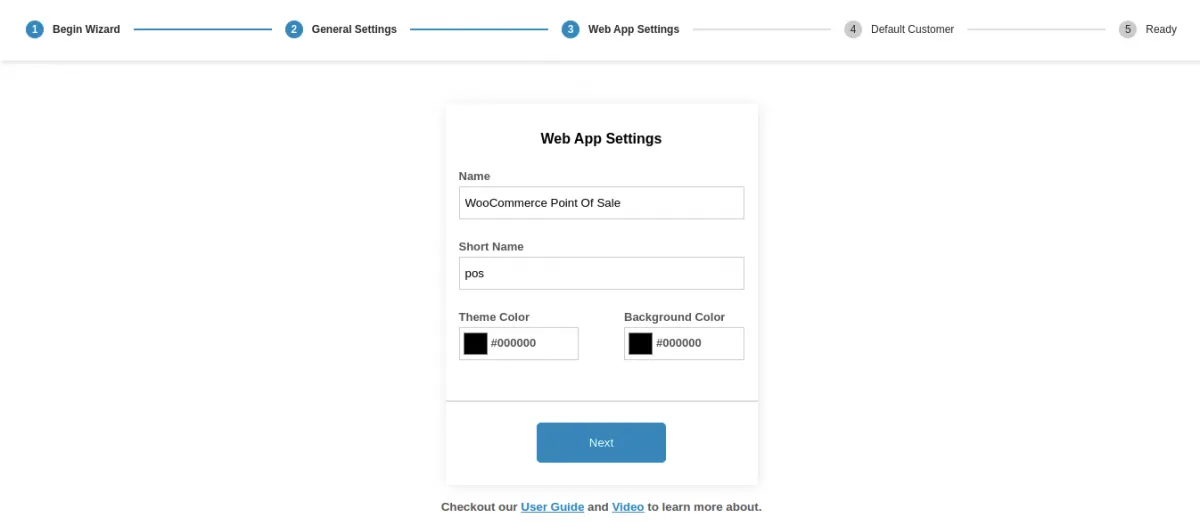
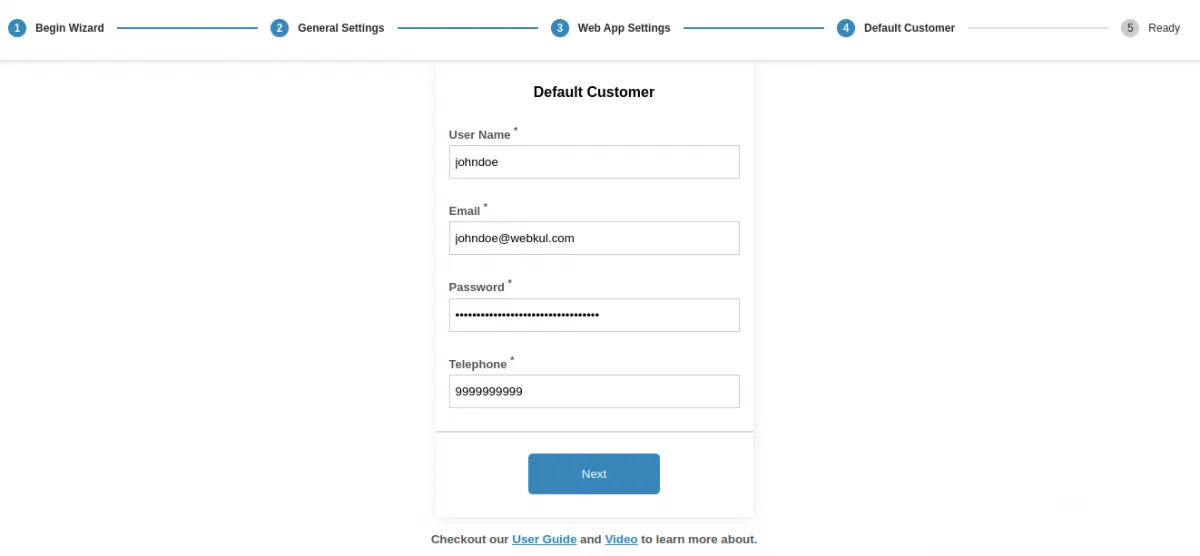
Web App Settings
Next, the admin needs to configure the Web App Settings, where the following details are added:
- App Name
- Short Name
- Theme Color
- Background Color
Additionally, the Default Customer Configuration details will be auto-filled, as shown in the image below.
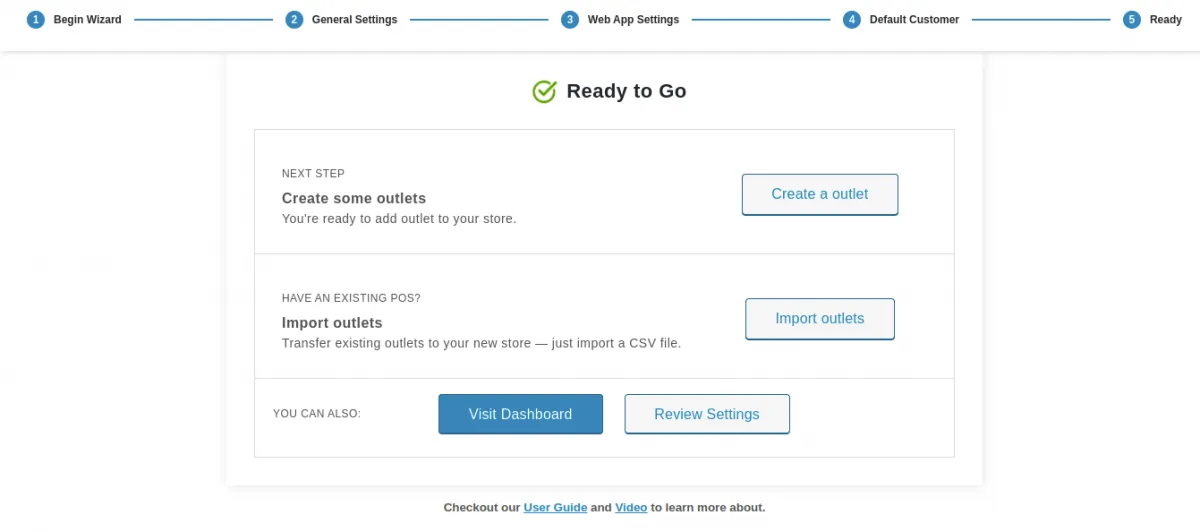
Wizard Completion
Finally, the admin is redirected to the Ready menu option. From here, the admin can:
- Create an Outlet
- Import Outlets
Once these steps are completed, the POS Wizard setup is finished.
License Activation
Activation Process
Step 1: Locate Purchase Code
- Find purchase code in your Webkul purchase email
- Or access from Webkul client area

Step 2: Enter License Details
- Navigate to: Point of Sale → Settings → License
- Enter Purchase Code
- Enter Registered Email
- Click "Activate License"
Step 3: Verify Activation
- Green checkmark indicates successful activation
- License details will display expiration date
- Activation status shows in plugin header
License Management
- View License: Check status and expiration
- Renew License: Before expiration for updates
- Transfer License: Move to another domain
- Deactivate: Free up license for reuse
Essential Settings to Configure:
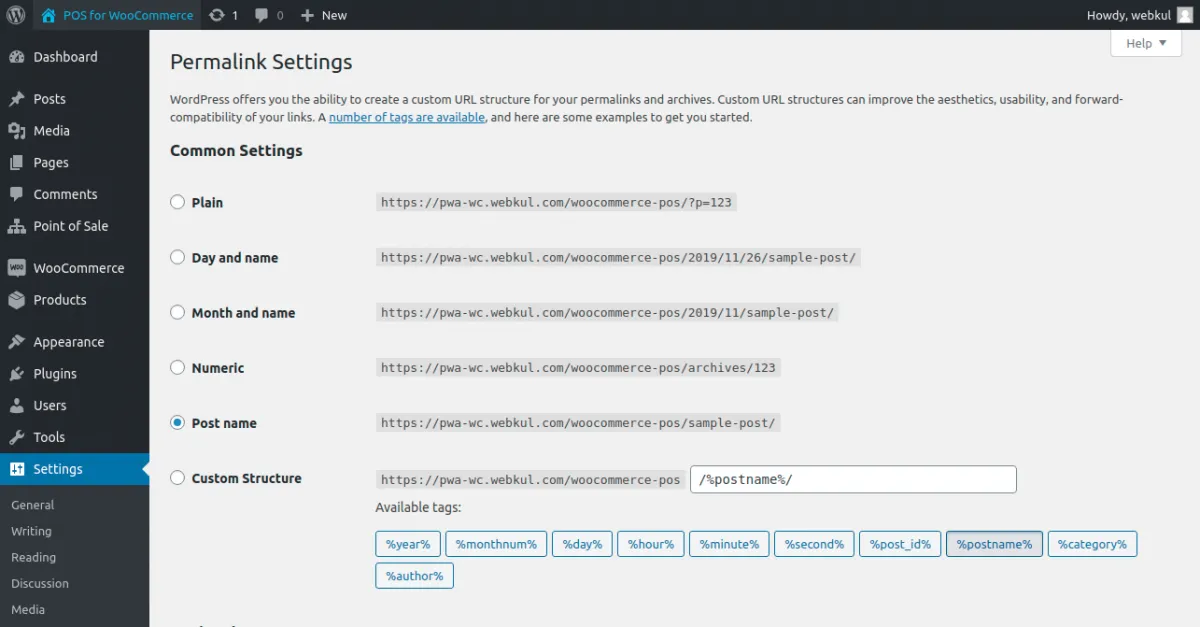
1. Permalink Flush
- Go to: Settings → Permalinks
- Click "Save Changes" (no changes needed)
- This ensures POS endpoints work correctly
2. General Configuration
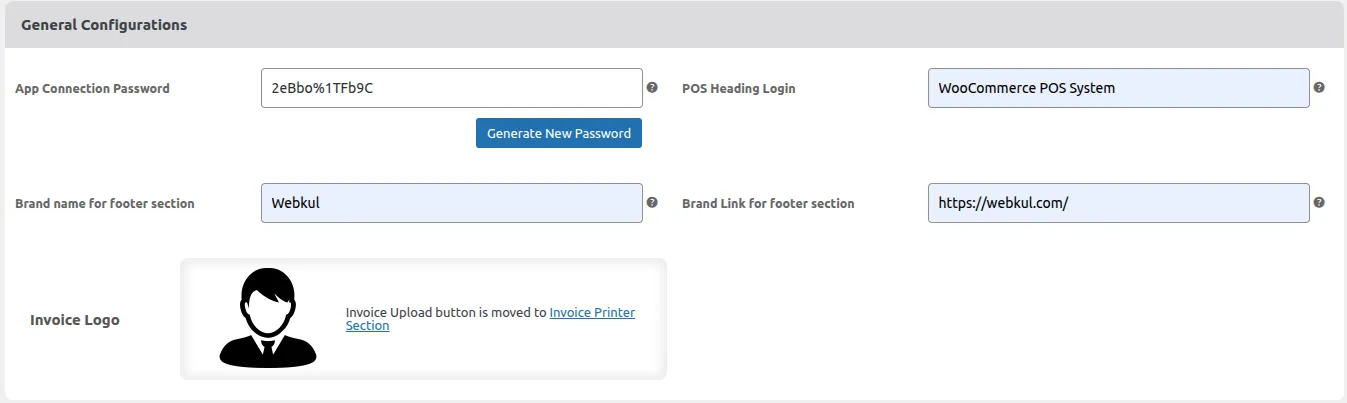
App Connection Password
2eBbo%1TFb9C Used to authenticate the API connection between the WooCommerce store and the POS mobile app.
Generate New Password
Generates a temporary password for API connection, which should be cleared after use.
POS Heading Login
WooCommerce POS System Defines the heading text shown on the POS login screen.
Brand Name for Footer Section
Webkul Specifies the brand name displayed in the footer area of the POS interface.
Brand Link for Footer Section
https://webkul.com/ Sets the clickable brand URL shown in the footer section.
Invoice Logo
Used to upload the logo that appears on printed and digital invoices.
3. POS Panel Configurations
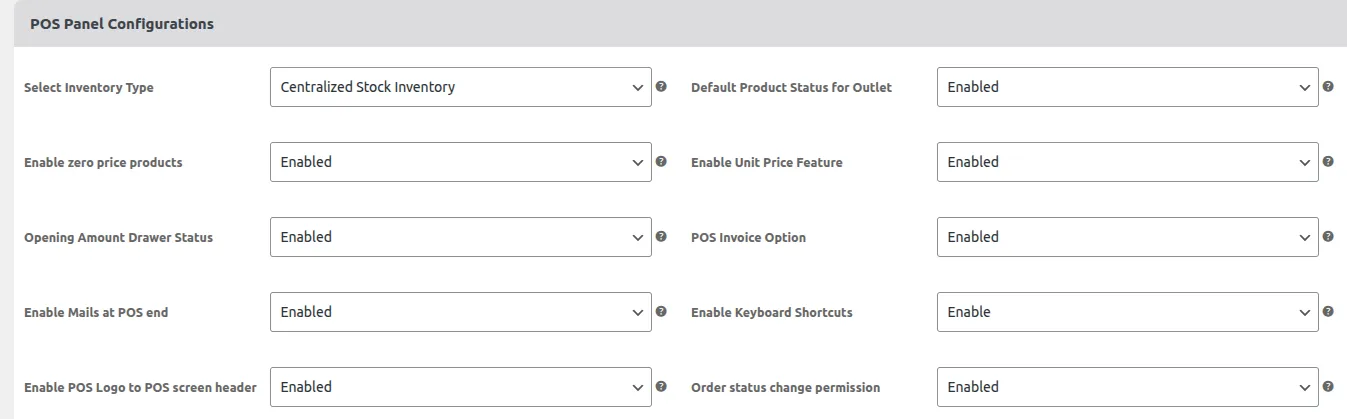
Select Inventory Type
Centralized Stock Inventory Defines whether the POS will use centralized stock management across all outlets.
Default Product Status for Outlet
Enabled Sets the default status of products when they are assigned to an outlet.
Enable Zero Price Products
Enabled Allows selling products with a price set to zero in the POS system.
Enable Unit Price Feature
Enabled Enables the unit price calculation feature for products sold in POS.
Opening Amount Drawer Status
Enabled Allows entering the opening cash amount when starting a POS session.
POS Invoice Option
Enabled Enables invoice generation for orders placed through the POS.
Enable Mails at POS End
Enabled Sends order-related emails after completing a POS transaction.
Enable Keyboard Shortcuts
Enabled Allows the use of keyboard shortcuts for faster POS operations.
Enable POS Logo to POS Screen Header
Enabled Displays the POS logo in the header section of the POS screen.
Order Status Change Permission
Enabled Allows POS users to change the order status directly from the POS panel.
POS Cron Configurations
Here, the admin can configure and manage POS cron jobs and Node server settings.
POS Cron Settings
The admin can:
Set the Cron Type Choose between WP Cron or Server Cron.
Enable / Disable Auto Drawer Close Turn automatic drawer closing on or off.
Set Drawer Time Define the time after which the drawer will close automatically.
Run Cron Commands Execute cron commands from the root directory.
Server Cron Setup
For Server Cron
wget -q -O - https://wpdemo.webkul.com/woocommerce-point-of-sale-115-113-191-18/wp-content/plugins/woo-point-of-sale/wcpos-cron.php >/dev/null 2>&1