
WooCommerce POS - Agent Guide (Step-by-Step Usage)
Login & Dashboard Overview
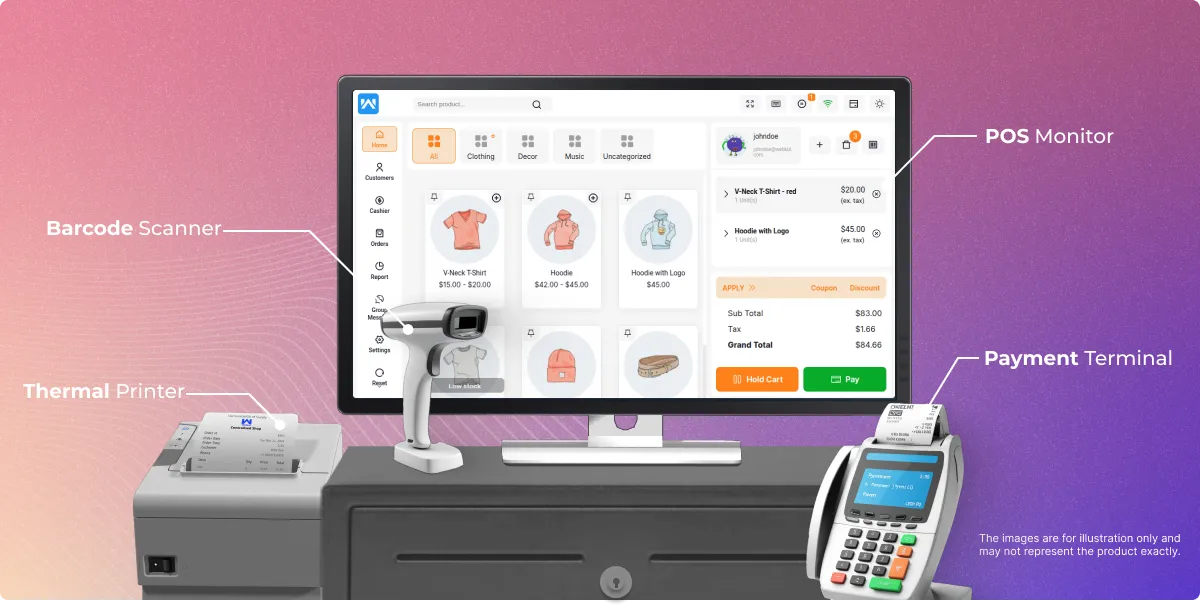
Accessing the POS System
Login Process:
- POS agent enters login details provided by admin to access front end
- Enter username or email
- Enter password
- Select outlet (if multiple outlets assigned)
- Click Login button
Navigation Menu
Left Navigation Drawer displays menu options:
- Home: Main dashboard and quick access
- Customer: Customer management and search
- Cashier: Point of sale interface and transactions
- Orders: Order management and history
- Report: Sales and performance reports
- Group Message: Broadcast messaging to customers
- Settings: User preferences and configurations
- Reset: Data synchronization options
- Logout: Secure logout from system
Dashboard Features
After Login:
- POS user sees panel with all products assigned to outlet displayed
- Products organized by categories
- Search bar for quick product lookup
- Cart section for order management
Cart Overview:
- Cart option contains all ordered products by customer
- Real-time total calculation
- Product quantity adjustment
- Quick product removal
Theme Configuration
Dark Theme Setup:
- User can configure dark theme for POS page from POS panel
- Theme switching: Open POS panel > click theme switch in right side corner > change to dark mode
- Toggle between light and dark mode as needed
- Preference saves automatically
Theme Benefits:
- Reduced eye strain
- Better visibility in different lighting
- Personal preference accommodation
Adding Products to Cart
Product Search Methods
The POS system offers multiple ways to find and add products quickly.
1. Search by Product Name
Using Search Bar:
- Type product name in search bar
- Results appear as you type
- Select desired product from results
- Product automatically adds to cart
Search Tips:
- Use partial names for quick results
- Search is case-insensitive
- Works with product titles
2. Category-Based Search
Category Navigation:
- Click on category icon to view category lists
- Browse through available categories
- Select category to choose product
- View products within that category
- Click on product to add to cart
Category Features:
- Visual category browsing
- Organized product display
- Quick category switching
3. SKU-Based Search
Search by SKU:
- On basis of SKU of product, POS user can search for products
- Enter SKU in search bar
- Exact or partial SKU matching
- Quick product identification
SKU Search Benefits:
- Faster than name search
- More accurate results
- Useful for inventory management
4. Barcode Scanning
Using Barcode Scanner:
- POS users can add product to cart by scanning barcode
- Barcode generated based on SKU or Product ID
- Barcode readers can be used to add products to cart
- Product addition: Add products to cart by both barcodes (product ID or SKU)
Barcode Scanning Process:
- Aim scanner at barcode
- Press trigger to scan
- Product automatically adds to cart
- Quantity adjustable after adding
Compatible Barcodes:
- Code-128 format
- SKU-based barcodes
- Product ID-based barcodes
Adding Variable Products
Variable Product Workflow:
- Search Main Product: Search main product using name or SKU in search bar
- Product Selection: Once main product appears in results
- Variant Selection: Select variant for customer (size, color, etc.)
- Add to Cart: Selected variant adds to cart
Variant Options:
- Size variations
- Color variations
- Material variations
- Any configured product attributes
Adding Custom Products
Custom Product Entry:
For products not available on website but available in physical store:
- Click Plus Sign: Click plus sign (+) button to add custom product
- Enter Product Details:
- Product name
- Product price
- Add to Cart: Click "ADD" button to add custom product to cart
Custom Product Use Cases:
- Unlisted items
- Special orders
- One-time products
- Emergency inventory
Customer Search/Add
Adding Customer to Order
Initial Customer Selection:
- Add customer details: Click on Default Customer option after adding products to cart
- Customer selection interface opens
- Search or add new customer
Searching Existing Customers
Customer Search Options:
- POS users can search for customers by name or email
- Type in search field
- Select from results
Search Features:
- Real-time search results
- Name-based search
- Email-based search
- Phone number search (if enabled)
Adding New Customers
New Customer Entry:
- Enter Customer Details in customer field:
- First Name
- Last Name
- Email Address
- Phone Number
- Address (optional)
- Save Customer: Click save or add button
- Customer Selection: Select customer from customer's field to pay for order
Customer Administration:
- Admin can add customers with details like name, email, telephone and address
- Customers saved for future use
- Customer history tracking
Customer Display in Cart
Customer Confirmation:
- Default Customer Tab: Added customer visible in cart with tab name (e.g., "Johndoe")
- Customer name displayed prominently
- Easy customer verification
- Quick customer change option
Applying Discounts & Coupons
Coupon Application
How to Apply Coupons:
- Coupon Application: POS agent can apply coupon to cart at time of checkout
- Apply Coupon Button: Click Apply Coupon button
- Enter Coupon Code: Type or scan coupon code
- Hit Enter: Press enter to apply coupon to order
Coupon Confirmation:
- Coupon applied successfully pop-up message appears
- Coupon Display: Shows in cart under "coupon" option
- Discount amount visible in cart total
Manual Discount Application
Discount Options:
Discount application available in two ways:
- Percentage-wise discount
- Flat Discount (fixed amount)
Applying Discount:
- "Apply discount to sale" appears on clicking "Discount" option in cart
- Select Discount Type:
- Percentage discount: Select "%" option to tabulate discount on percentage basis
- Flat discount: Enter fixed amount
- Apply Discount: Discount applies to cart
- Grand Total: Displays discounted amount
Customer-Based Discounts
Automatic Discounts:
- Customer-based discount: Applicable for few products
- Discount applies automatically when customer selected
- Based on customer group membership
- No manual intervention needed
Discount Features:
- Loyalty pricing
- VIP customer discounts
- Member pricing
- Group-specific offers
Price Editing
Manual Price Adjustment:
- Price editing: POS user can edit price of items in cart
- Click on price to edit
- Enter new price
- Confirm change
- Useful for special circumstances
Payment Processing
Available Payment Options
Payment Methods:
The system supports multiple payment methods:
- Cash Payment: Primary payment method
- Other Payment: Includes all payment methods enabled by admin such as:
- Paypal
- Sunmi Terminal credit/debit card
- Custom payment gateways
- Digital wallets
Split Payment Feature
Multiple Payment Methods:
- Split Payment: Customer can pay money in cash as well as any other payment method
- Payment Acceptance: Cash, via card, or split payment between card and cash
- Example: Part cash, part card for same transaction
Split Payment Process:
- Select first payment method
- Enter amount for first method
- Select second payment method
- Remaining amount automatically calculated
- Complete transaction
Payment Recording
Transaction Tracking:
- Monetary transactions done outside system
- POS records payment method used
- Payment details stored for reporting
- Reconciliation support
Payment View Options
Other Payment Display Views:
Choose from three display options for payment methods:
- Grid View Listing: Normal grid view with payment method tiles
- Grid With Currency Listing: Grid view with currency icon visible on each payment option
- Dropdown-listing: Dropdown menu for payment method selection
Selecting View:
- Configure in settings
- Choose preferred layout
- Optimize for screen size
- Personal preference
Completing Payment
Checkout Process:
- Review cart contents
- Verify customer details
- Apply discounts/coupons if applicable
- Select payment method(s)
- Enter payment amount(s)
- Process payment
- Generate receipt
Printing Invoices
Invoice Printing Overview
Receipt Generation:
- Invoice printing: User can print invoice for order
- Automatic or manual printing
- Multiple printer support
Invoice Configuration
Admin Settings:
- POS Invoice Option: Admin can select enable/disable to print POS invoices for orders
- Configure default printer
- Set auto-print preferences
Selecting Printer
Printer Options:
POS agent may choose printer option:
- A3: Large format paper
- A4: Standard paper size
- A5: Half A4 size
- Epson TM-T88V Thermal Printer: Receipt printer
- A6: Small format (common for receipts)
Printer Selection:
- Click printer icon or settings
- Select desired printer type
- Preview invoice
Auto-Print Feature
Automatic Printing:
- Auto-print setting: Introduced auto-print enable/disable setting for POS users
- Configure to print automatically after each sale
- Enable/disable per user preference
- Saves time during busy periods
Email Receipts
Digital Receipt Options:
- Order receipt: Admin can send order receipt manually via email after order completion
- Email to customer address
- Backup receipt option
- Environmental alternative to paper
Email Process:
- Complete transaction
- Click email receipt option
- Verify customer email
- Send receipt
Managing Returns
Viewing Refund Information
Refund Visibility:
- Refund visibility: WooCommerce website order refund details visible at POS
- Real-time refund synchronization
- Complete refund information
Processing Refunds
Refund Details:
- Refund initiation: If refund initiates for WooCommerce website order by admin, refund details visible at POS for particular order
- View refund amount
- See refund method
- Track refund status
Refund Information Display:
- Original order details
- Refund amount
- Refund date and time
- Refund reason (if provided)
- Refund method (original payment method)
Return Process
Steps for Returns:
- Search for original order
- View order details
- Check refund status
- Process in-store return if applicable
- Update inventory
- Complete refund transaction
Daily Closing Procedures
Accessing Close Counter
Navigation:
- Close Counter tab: Available under Cashier section
- End-of-day reconciliation
- Cash drawer management
Closing Cash Drawer
End of Day Process:
- Drawer closure: POS agent closes cash drawer at end of day
- Complete reconciliation required
- Accurate counting essential
Drawer Amount Details
Opening Information Display:
Drawer Amount Details displays:
- Opening Amount: Starting cash in drawer
- Today's Sales: Total sales for the day
- Expected Amount: Opening + Sales
Example:
Opening Amount: $1,000
Today's Sales: $2,500
Expected Amount: $3,500
Counted Drawer Amount
Physical Count Entry:
- Counted Drawer Amount: Cash amount collected for particular day
- Count all cash in drawer
- Enter counted amount
- Add remarks if needed
Counting Tips:
- Count carefully
- Separate denominations
- Double-check total
- Note any discrepancies
Closing Drawer Details
Reconciliation Summary:
- Closing Drawer Details: Closing balance details for particular day
- Difference viewing: Between opening and closing amount under Closing Drawer Details
- Shows over/short amount
- Requires explanation for variances
Closing Information:
- Expected closing amount
- Actual counted amount
- Difference (+ or -)
- Remarks field
Today Cash Option
Cash Summary Display:
Today Cash option displays:
- Cash Opening Balance: Starting amount
- Current Cash Balance: Cash in drawer now
- Current Card Balance: Card payments today
Real-time Updates:
- Updates with each transaction
- Track cash flow throughout day
- Monitor payment distribution
Sale History
Daily Sales Review:
Sale History under Cashier section shows:
- Particular Date: Sales for selected date
- Cash Sale: Total cash transactions
- Card Sale: Total card transactions
- Total Sale Display: Total sales after adding cash and card sale
Data Visibility:
- Data visibility in Sale History: Available when cash drawer closed in "Close Counter" section
- Historical data access
- Performance tracking
Completing Daily Close
Final Steps:
- Review all sales for the day
- Count cash drawer
- Enter counted amount
- Review discrepancies
- Add remarks if needed
- Submit drawer close
- Print/email closing report
- Secure cash for deposit