Direct Printing
Introduction
At a busy counter, every print that stops to show the browser's print dialog costs a few seconds and a click. Over a day of receipts, drawer reports and barcode labels, that adds up — and on a till with no keyboard nearby it can stop a sale altogether.
Direct Printing, added in WooCommerce POS 7.3.0, sends documents straight to the right printer on your counter through a print service:
- Receipts and drawer reports go to a thermal printer.
- Barcode labels go to a ZPL label printer, such as a Zebra.
- PDF files from the media library go to an ordinary A4 or laser PDF printer.
The printers are reached through a small desktop app on the till computer, so they do not have to be connected to your web server. If that computer is asleep, a job waits in the queue instead of failing.
Nothing changes until you switch it on
While the print service is disabled — the default — every print opens the browser print dialog exactly as in earlier versions.
Before You Start
- A Direct Print account at app.odoodirectprint.com — the print service the Printing tab connects to. The Create a key link on the Printing tab opens its sign-in page.
- The Webkul Cloud Print Manager desktop app running on the computer your printers are connected to.
- An API key from that account, allowed to use your printers.
- For receipts and drawer reports, the register's invoice page size set to Epson TM-T88V Thermal Page (see Admin Configuration → Invoice Printer). With A4, A3, A5 or A6, receipts keep using the browser dialog.
The next section walks through the account side step by step.
Setting Up the Print Service
Everything in this section happens in the Direct Print web panel and on the till computer, not in WordPress. You do it once per store; adding another till later only needs steps 2 and 3 again.
Step 1: Create a Direct Print Account
Open app.odoodirectprint.com/register and fill in Name, Company (optional — your name is used if left blank), Country, Email address and Password, then click Sign up. Already have an account? Sign in from the same page.
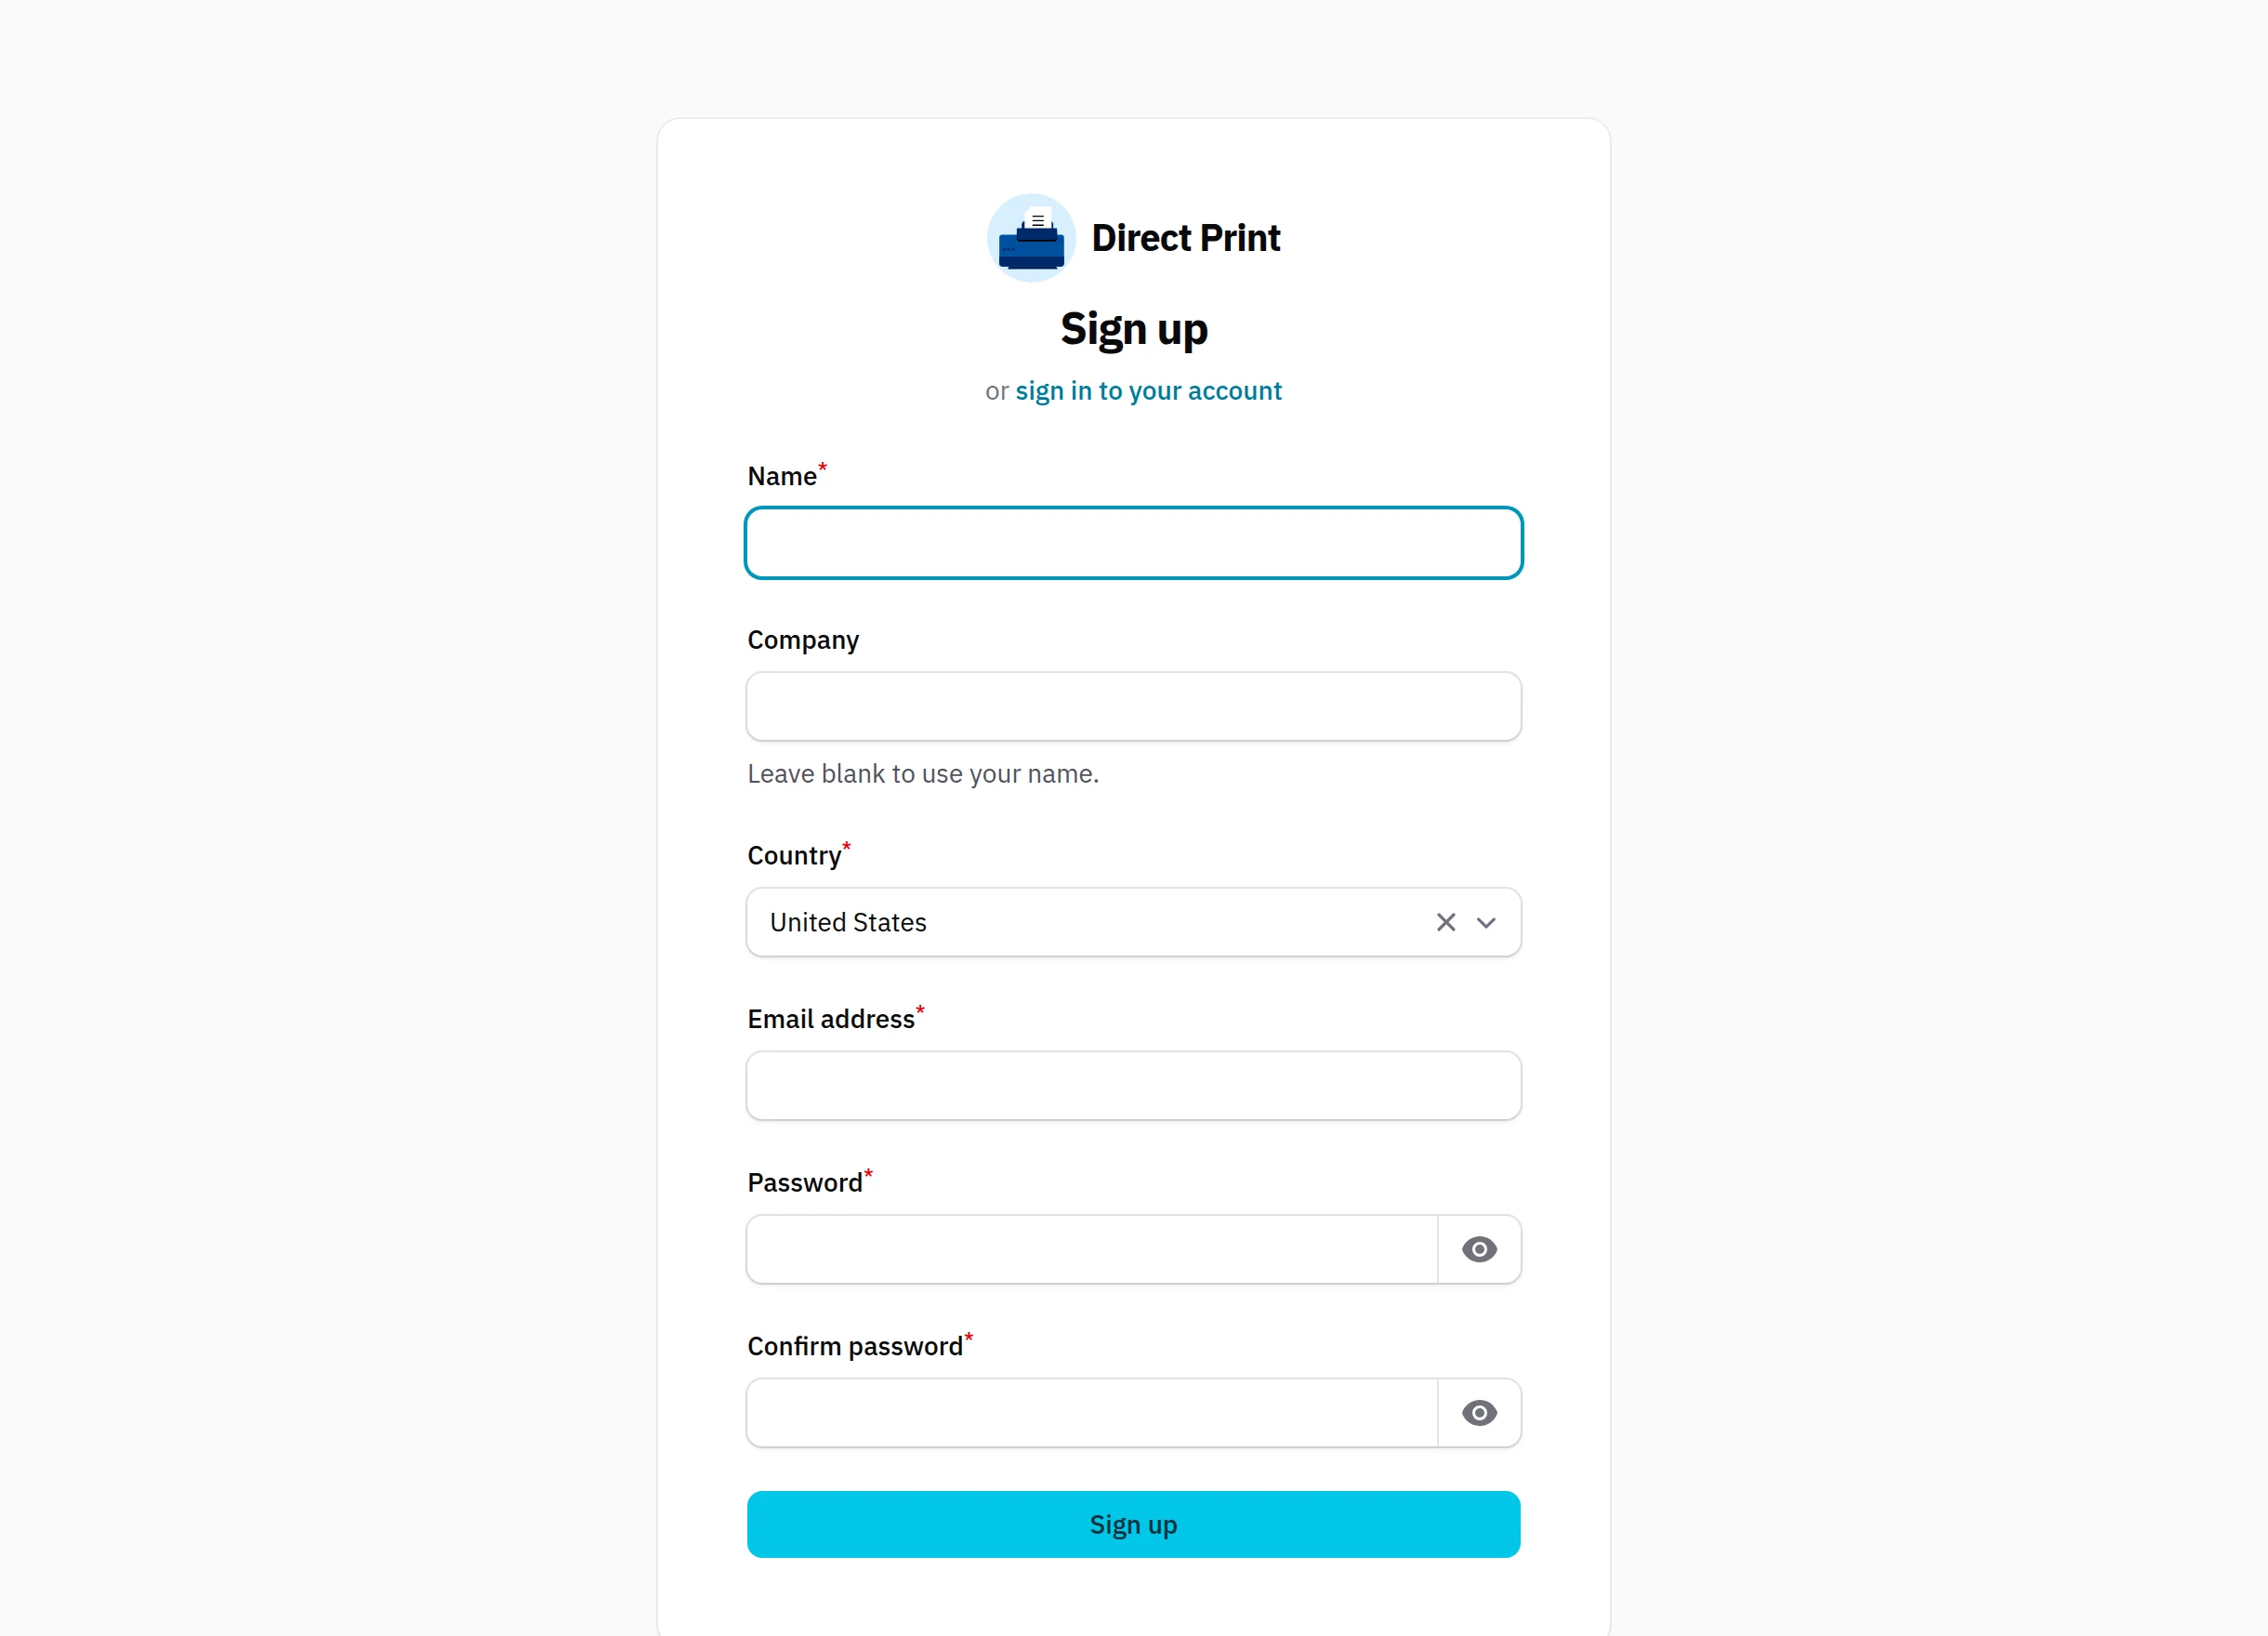
The Dashboard then shows your plan, the prints left this period, prepaid credits and how many computers are online.
Step 2: Install the Desktop App on the Till Computer
Go to Download the app in the panel menu and download Webkul Cloud Print Manager for the computer your printers are plugged into:
| System | Files offered |
|---|---|
| Windows | Setup EXE installer, or a ZIP |
| macOS | DMG or ZIP, for Apple silicon (arm64) and Intel (x64) |
| Linux | AppImage, DEB, RPM or ZIP |
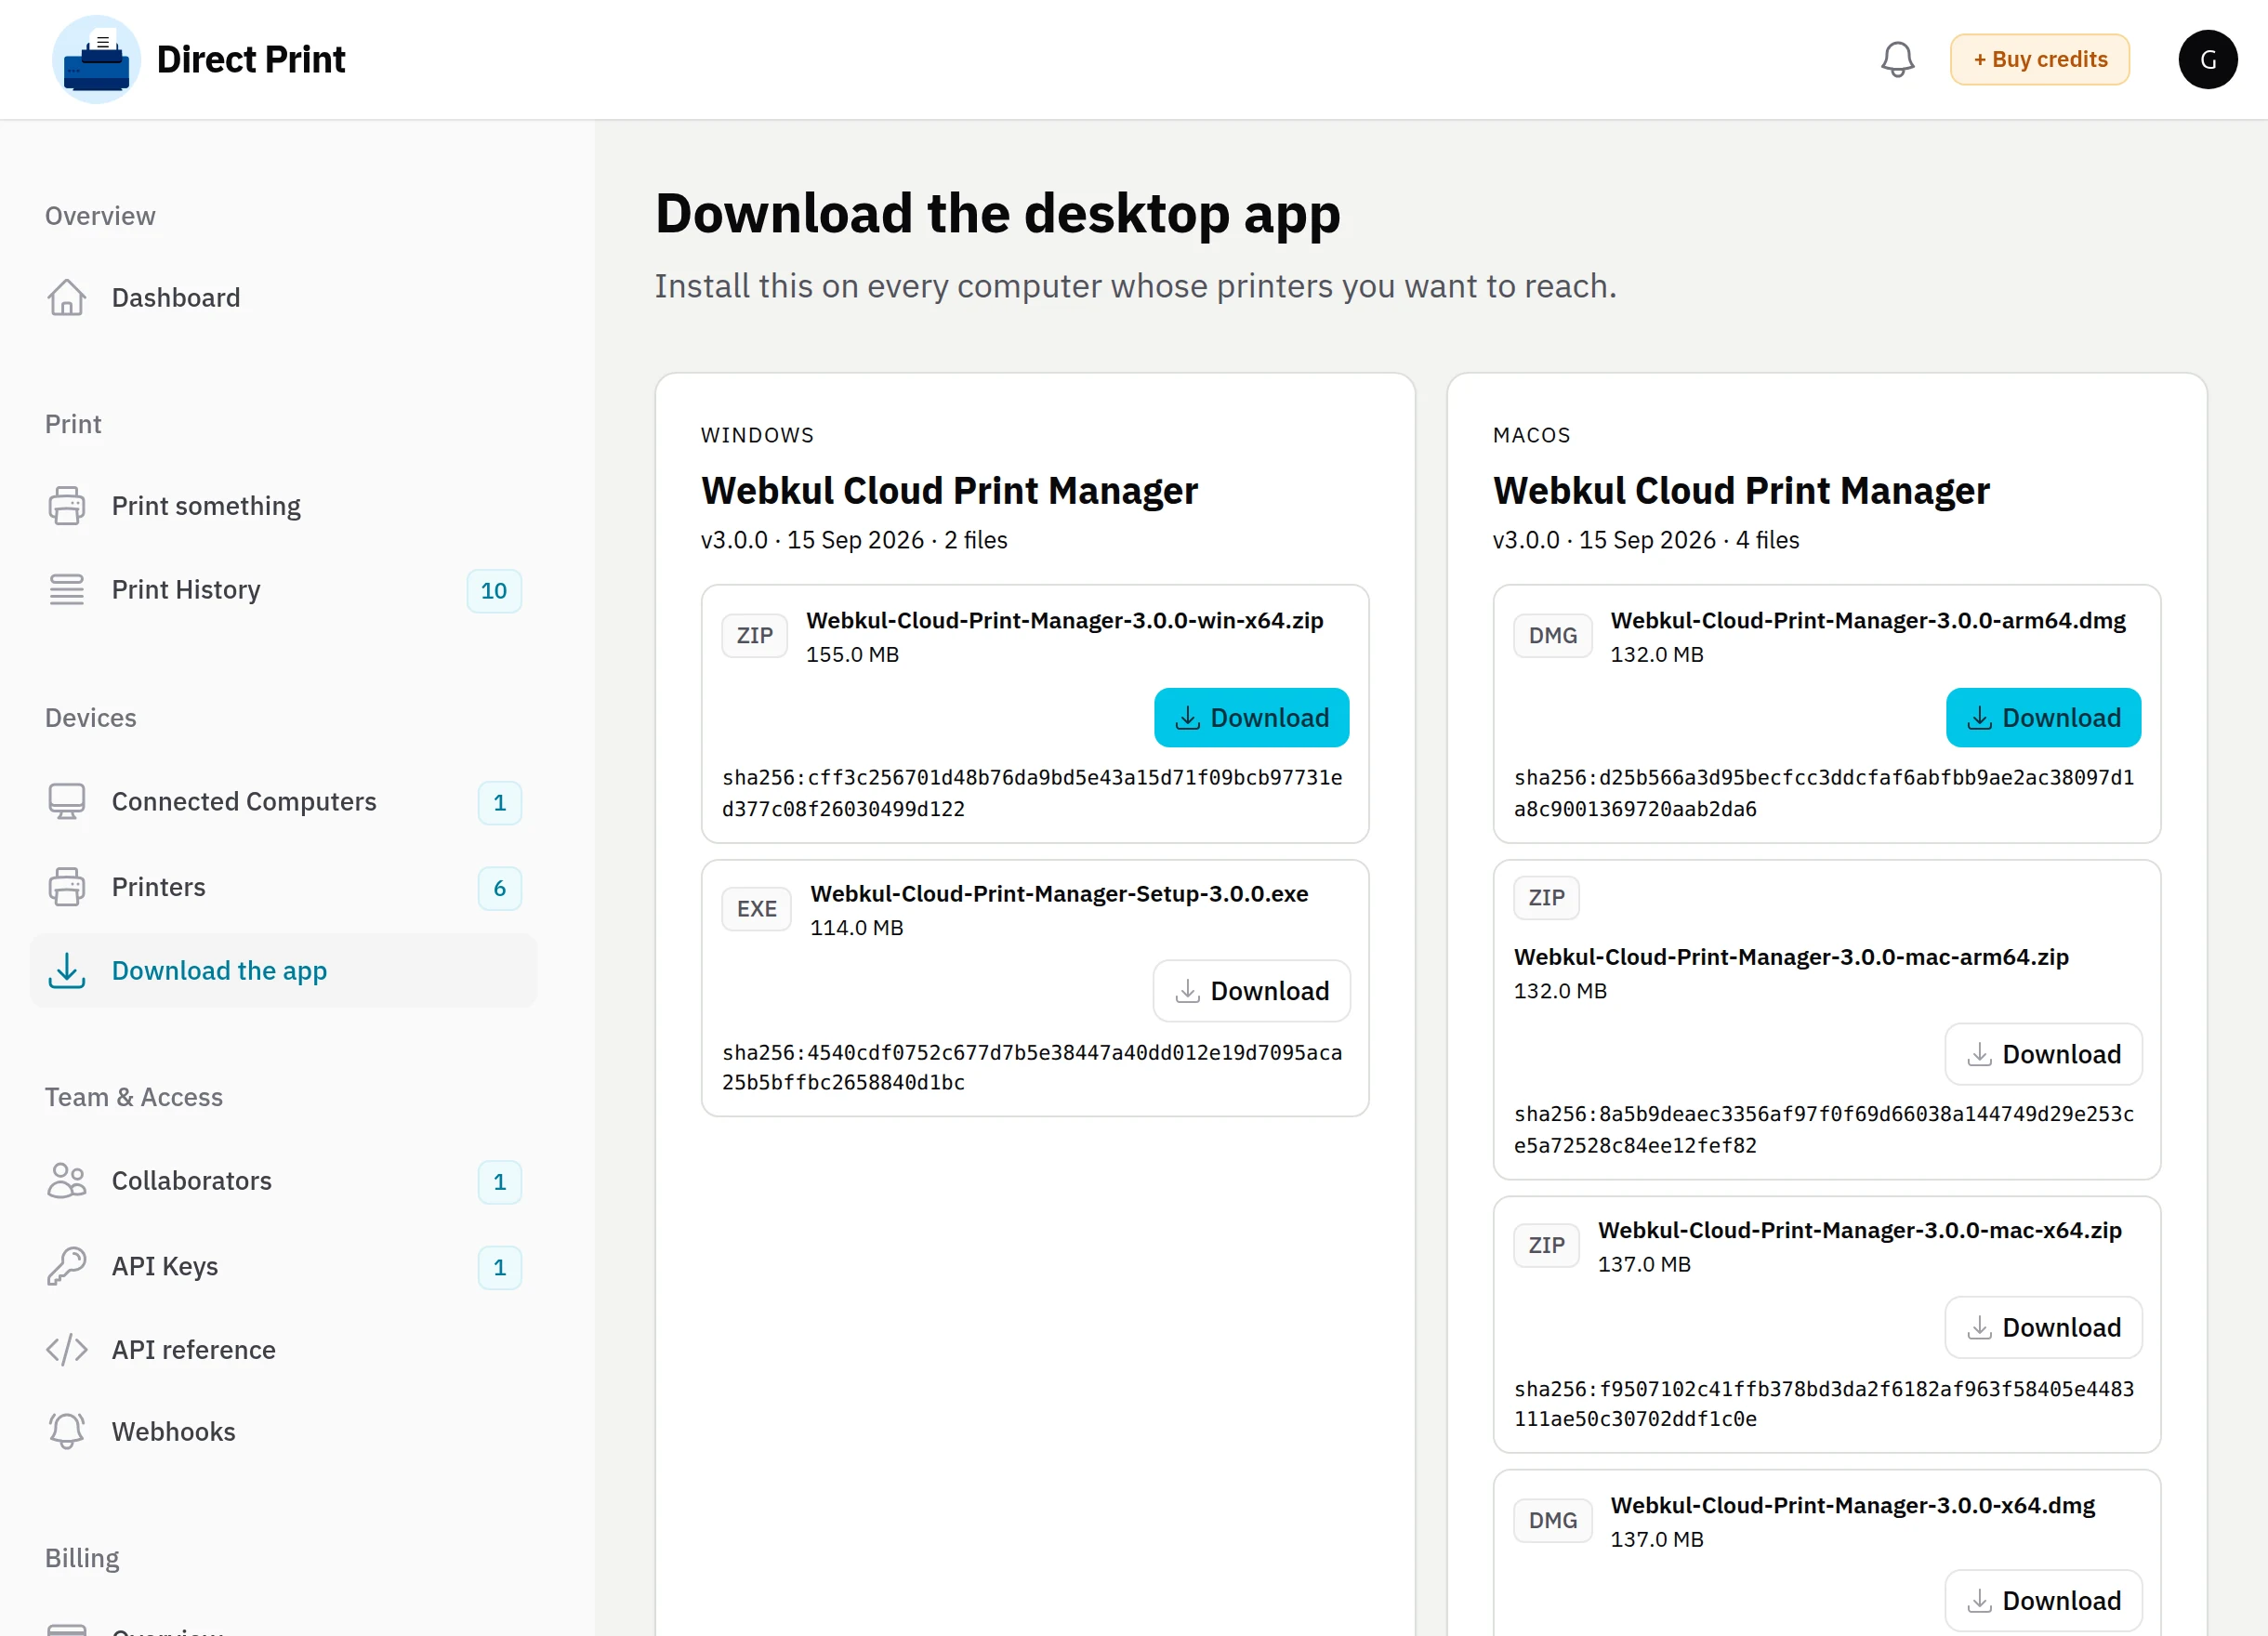
Install it on every computer whose printers you want to print to — normally the computer at each counter. The printers themselves stay connected to that computer as usual (USB or network); they never need to reach your web server.
Step 3: Connect the Computer to Your Account
- In the panel, open Connected Computers and click Add computer.
- Copy the Enrollment token with the copy button.
- Open the desktop app on the till computer and paste the token when it asks you to enroll.
The computer appears in Connected Computers once the app checks in, and its printers are discovered automatically. The same token connects every computer in your account, up to the number your plan allows.
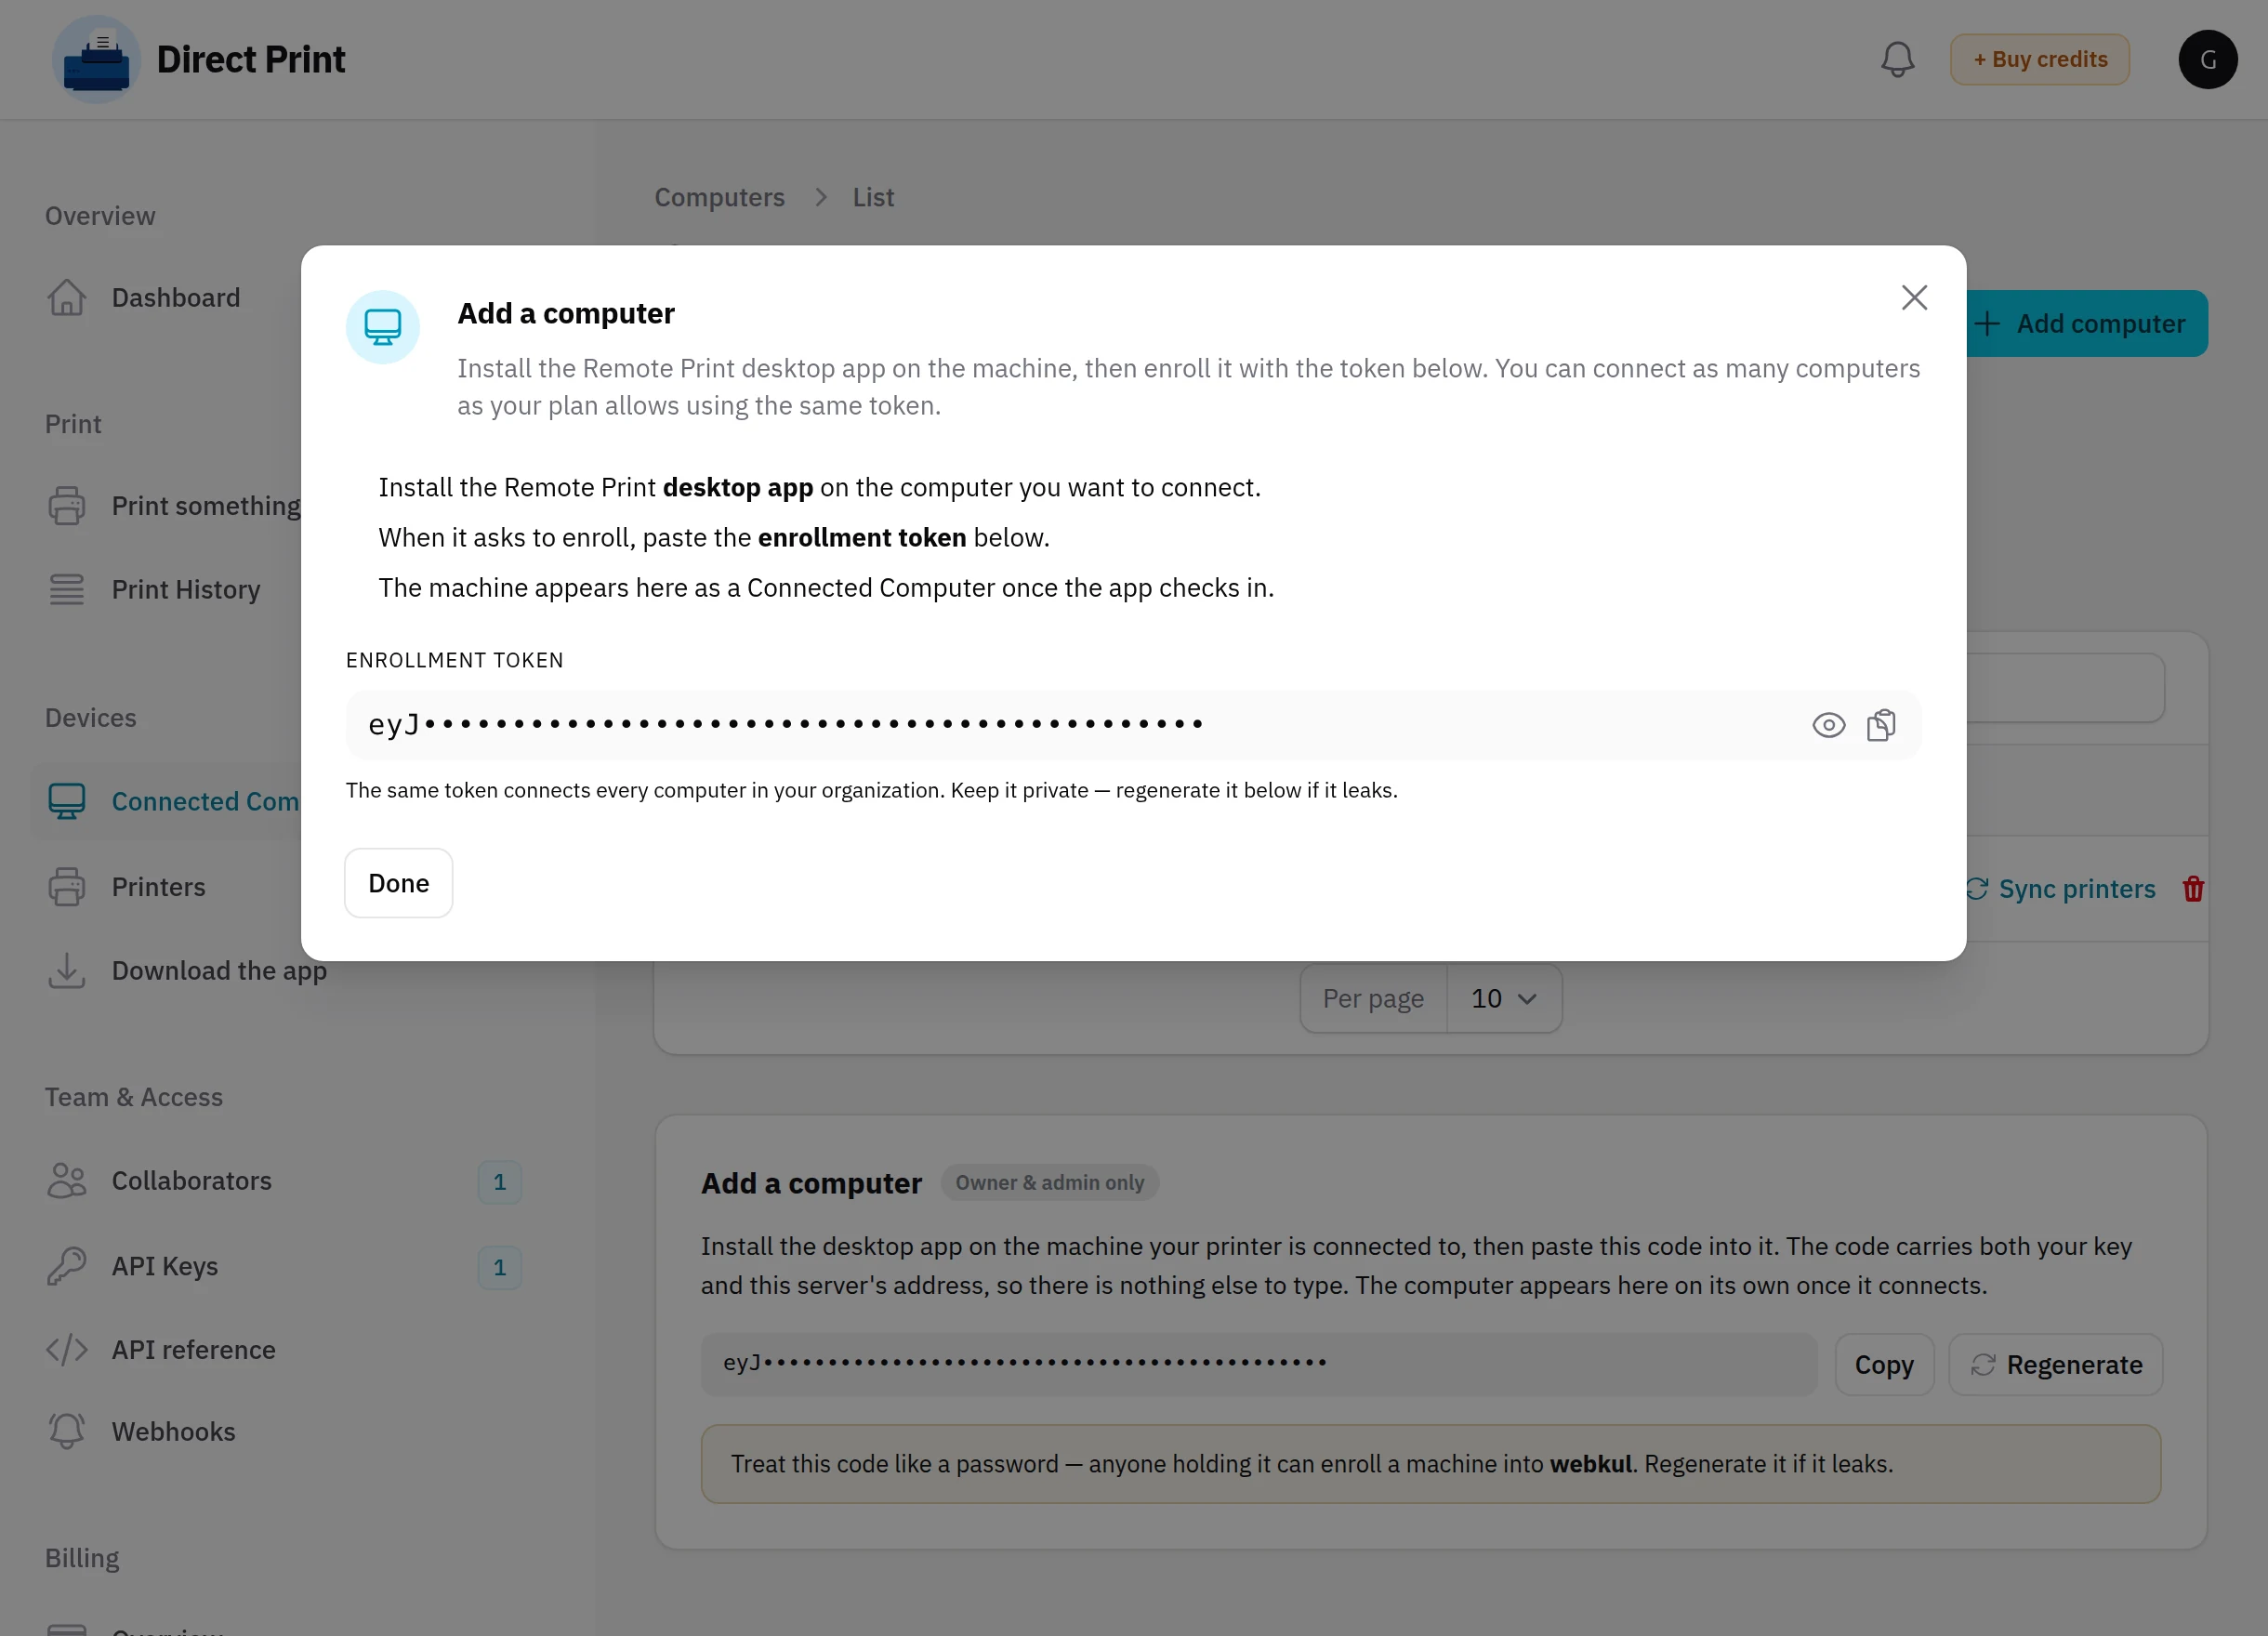
Keep the enrollment token private
Anyone holding it can connect a machine to your account. If it leaks, click Regenerate on the Connected Computers page.
Step 4: Set Each Printer's Type
Open Printers. Every printer found on your connected computers is listed with its type, driver and status. Click Edit on a printer:
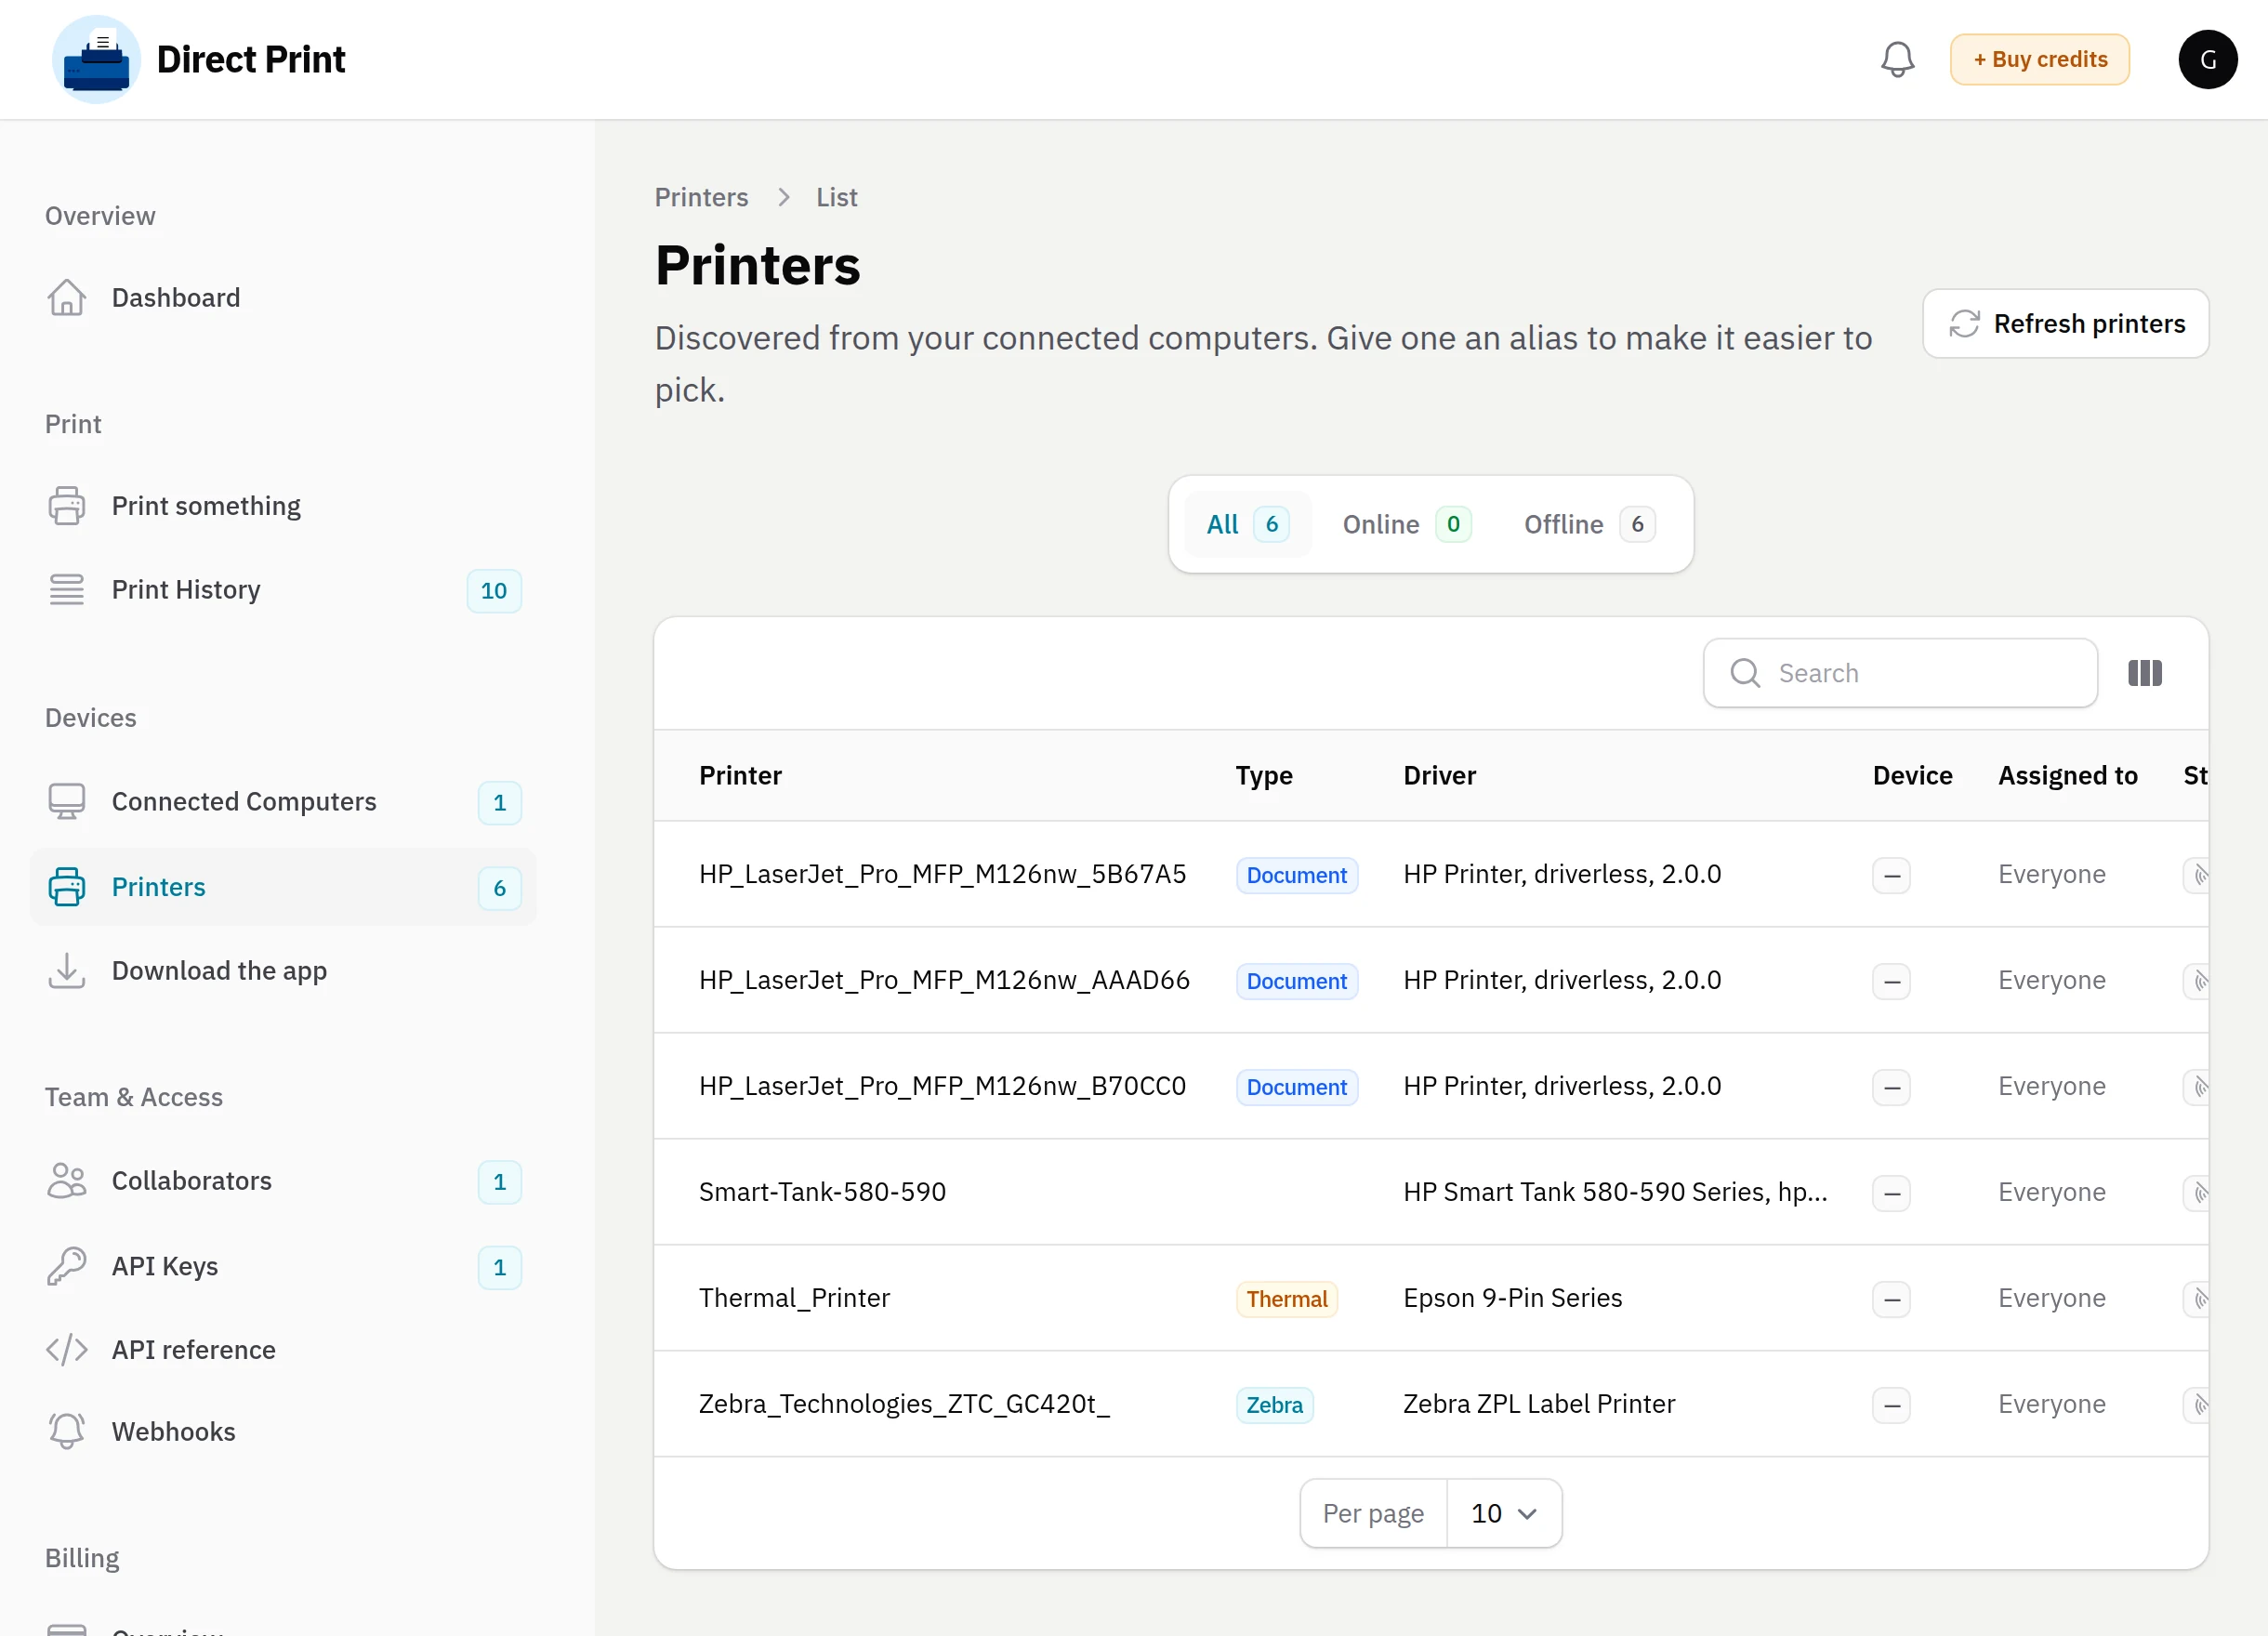
- Display name — optional friendly name, for example Front counter receipts. WooCommerce POS shows this name in its printer dropdowns and in the till's printer picker instead of the driver name.
- Printer type — required. Pick the type that matches the job the printer will do in the POS:
| Printer type in Direct Print | Use it as this printer in WooCommerce POS |
|---|---|
| Thermal / receipt (ESC/POS) | Thermal printer — receipts and drawer reports |
| Zebra / label (ZPL) | ZPL printer — barcode labels |
| Document / PDF (A4, laser, inkjet) | PDF printer — PDF files |
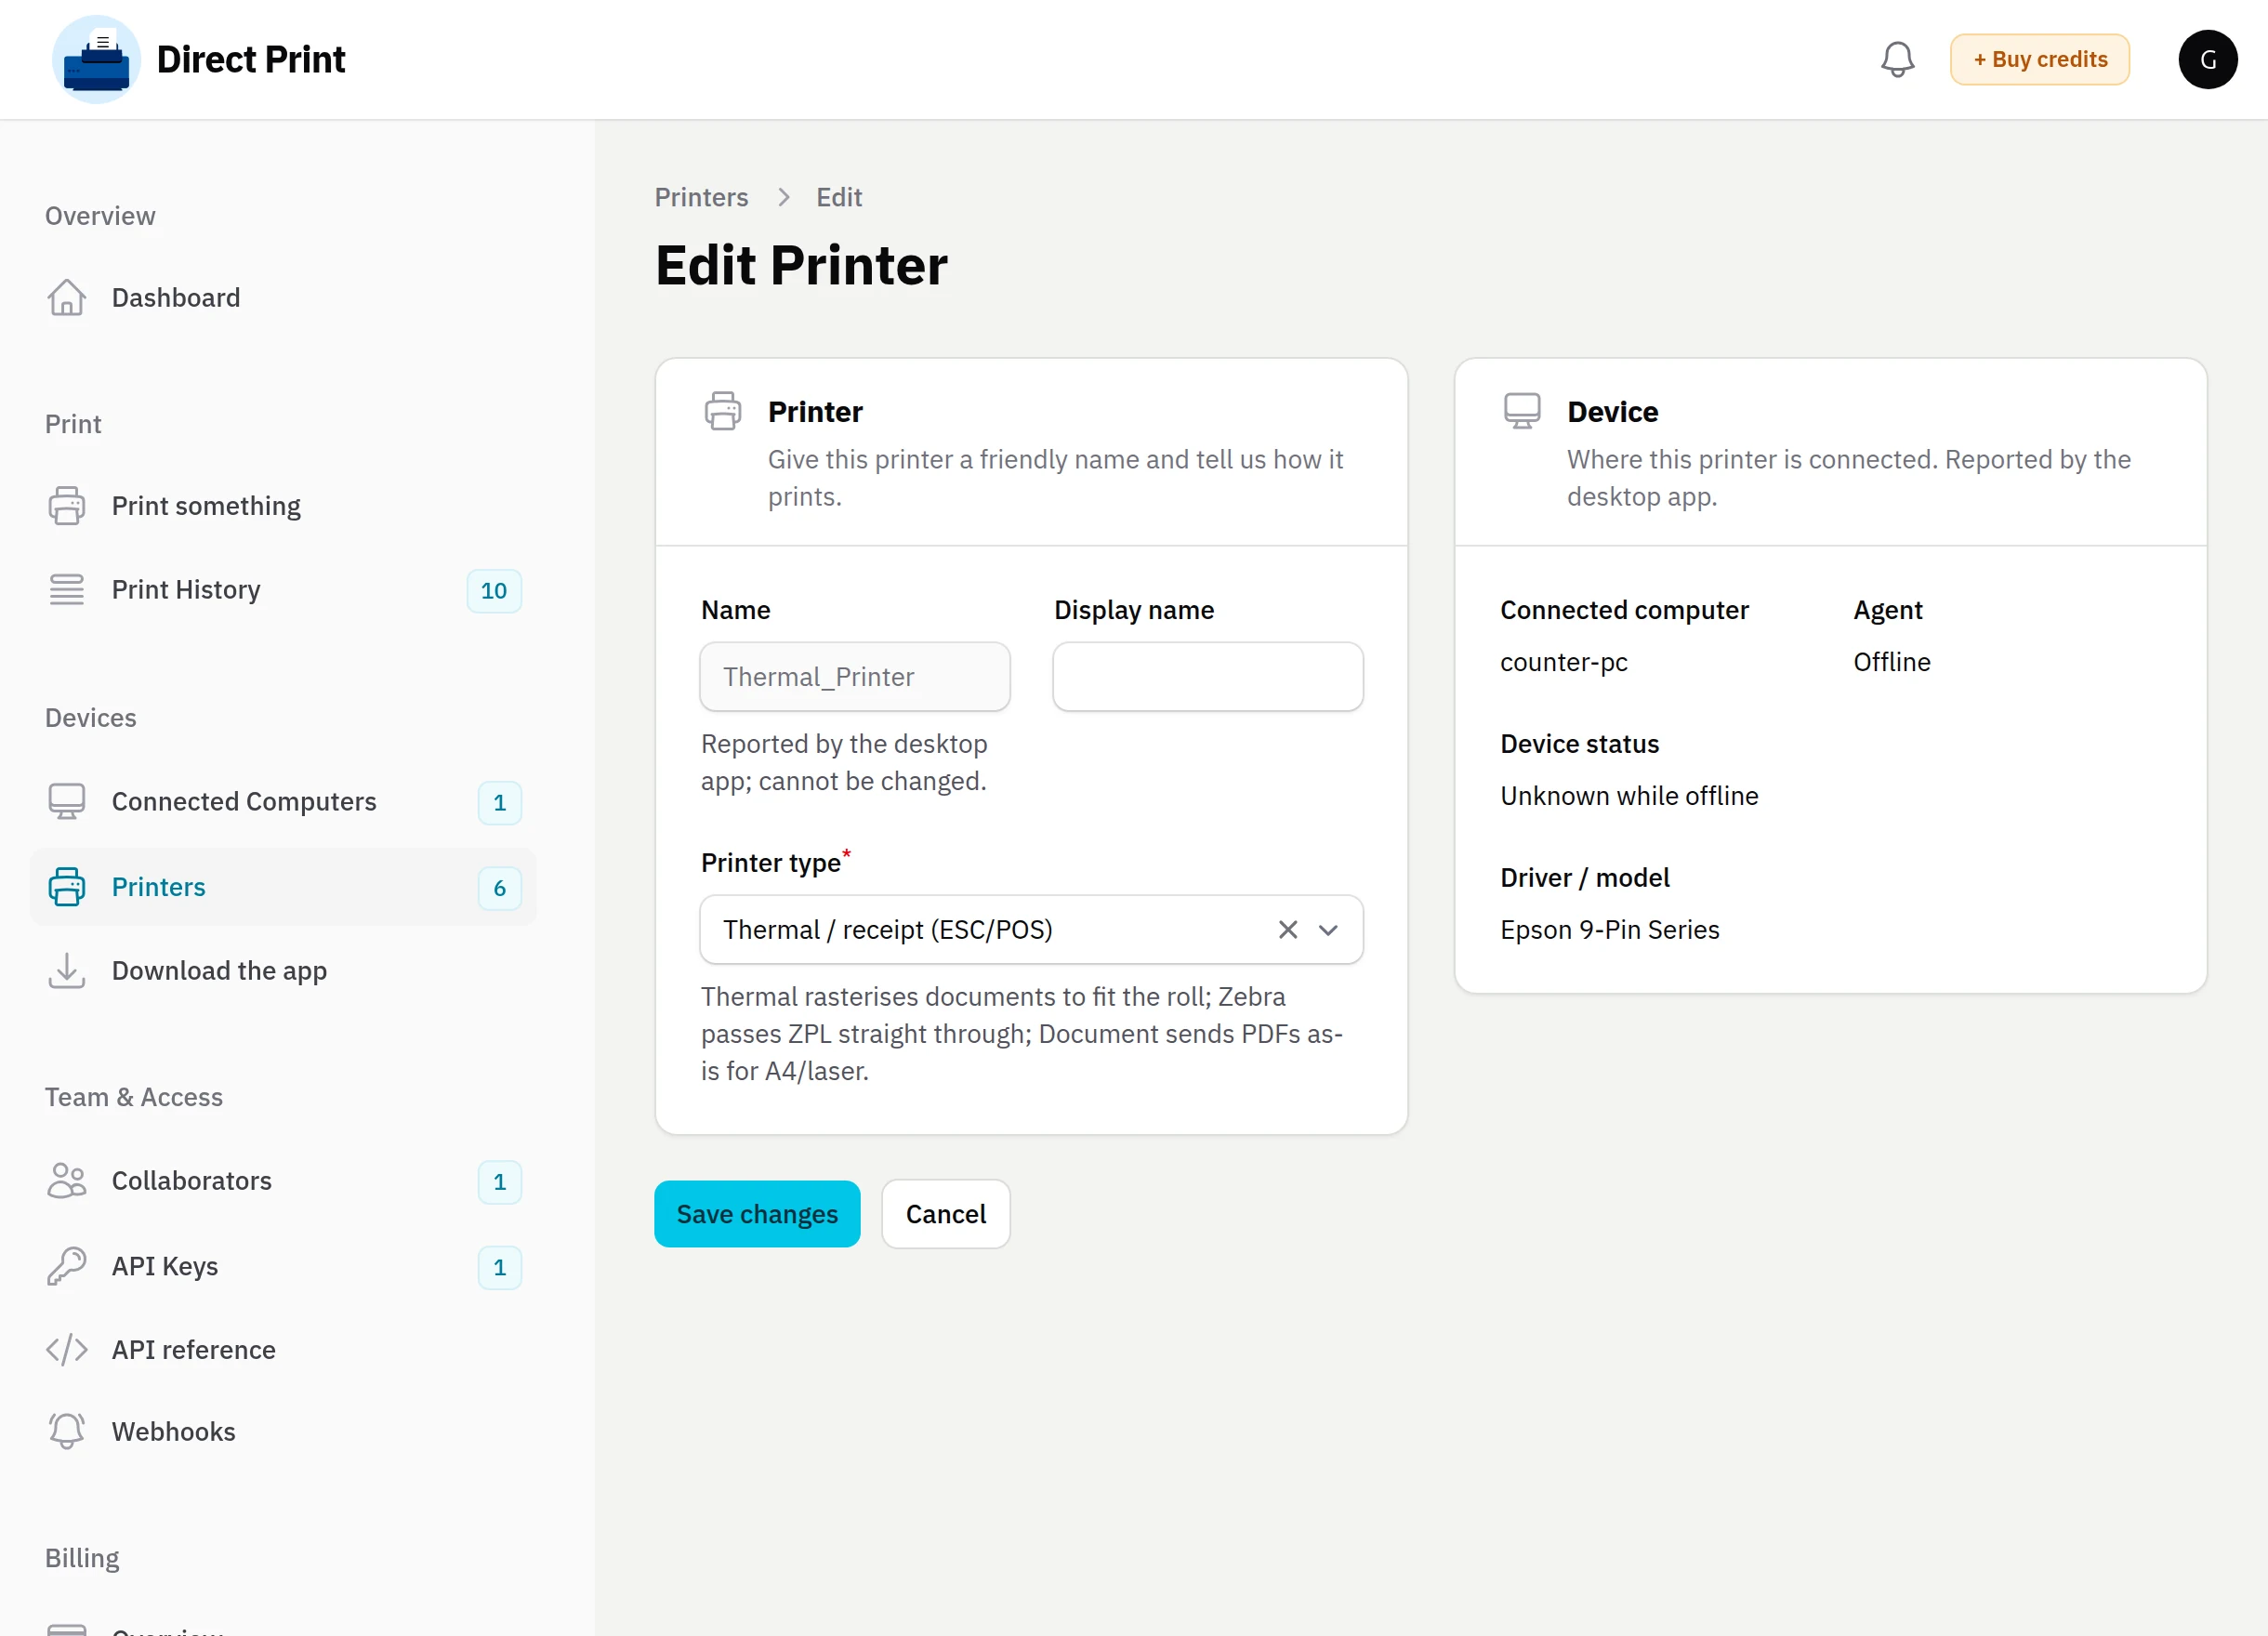
Click Save changes. A printer whose type has not been chosen does not accept prints — the Dashboard flags it under Needs type.
Step 5: Create the API Key for WooCommerce POS
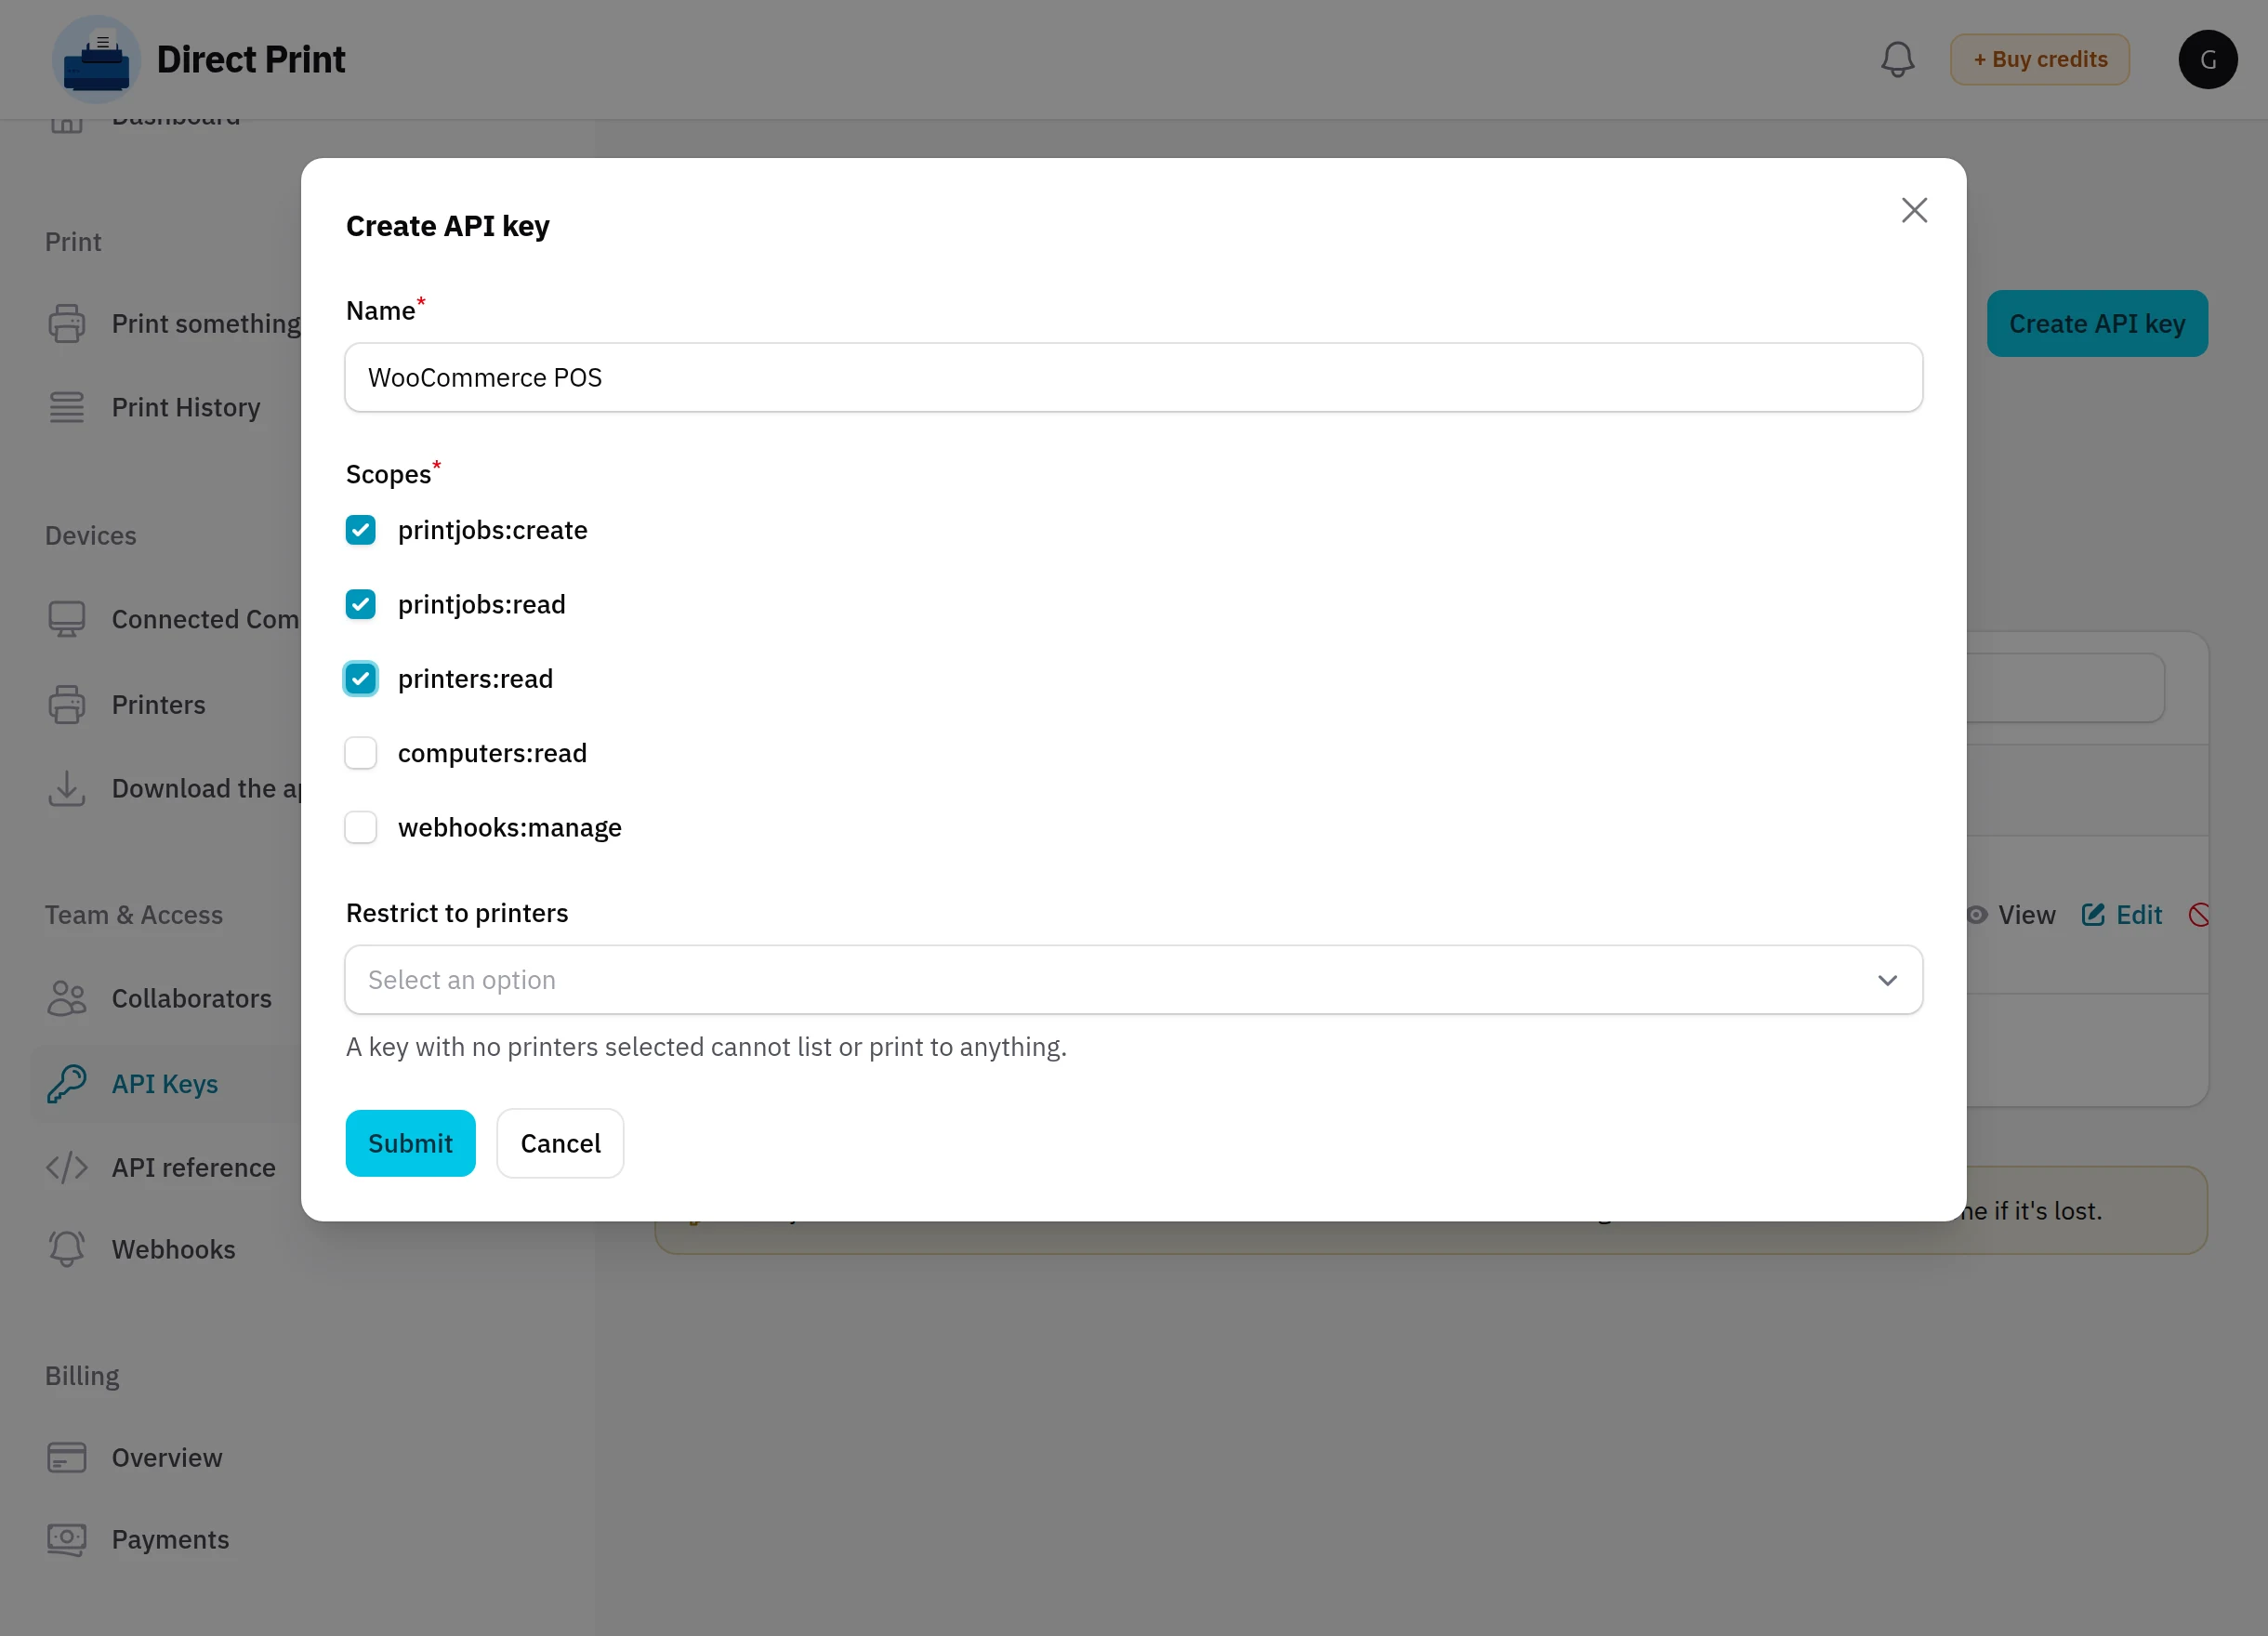
- Open API Keys and click Create API key.
- Name — anything that tells you where the key is used, for example WooCommerce POS.
- Scopes — tick printjobs:create, printjobs:read and printers:read. These are the three WooCommerce POS uses: sending prints, checking whether a print went through, and loading your printer list. computers:read and webhooks:manage are not needed.
- Restrict to printers — select every printer the POS should be able to use. A key with no printers selected cannot list or print to anything, so the Printing tab would stay empty.
- Click Submit and copy the key straight away. It starts with
cp_live_.
The key is shown only once
Direct Print stores the key hashed and can never show it again. If it is lost, click Revoke on the old key, create a new one and paste the new key into the Printing tab.
Step 6: Connect WooCommerce POS
Paste the key into API key on the Printing tab and save, as described in the next section. Your printers are loaded from the account the moment the key is accepted.
Prints, Plans and Print History
- Every print job sent from the POS — a receipt, a drawer report, a barcode print or a PDF — uses one print from your plan's allowance for the period; once that runs out, prepaid credits are used. Plan and credits are under Billing in the panel.
- A job that finally fails gives its print back automatically.
- If the till computer is off or asleep, the job is held — not lost — and prints when the desktop app reconnects.
- Print History lists every job with its status (Printed, Sending, Waiting, Failed, Cancelled, Expired) and lets you retry a failed one.
Configuring the Printing Tab
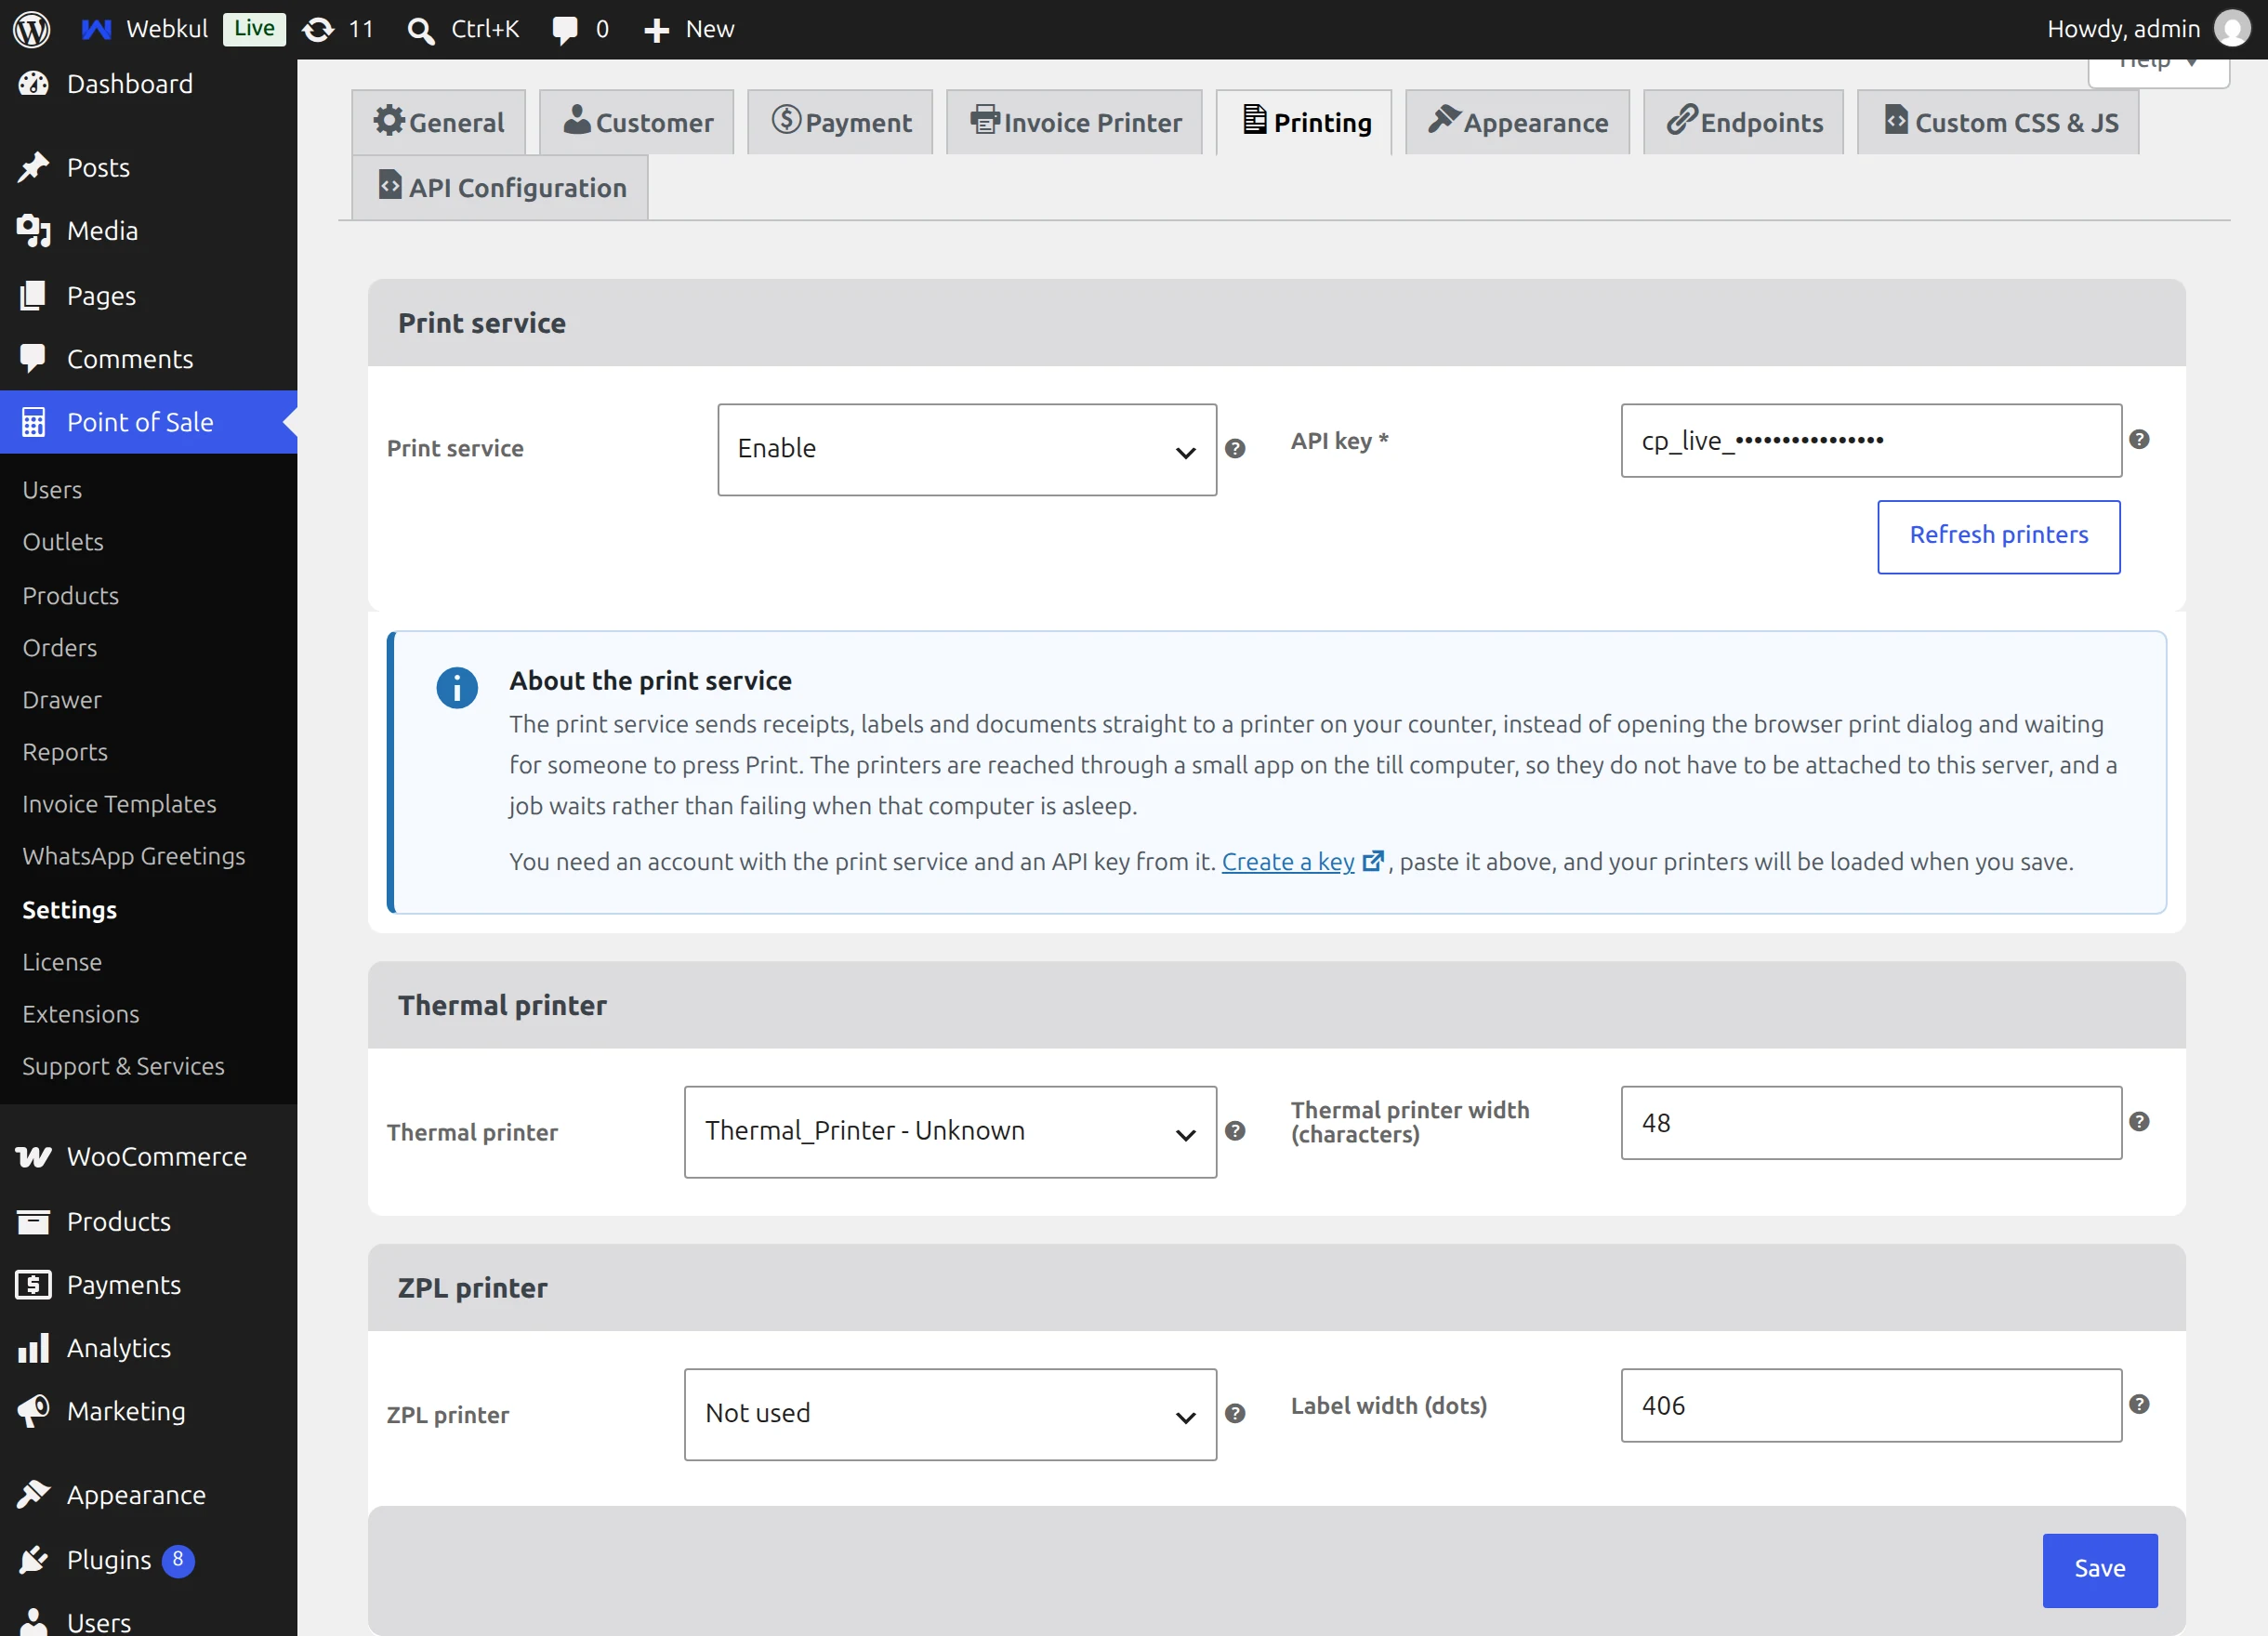
Navigation path:Point of Sale → Settings → Printing
Print Service
- Set Print service to Enable. The rest of the tab appears; it only applies while the service is on.
- Paste your key into API key. It is required and cannot be left empty.
- Click Save. The key is checked against the print service and your printers are loaded at the same time.
Added a printer to your account later? Click Refresh printers to reload the list without saving. Until a working key has been saved, the tab shows No printers loaded yet.
Choosing the Printers
Each printer dropdown lists every printer on your account, whatever its type, so you decide which printer does which job. A printer that is not ready shows its status after its name, for example Thermal_Printer - Unknown. Choose Not used to leave a job type on the browser dialog.
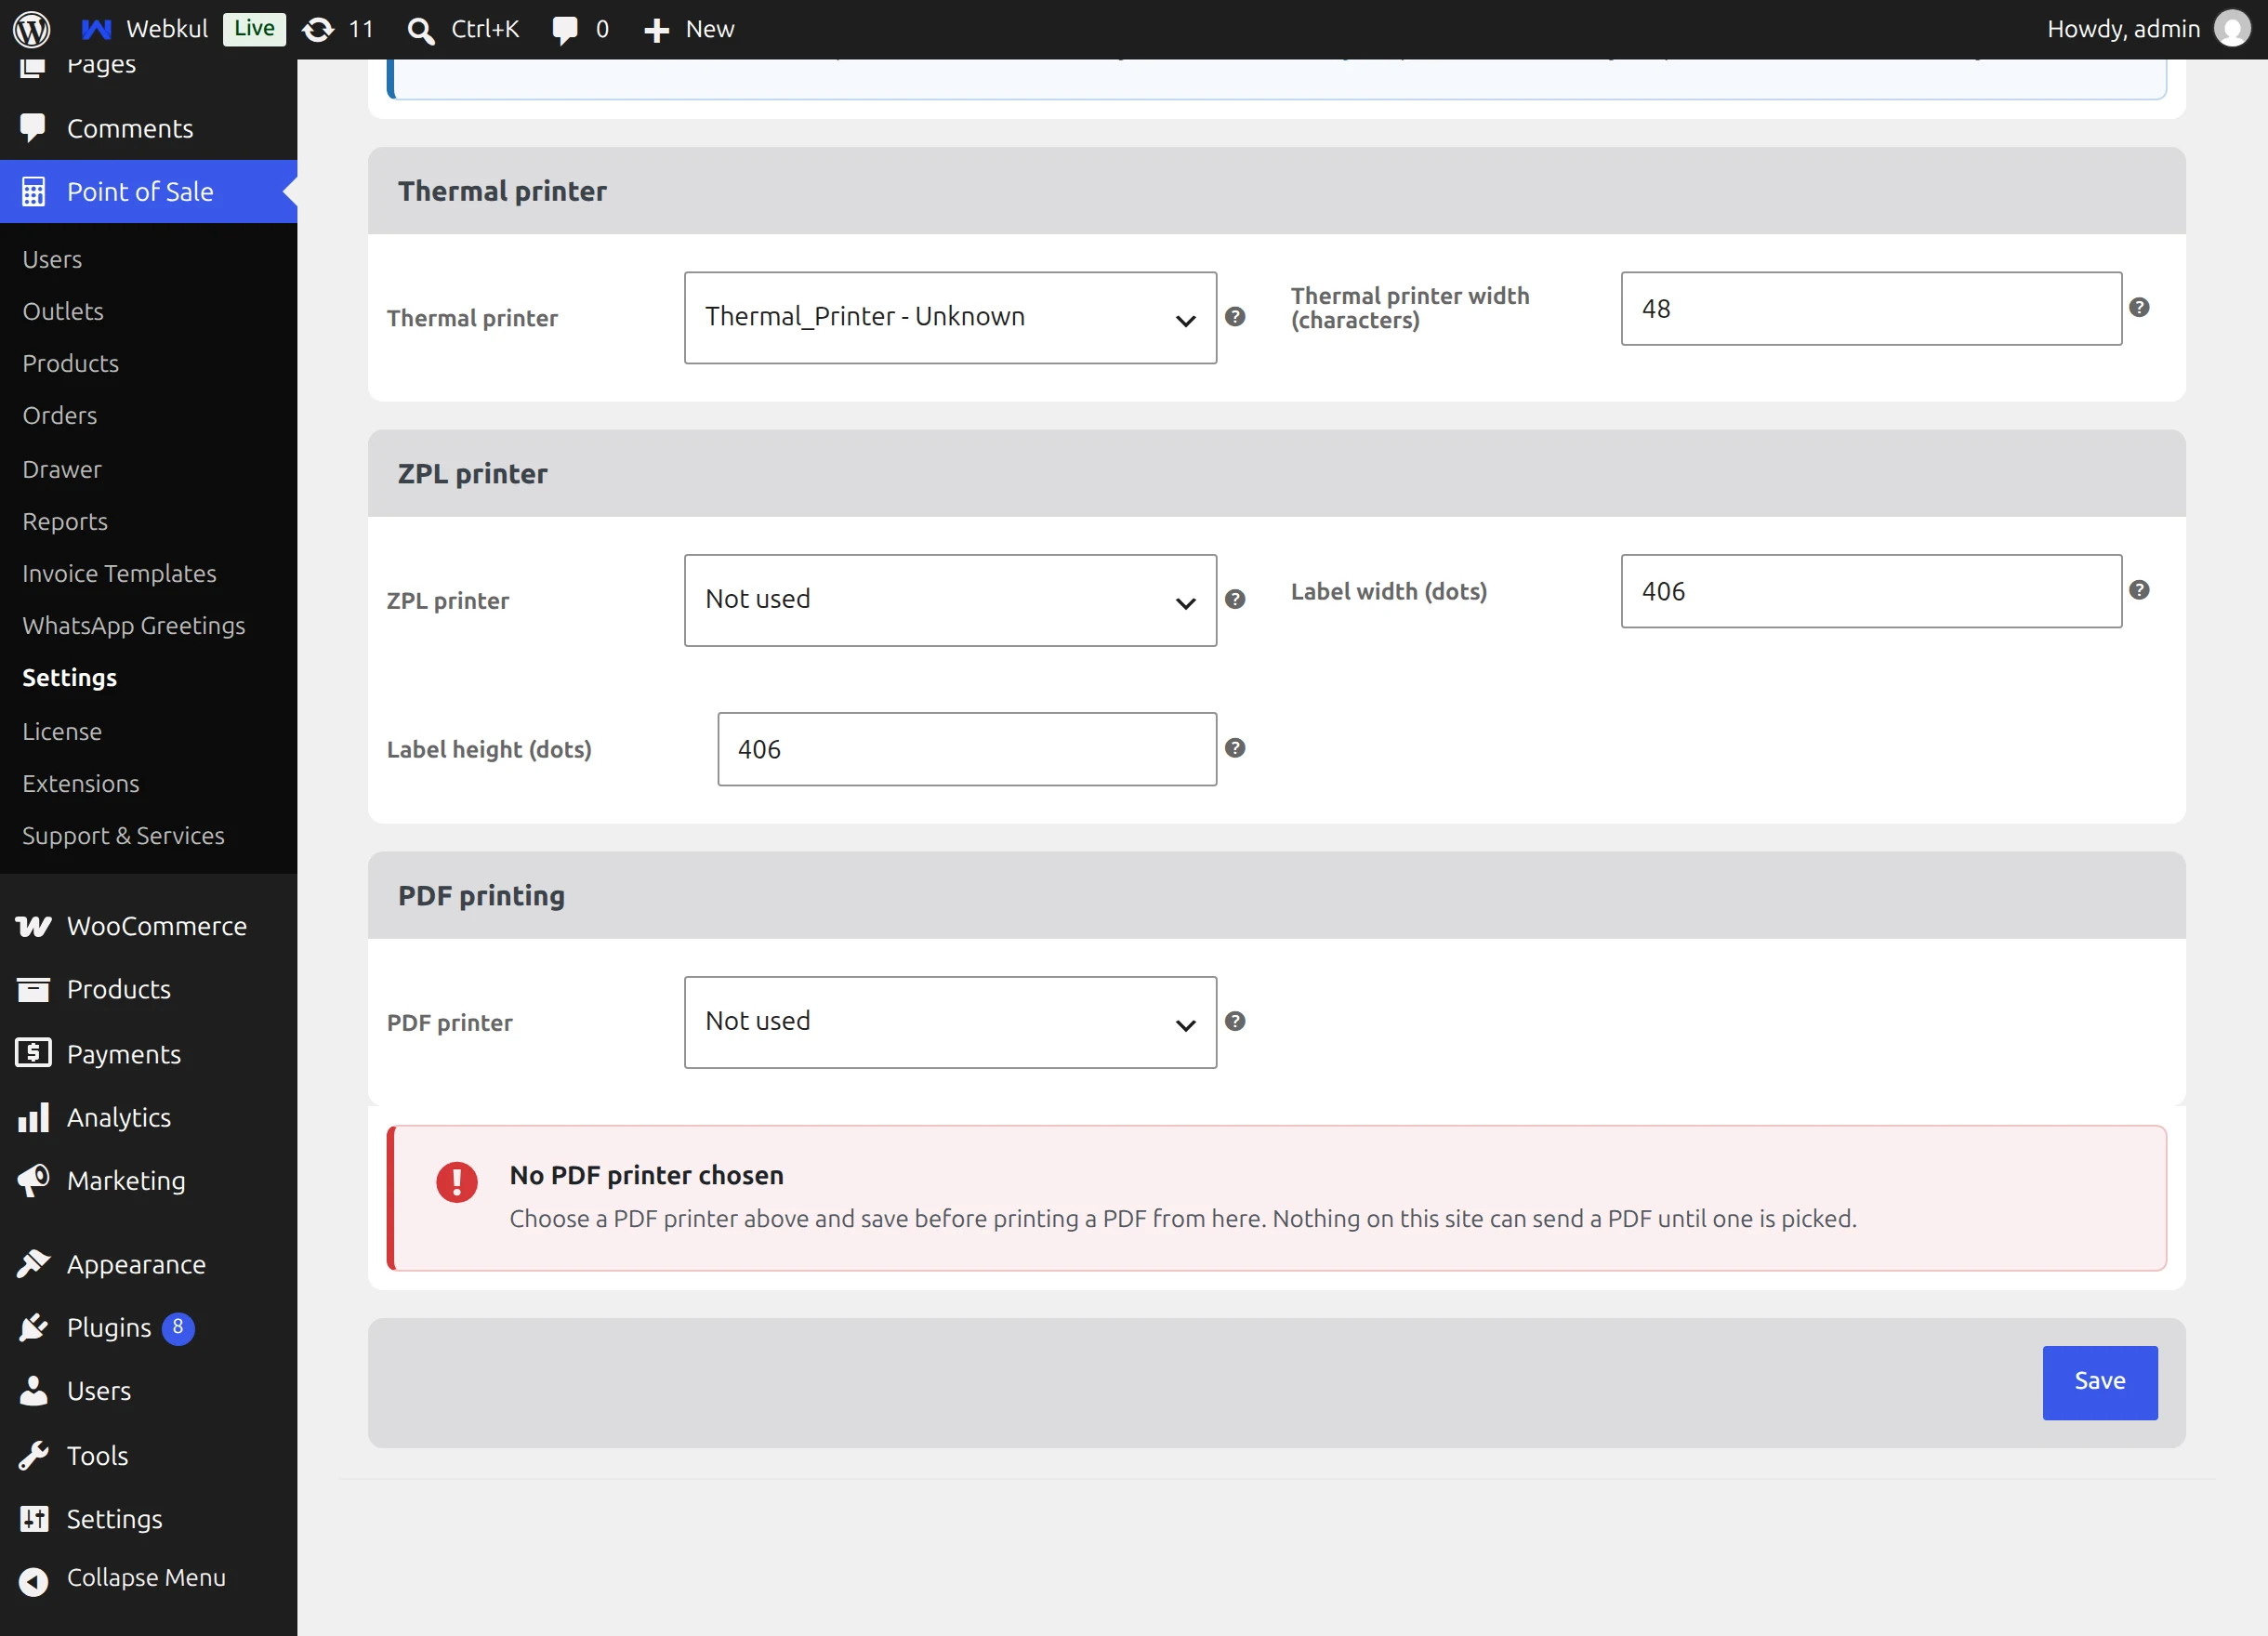
| Setting | Description | Default |
|---|---|---|
| Print service | Switches direct printing on or off for the whole store. | Disable |
| API key | The key from your print service account. Verified when you save. | Empty |
| Thermal printer | The receipt printer on the counter. Receipts and drawer reports go here unless the outlet, or the till for its session, has picked another. | Not used |
| Thermal printer width (characters) | How many characters the thermal printer prints on one line: 48 for 80 mm paper, 32 for 58 mm paper. Accepts 16 to 170. | 48 |
| ZPL printer | The label printer. Barcode labels are sent here as ZPL. | Not used |
| Label width (dots) | Width of one label. At 203 dpi, 8 dots make about 1 mm, so 450 is a 56 mm wide label. Accepts 64 to 4096. | 450 |
| Label height (dots) | Height of one label. 210 is a 26 mm tall label. Accepts 64 to 4096. | 210 |
| PDF printer | An ordinary A4 or laser printer. PDFs are sent here. | Not used |
Printers removed from your account
If a chosen printer is no longer on your account when you save, it is not saved and the tab shows That printer is no longer on your account, so it was not saved. Refresh the printer list and pick again.
A Different Printer for Each Outlet
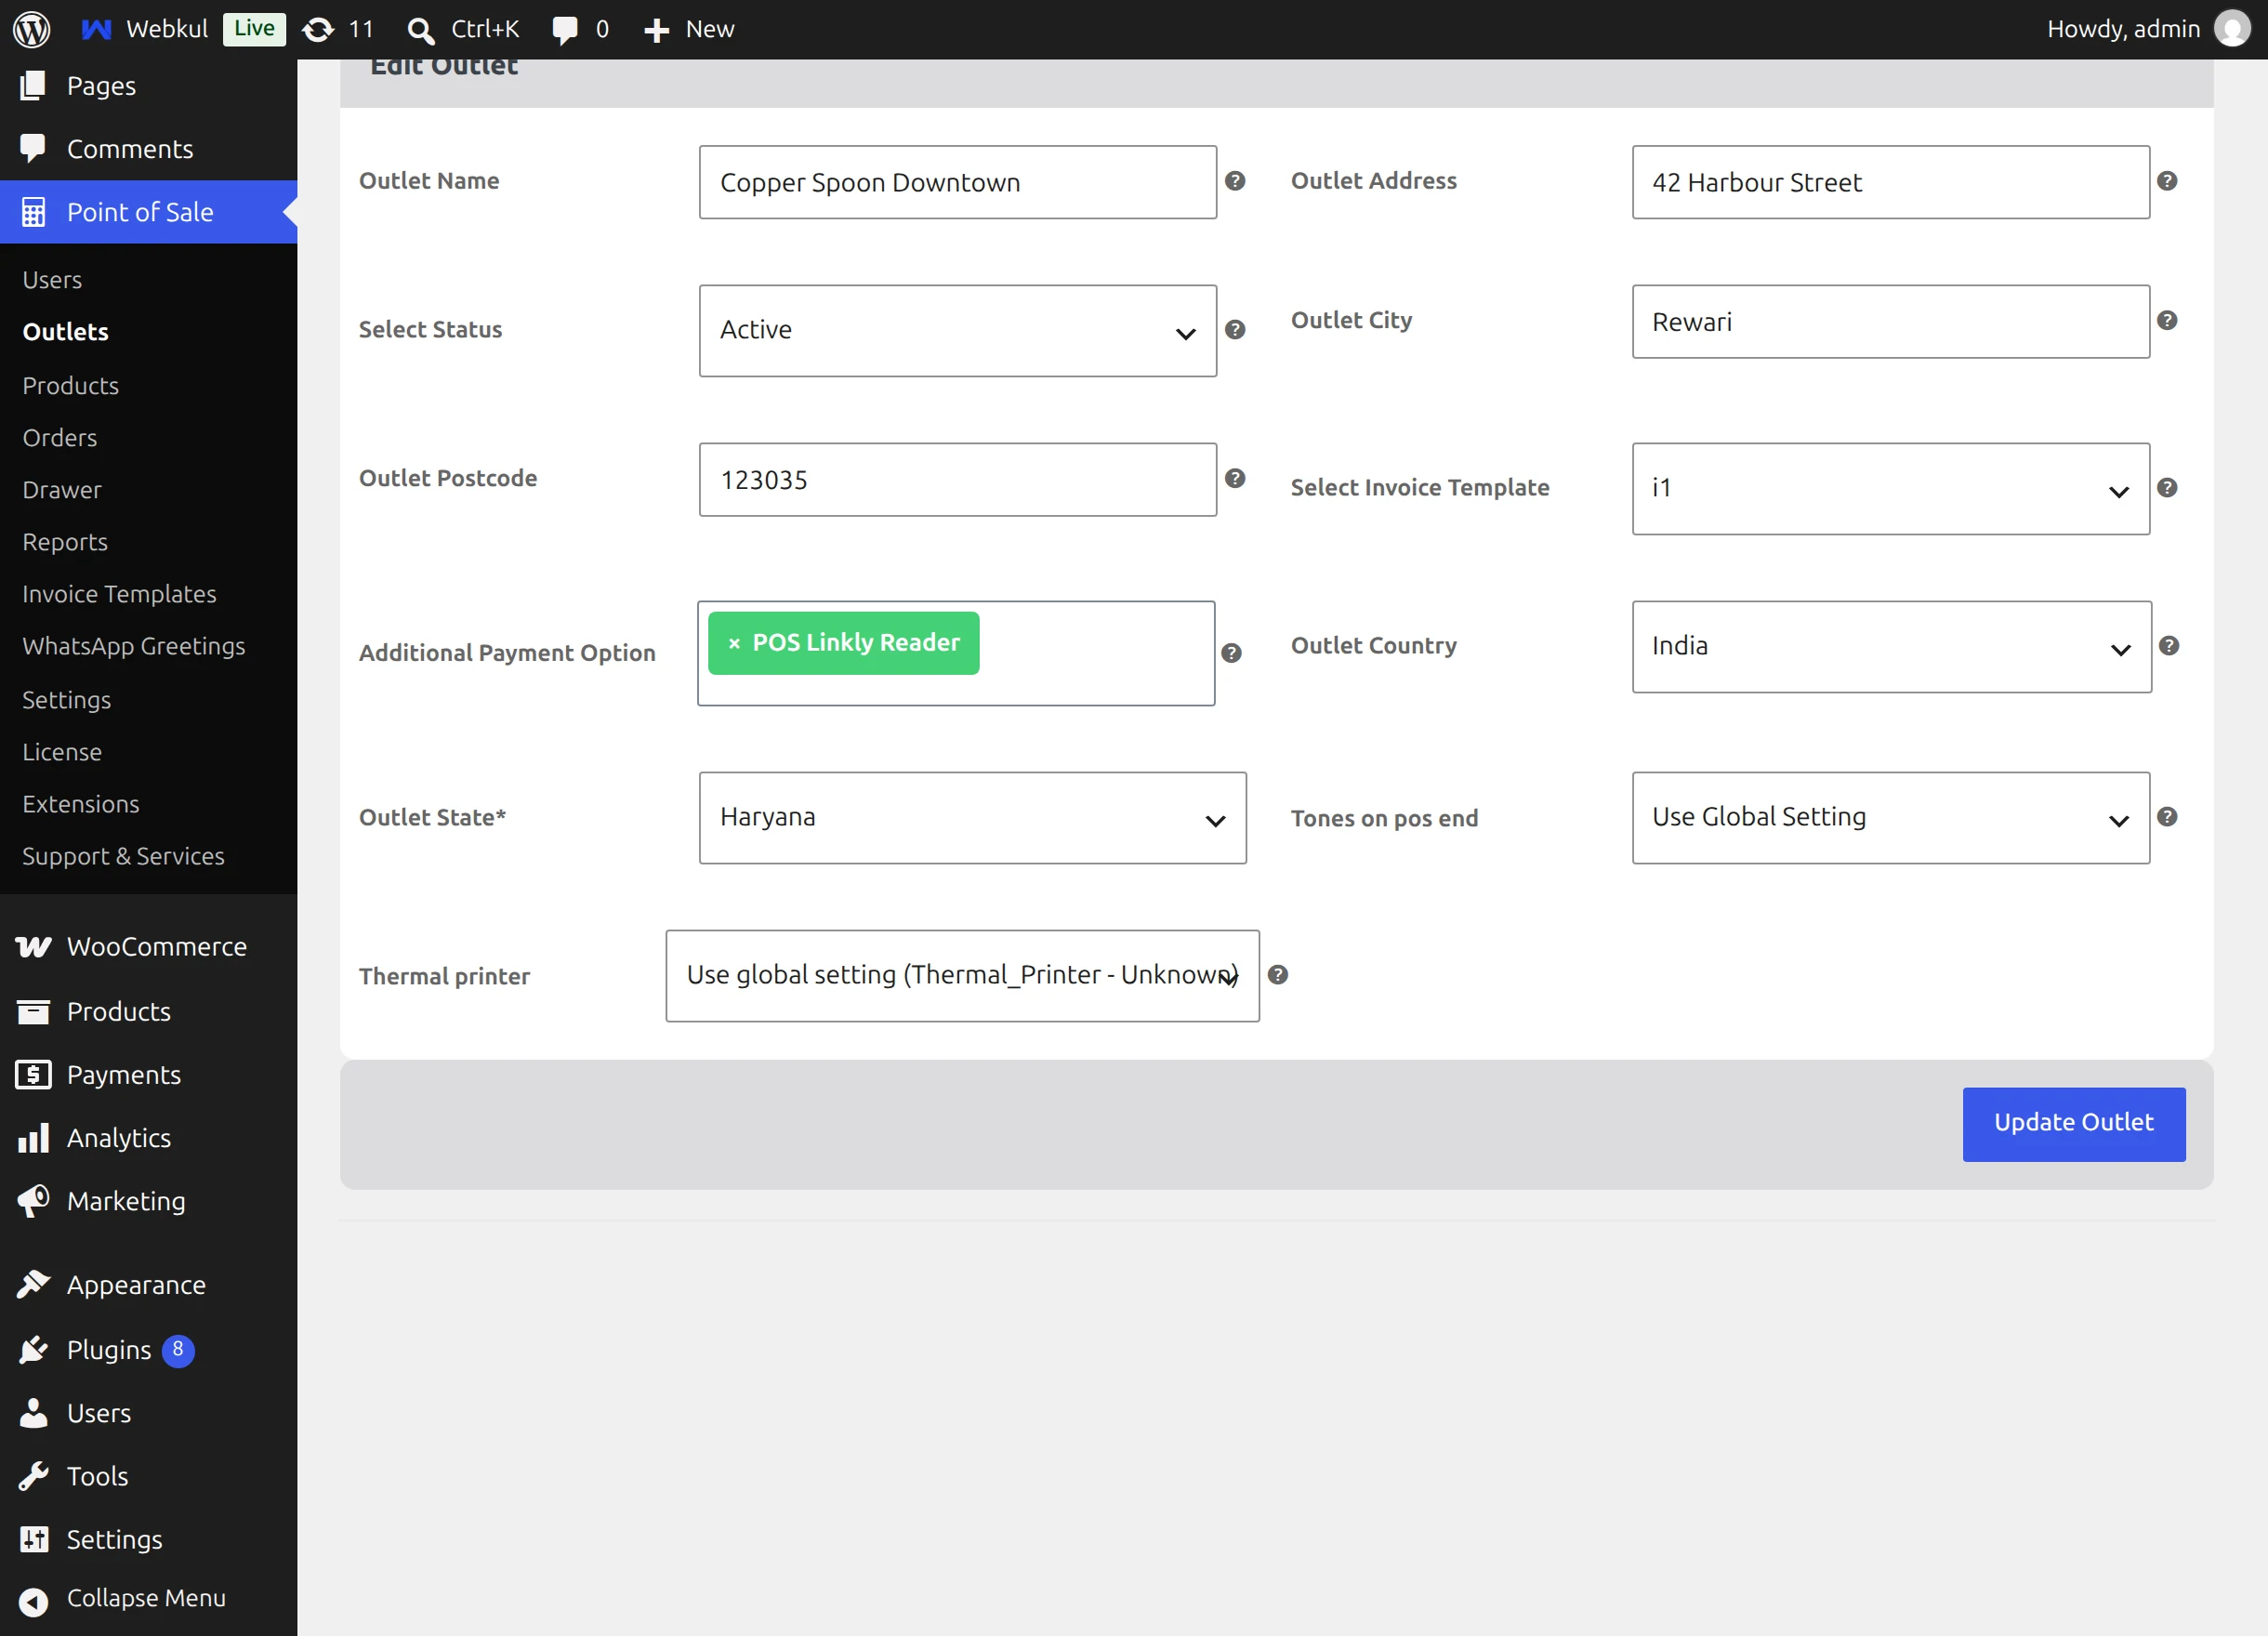
Navigation path:Point of Sale → Outlets → Edit
When the print service is on, the outlet form has a Thermal printer field. Leave it on Use global setting — the label shows which printer that is — or pick the printer at this outlet's counter, then click Update Outlet.
Choosing a Printer at the Till
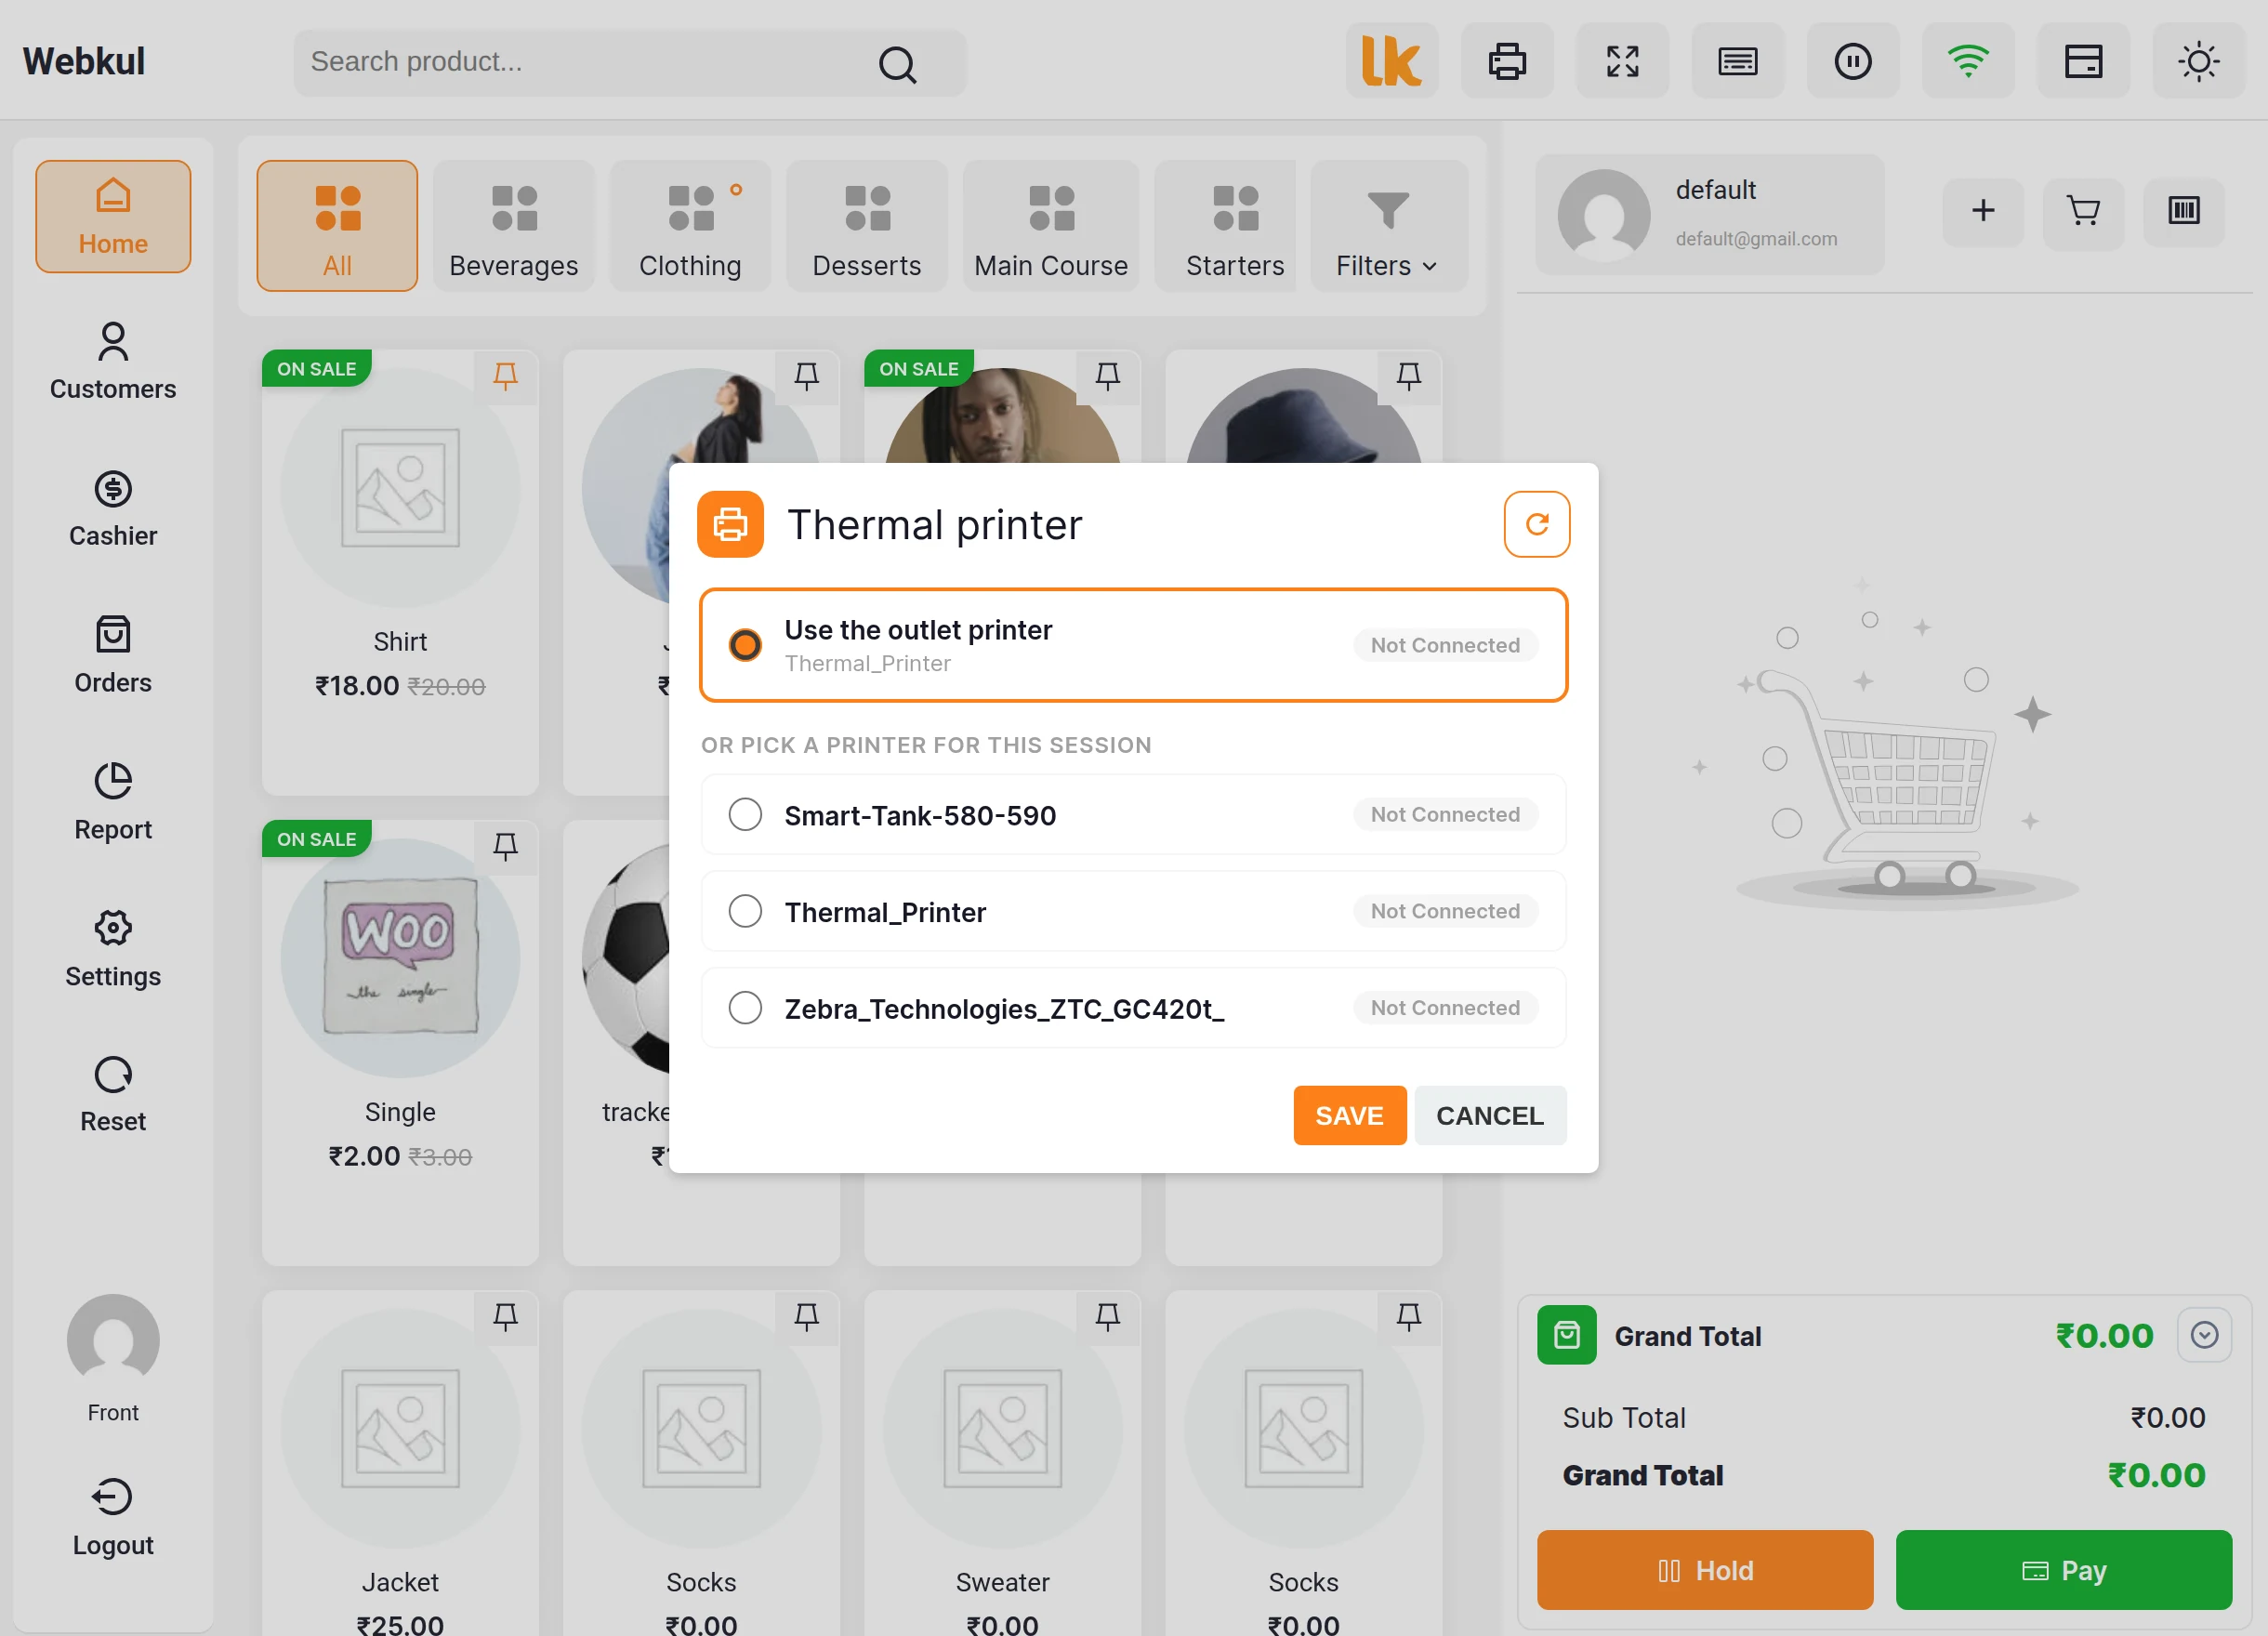
While the print service is on, the POS header shows a printer icon. It opens the Thermal printer dialog:
- Use the outlet printer — the default, with the outlet's printer named underneath.
- Or pick a printer for this session — any printer on the account, each with a Ready or Not Connected badge.
- The refresh button in the dialog fetches the printer list again.
Click Save. Receipts from this till now go to the chosen printer for the rest of the session.
The printer used for a receipt is decided in this order:
- The printer picked on the till for the session.
- The outlet's Thermal printer.
- The store's Thermal printer on the Printing tab.
What Prints Directly
Receipts and Drawer Reports
With the till's invoice page size set to Epson TM-T88V Thermal Page, printing a receipt — after payment, from order history or from an offline order — and printing or reprinting a drawer report go straight to the thermal printer. The till shows Sending to the printer… and then Sent to the printer.
If the print service cannot print the job, the browser print dialog opens instead, so the customer still gets a receipt.
Invoice fonts
Fonts chosen in the invoice template builder print only through the browser dialog. Receipts sent through the print service use the thermal printer's own type, sized to the roll width.
Barcode Labels
Navigation path:Point of Sale → Products → Print Barcode
Choose Barcode By (SKU or ID) and the Quantity, then click Print. With a ZPL printer chosen, the labels are sent to it and a message confirms Barcodes sent to the ZPL printer. Each label carries the barcode and, if your barcode settings display it, the product title — shortened to fit the label.
If no ZPL printer has been chosen, the screen says No ZPL printer has been chosen. Pick one under POS Settings > Printing first.
PDF Files
Once a PDF printer has been saved, the PDF printing section shows a PDF file row:
- Click Choose PDF and pick a PDF from the media library.
- Click Print PDF.
The tab reports Printed., or Sent to the print queue. if the printer has not finished yet. Nothing is stored — this is a way of printing a file, not a setting. Only PDFs from this site's media library can be printed.
Messages and What They Mean
| Message | What to do |
|---|---|
| The print service API key cannot be empty. | Paste a key into API key, or switch Print service to Disable. |
| The print service API key is wrong or has been revoked. | Create a new key in your print service account and save it. |
| The print service has no prints left for this period. | The plan allowance for this period is used up. Buy credits or change plan under Billing in Direct Print. |
| Too many print requests. Please try again shortly. | Wait a moment and print again. |
| No printer has been chosen for this. Pick one under Printing settings first. | Choose a printer for that job type on the Printing tab. |
| The thermal printer width must be between 16 and 170 characters, so the previous width was kept. | Enter a width between 16 and 170. |
| This barcode is too long for the label width set under Printing settings. | Increase Label width (dots), or print by ID instead of a long SKU. |
| The label height set under Printing settings is too small for a barcode. | Increase Label height (dots). |
| This API key is missing the permission this request needs. | Edit the key in Direct Print → API Keys and tick printjobs:create, printjobs:read and printers:read. |
| The print service does not recognise that printer or job. | The printer was removed from the account or from the key. Click Refresh printers and pick again. |
| No printers loaded yet (or a printer is missing from the dropdowns) | Check that the key's Restrict to printers includes the printer, that its computer is connected, then click Refresh printers. |
| The printer could not print this job. | Check that the printer has a Printer type, is switched on, and that Webkul Cloud Print Manager is running on its computer; see Print History in Direct Print for the reason. Receipts fall back to the browser dialog. |
Related Features
- Hardware Support — printers, scanners and cash drawers the POS works with.
- Products & Inventory — barcode generation and barcode settings.
- Z-Report Generation & Printing — closing the drawer and printing its report.
- Admin Configuration — invoice page size, invoice templates and fonts.