Install the Plugin
At a Glance
- Time: About 2 minutes plus any missing prerequisites
- What you do: Check your system, upload the ZIP, activate, open the wizard
- Up next: Quick Start
Pre-flight Checklist
Run through this list first. It only takes a minute, but each item saves hours of hair-pulling later.
- [ ] PHP 8.1 or higher (run
php -vto check) - [ ] WordPress 6.0 or higher
- [ ] WooCommerce 8.0 or higher, installed and active
- [ ] MySQL 8.0 or higher (MariaDB 10.4+ also works)
- [ ]
pcntlPHP extension (for parallel processing — optional but strongly recommended) - [ ]
posixPHP extension (for FIFO pipes — optional but recommended) - [ ]
LOAD DATA LOCAL INFILEenabled in MySQL - [ ] PHP
memory_limitof 256M or higher - [ ] PHP
max_execution_timeof 300 seconds or higher (or 0 for unlimited)
Do not worry if some of these are missing. The plugin runs a full system check the first time you open the dashboard and tells you exactly what to fix.
System Requirements
Here is the full table so you know what works.
| Requirement | Minimum | Tested Up To |
|---|---|---|
| PHP | 8.1 | 8.3 |
| WordPress | 6.0 | 6.9 |
| WooCommerce | 8.0 | 10.6 |
| MySQL | 8.0 | 8.4 |
| MariaDB | 10.4 | 11.4 |
Recommended (Not Required)
These make the plugin faster but are not strictly needed.
| Item | Why |
|---|---|
pcntl extension | Enables parallel processing — 10x faster imports |
posix extension | Enables FIFO pipes for zero-disk I/O |
| MyISAM engine | 2x faster than InnoDB for bulk staging |
| 4+ CPU cores | The plugin uses every core you have |
| 4GB+ RAM | Helps with very large files |
Shared Hosting Warning
Most shared hosting plans do not have pcntl. The plugin still works, but falls back to single-process mode. For stores with more than 10,000 products, a VPS or dedicated server is much better.
How to Install the Plugin
You have three ways to install. Pick the one that matches your style.
Option 1 — Upload the ZIP (Easiest)
This is the way most people install WordPress plugins.
Download
advance-import-and-export-for-woocommerce.zipfrom your Webkul account or CodeCanyon.In WordPress, go to
Plugins → Add Newand click Upload Plugin.Click Choose File, pick the ZIP, and click Install Now.
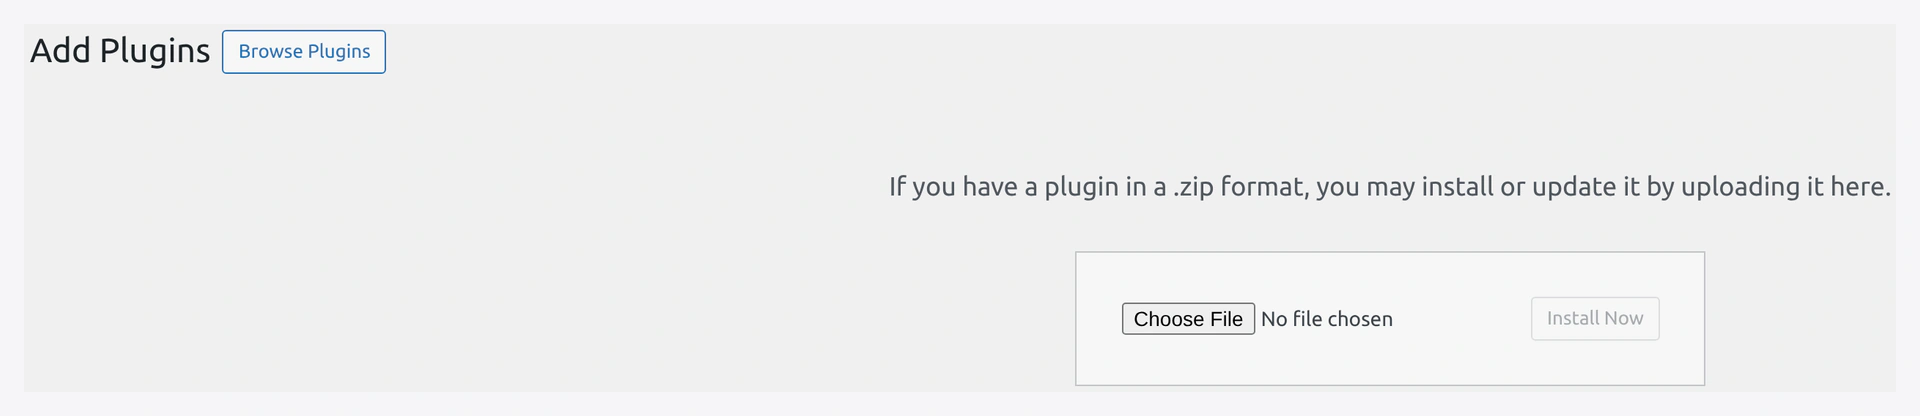 Add Plugins screen — click Upload Plugin, choose the ZIP file, and click Install Now.
- Wait for "Plugin installed successfully" and click Activate Plugin.
 After install, click Activate Plugin to turn it on.
Option 2 — FTP or SFTP
Use this method if your host limits file upload size.
Unzip
advance-import-and-export-for-woocommerce.zipon your computer.Open your FTP or SFTP client (FileZilla, Cyberduck, etc.) and connect to your server.
On the remote side, go to
/wp-content/plugins/. Drag the unzippedadvance-import-and-export-for-woocommercefolder from your computer and drop it in.Open your WordPress admin and go to
Plugins → Installed Plugins.Find Advance Import and Export for WooCommerce in the list and click Activate.
Option 3 — WP-CLI (For Developers)
One command gets it done:
wp plugin install /path/to/advance-import-and-export-for-woocommerce.zip --activate
What Happens After You Activate
Three things happen right away.
1. A New Admin Menu Appears
Look for Webkul WC Addons in your sidebar. Under it you will find Advance Import Export with these pages:
- Dashboard — Stats and system info
- Quick Import — The 5-step wizard
- Quick Export — One-page export tool
- Jobs — Saved and scheduled jobs
- History — Every run you have done
- Health Check — Data integrity tool
- Settings — Defaults and credentials
2. Database Tables Are Created
The plugin adds six tables to your database. You do not need to do anything with them.
| Table | What It Stores |
|---|---|
wp_wkaie_jobs | Saved import/export jobs |
wp_wkaie_history | Every import run |
wp_wkaie_schedules | Cron schedules for jobs |
wp_wkaie_mappings | Saved column mapping presets |
wp_wkaie_row_hashes | Delta import fingerprints |
wp_wkaie_stg_* | Per-job staging tables (auto-dropped) |
3. The System Check Runs
Open the Dashboard. The System Information card shows what is working and what is not. Anything in red needs your attention.
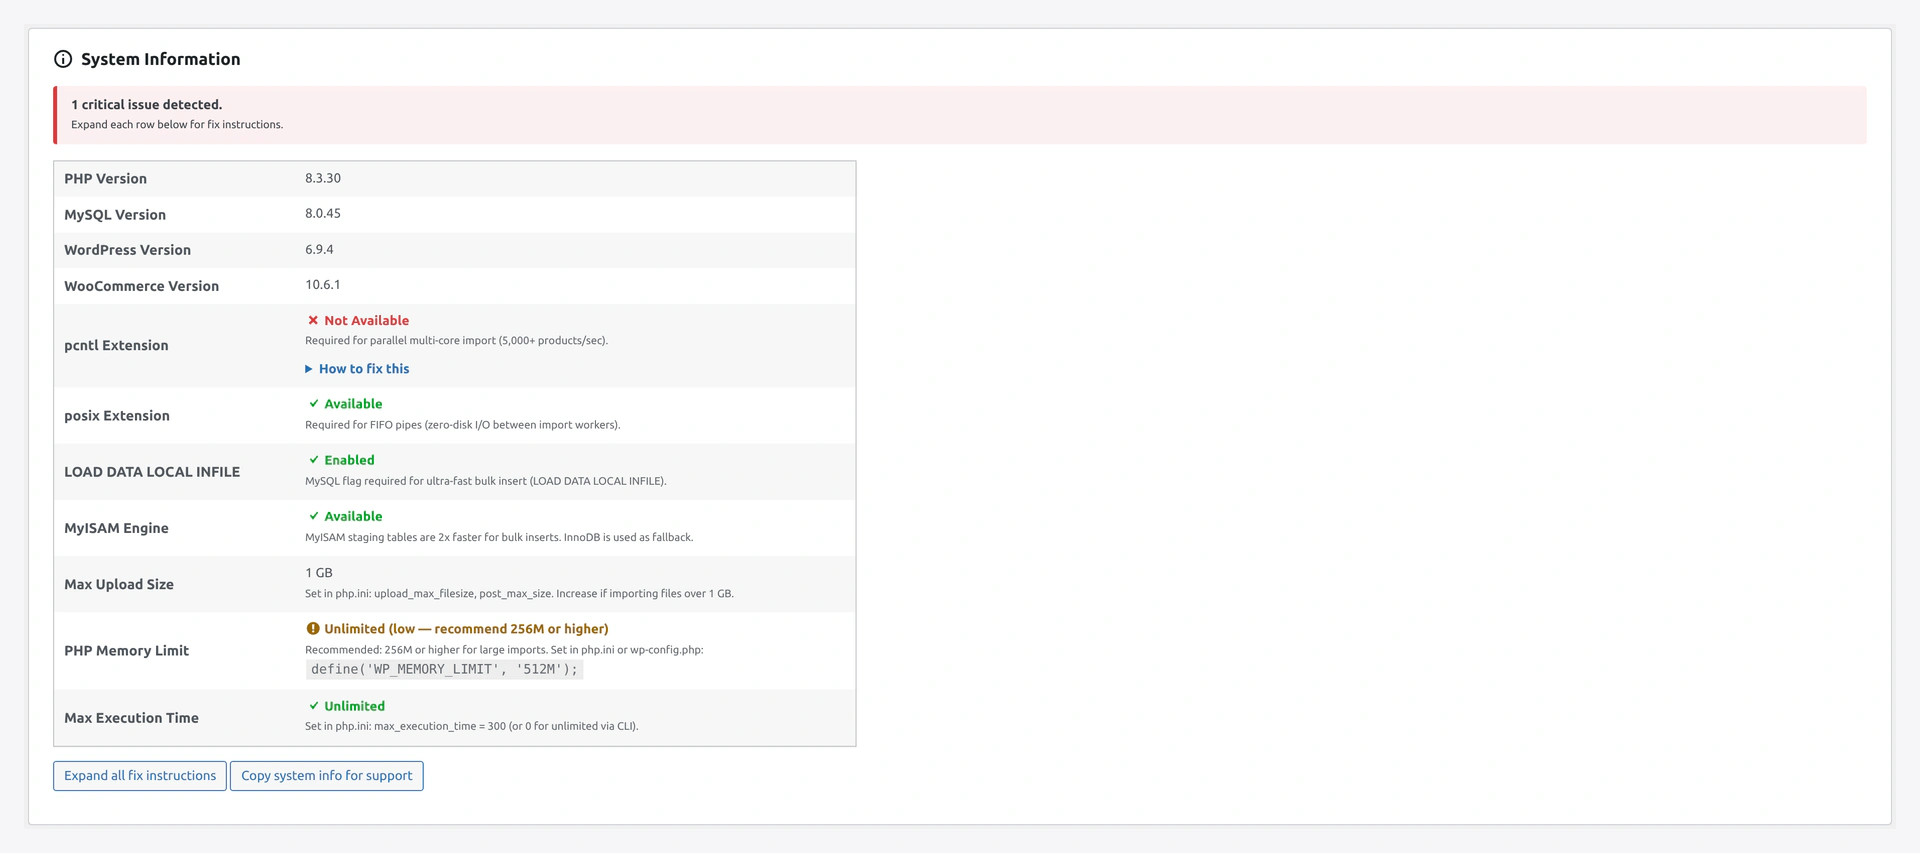 Screenshot: System Information card — green good, yellow warning, red needs attention.
If pcntl or posix is missing, the card has a "How to fix this" section with exact install commands for your server OS.
Verify the Install
Open the Dashboard page. You should see:
- ✅ Connection status
- ✅ System info (everything green or yellow — red items are explained below)
- ✅ Quick Action buttons
- ✅ "No recent activity" (because you have not run anything yet)
Click New Import to jump to the wizard. If that page opens, the plugin is installed correctly.
How to Uninstall or Reset
Sometimes you need to start over.
- Deactivate keeps all your data. Jobs, history, and mappings stay put.
- Uninstall (Delete from the Plugins screen) removes the files. By default, it keeps your settings in case you reinstall.
- Reset plugin (under
Settings → Advanced) wipes everything — jobs, history, mappings, schedules — and starts fresh.
Reset wipes everything
Reset is final. You cannot undo it. Make sure you really want a clean slate first.
Troubleshooting
| Problem | Fix |
|---|---|
| "Plugin could not be activated — fatal error" | Your PHP version is too old. Upgrade to PHP 8.1 or higher |
| "WooCommerce is not active" | Install and activate WooCommerce first |
| Menu does not appear after activation | Clear your browser cache and refresh. Also check you have manage_woocommerce capability |
| Dashboard shows blank page | Turn on WP_DEBUG in wp-config.php to see the error. See Troubleshooting |
| pcntl shows "Not Available" | Follow the install commands in the dashboard "How to fix this" box |
| LOAD DATA LOCAL INFILE shows "Disabled" | Run SET GLOBAL local_infile = 1; as MySQL admin or ask your host |
Where to Go Next
- Quick Start — Run your first import in 5 minutes
- Dashboard — Learn every section of the dashboard
- Settings — Set defaults for batch size, images, and more
- Compatibility — Turn on support for Yoast, ACF, Dokan, and others